
Tags
(Part two of my description of the essential steps in making a telescope)
2. Hogging Out means making your mirror blank have roughly the proper concave shape for the focal length or f-ratio that you want. There are many articles and web pages on this, which you really should look at!
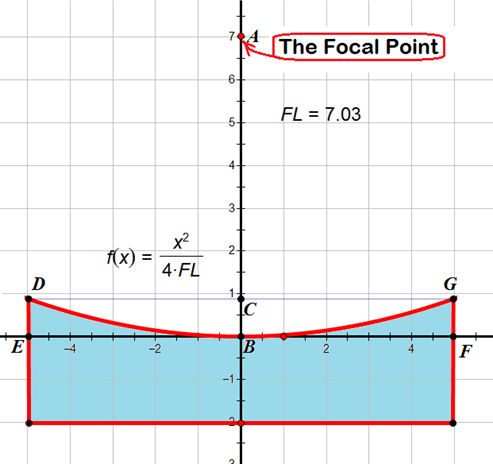
A. The math is important: you want your mirror to be a parabola, and the equation for the depth (or sagitta) that you must grind into the glass isn’t too difficult. First of all, “f-ratio” means the ratio between the focal length and the diameter of the primary mirror. So if you plan on making an 8” diameter mirror with a 40-inch focal length, 40” divided by 8” gives you an f-ratio of 5. With no units. If you wanted a 10” diameter mirror with the exact same focal length, we would call that f/4. For the sagitta (depth of curve) required, it’s easiest to use the formula for a parabola facing upwards with its vertex at the origin, namely, . and you will need to do a little math[1]. Here’s a diagram that I hope will help: It is supposed to show a mirror (blue) with an insanely short focal length of 7.03 inches and a diameter of 10 inches. The sagitta is the depth at the center of the curve, or length CB, which will be the same as DE and GF. Using the formula , and plugging in 5 for x and 7.03 for F, we get that y (the sagitta) would be about 0.889 inches, a bit more than 7/8” of an inch of glass to remove. And that’s what we see in the diagram, too, if you look carefully. For a more realistic example, let’s suppose we wanted to make a ten-inch mirror with a focal length of 60 inches (which means that the scope would be about 5 feet long, or roughly 1.5 meters). In that case, we would get a sagitta of about 0.104”, a bit more than a tenth of an inch. You will need some way of measuring the sagitta. We use some spherometers that we fabricated from bits of metal and various dial indicators. Some people use a collection of automobile mechanic’s feeler gauges and a straightedge that goes across the entire diameter. Note that a spherometer will typically NOT measure the entire diameter of your mirror, so you need to account for that smaller diameter. You should calculate and record what your numerical goal is for your chosen method of measurement. However: one nice thing about Newtonian reflectors is that the exact focal length isn’t very important – unlike the other telescope designs, where any deviation from the designed model will cause the project to fail catastrophically. A 6” f/8 scope will work just as well as a 6” f/8.15 scope or a 6” f/7.7 scope; the only difference will be that the first scope tube will be about 48 inches long, the second one closer to 49 inches and the last one closer to 46 inches long.
B, To grind the mirror, we use relatively coarse grit (silicon carbide, which is not toxic at all) mixed with ordinary tap water. The water acts as a lubricant and also to keep down the glass dust – silica dust causes very serious lung problems if it’s dry. So we keep it wet. We begin with either 50, 60, or 80 grit, depending on the size of the mirror. We put the tool (another cylindrical piece of glass or ceramic, or else something we cast from dental plaster and hard ceramic tiles) on many thicknesses of clean newspaper, on top of the workbench. We dampen the newspaper so they won’t slide around. We sprinkle some water onto the tool, and spread it around with a finger. Then we sprinkle some grit onto the water and tool as if we were liberally salting a dish we were cooking or eating. Then using both hands, we carefully place the mirror face down on top of the tool. We use both hands to make the mirror travel in a circular path in either direction for about 6 turns, grinding the center of the mirror mostly against the edge of the tool. (This needs to be demonstrated!) Wide strokes are good, but the center of the mirror must not get too close to the edge of the tool. At first this motion will be very, very noisy, which is fine. However, after perhaps 20-30 seconds, the noise will decrease. This means that the largest grains of grit have quickly been shattered, and they have also created gouges and fractures in the glass. After a minute or so, you need to separate the mirror and the tool and add some more grit and water, and continue the hogging out. After about 30-40 minutes, it is a good idea to rinse off the mirror, dry it thoroughly, and measure the sagitta with a spherometer to see how much progress you have made. It is a good idea to have a plastic bucket available that you can fill with water and use to rinse off the mirror and tool. The ground-up glass and grit will make a muddy slurry, which will eventually slow down the grinding process. 
C. Try not to wrap your hands around the edge of the mirror towards the edge, if at all possible. This will heat up the edge of the mirror, making it expand, which can cause bad, unexpected results.
D. Systematic rotation is super, super important: develop a method of methodically rotating the mirror and the tool with respect to each other, to the table, and to your body, so that you do not develop astigmatism! There are many ways of doing this. If we had barrels, you would be walking around the barrel. We don’t. We have large, heavy work-benches instead. I like to rotate them both in the same direction, like the hands of a clock, with the top piece of glass going a little faster than the bottom one. Do it systematically, NOT randomly. One way: do about 8 circular strokes. Then center the mirror on the tool. Turn the lower piece of glass to the left by about 15 degrees (1 hour on a normal clock face); then turn the upper piece of glass about 10 more degrees. Then grind away for 8 more circular strokes. Then turn the lower piece of glass to the left by about 15 degrees, and the upper piece by about 10 more degrees. And repeat, again and again. If you have a barrel to walk around, you would do this differently.
E. It is possible to overshoot your goal when you are doing this initial hogging step. In fact, I recommend overshooting it by perhaps 5 thousandths of an inch, since the hogging stroke does not create a strictly spherical shape. But it does remove a lot of glass very quickly. If you end up much deeper than you intended, then put the mirror on the bottom and the tool on top and continue. Alternating tool on top and mirror on top will allow you to reach you goal as closely as you desire.
F. Beveling the edge: if you have a sharp edge on your mirror or tool, then you will produce little shards of glass, much like making flint arrowheads. These shards will cut your fingers, and they will also scratch your mirror. Therefore, it is necessary to make sure that the edges of your mirror and your tool (front and back) are beveled or chamfered. There are many ways of doing this. You can use sharpening stones or wet-dry sandpaper, or you can put some water and grit into the wok that one of us banged into a smooth curved shape at his blacksmith shop. However you do it, it doesn’t take too long, and it will prevent lots of problems. You may have to renew the bevel after a while. Keep it around 1/8” (a few millimeters).
[1] If you are interested, I could show you how to derive this formula simply by using the Pythagorean Theorem.
