I’ve got the new stepper motors, and their drivers, and their power supplies, working away just fine on my desk, and I’m pretty excited and confident that we will have enough power and precision to drive and slew the Ealing properly!

These steppers are very strong: I am completely unable to stop the motors with my hands (bare or gloved) either when they are just tracking or when they are slewing at full speed or guiding at low speed, even with a fairly large fixture on the end of the shaft.
Without Ken Hunter’s expertise, there is no way I could have figured out how to get these particular steppers wired so that they would run, especially since they require those special, large, green and black drivers that you see in the photo above, which are about the size of the palm of your hand. Ken deserves a real round of applause, and more. (I have found that his advice on the OnStep wiki message board is much more accurate and friendlier than the advice of many others there.) In addition, he also repaired two boards that had been incorrectly soldered and assembled by someone else and which I and Alan Tarica purchased from that person, separately.
Before Ken’s intervention, the boards didn’t work. He found a number of assembly and soldering errors, and not only fixed them, but he also ‘flashed’ them with the latest OnStep software versions. At no cost! Now, they work very well.
I want to thank Prasad Agrahar again for his original inspiration and follow-through, and also Alan Tarica for his enthusiastic and knowledgeable assistance and advice (which I don’t always follow).
What’s more, as far as I can tell, this arrangement with super-duper steppers and drivers is unique in OnStep. Something like it clearly exists in some form in the professional or amateur CNC world, which is why we can purchase these insanely complex drivers for less than $9 apiece and the steppers for just $37 each, but to my knowledge nobody in the OnStep world has done this particular arrangement.
The old NEMA-23 steppers and these new ones have the exact same ‘form factor’ except that one can use larger bolts to fasten the new ones to the L-shaped brackets I already have installed.
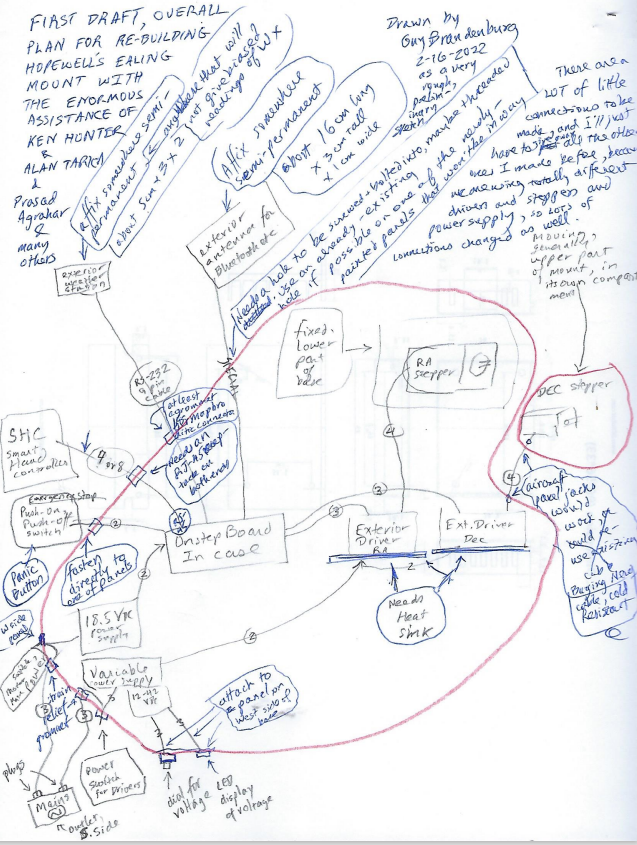
The attached schematic diagram is a first draft of how the connections on the mount itself will be made. The wiring job is going to have a lot of parts, and lots of connections!
At the observatory, we won’t have those old military-grade, 14-connector cables any more, nor that very heavy old hand paddle whose cable we all used to trip over. Instead, I ordered 10 feet of 14-gauge, 4-conductor shielded, stranded cable that is highly rated for both high and low temperatures, in order to connect the DEC drive to the rest of the scope. It will need new strain-relief grommets. So will several other wires. I can re-use most of the existing holes in the cover plates for this mount, and will seal the rest of them to keep out insects. Wiring all of those new connections will take a while!
We will have a local wireless connection (with a small external antenna, like on a router, to make sure there is a good wireless signal), and a small (2x3x5 cm) dedicated basic weather monitor (very basic: just humidity, temp, etc) attached somewhere on the mount*. There will also be an emergency ‘Kill’ switch to allow one to stop the drive immediately if needed.
You can control the scope with a Smart Hand Controller that will be attached via a flexible ethernet-type cable, or, if you prefer, with an inexpensive Android cell phone or tablet that has the proper software installed. (We will leave a tablet up there, with its charging cord.) One won’t need to unclamp, slew, and re-clamp the RA and DEC axes any more in order to acquire a target. We will see how good the pointing accuracy and tracking are, once it’s all up and running.
Since we are using much stronger stepper motors than the ones had been suggested to me and that I had purchased earlier, and they needed a lot more current, we needed different drivers. As a result, most of the connections I had previously fabricated won’t be of much use for us anymore. Perhaps I can give them away to somebody else who is attempting an OnStep conversion on a telescope mount that weighs much less than this one.
Here is a little video of these things in action:
And here is my first draft of the schematics showing how these things all connect inside the scope as well as how we will connect them to the body of the mount itself. It’s crude, but I think it will be useful.