• My series on making a Newtonian telescope
  • How Leon Foucault Made Telescopes

Guy's Math & Astro Blog

Guy's Math & Astro Blog

Tag Archives: electronics

Hopewell’s Ealing Mount is Working Again – After 8 Months!

09 Saturday Jul 2022

Posted by gfbrandenburg in astronomy, astrophysics, Hopewell Observatorry, Optics, Telescope Making

≈ Leave a comment

Tags

Android, Arduino, DM524, ealing, electronics, MaxESP, motherboards, OnStep, signal, stepper drivers, Stepper Motors, TB6600, Telescope, Telescope drive

 Guy BrandenburgJul 6 

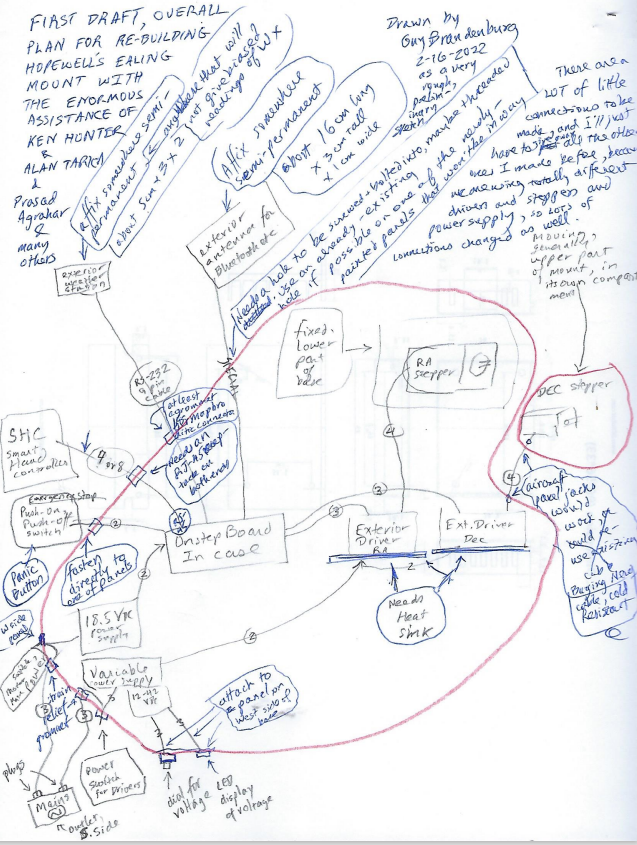
 At long last, we have finally got the venerable, massive Ealing telescope mount at Hopewell Observatory working again, after nearly 9 months, with a totally different, modern, electronic stepper motor drive based on Arduino.

My first post to the OnStep group ( https://onstep.groups.io/g/main/message/37699 ) was on October 21, 2021, over eight months ago. In it, I wrote that I had decided to give up trying to fix the electro-mechanical synchronous drive and clutches on our Ealing-Byers mount at Hopewell Observatory, and asked the folks on the OnStep message boards for help in choosing the best OnStep combination to drive such a mount. 

Since then, it’s been a very long and steep learning curve. We only fried a couple of little slip-stick drivers and maybe one MaxESP board. We got LOTS of help from the OnStep list (not that the posters all agreed with each other on everything)!  We ran into a lot of mysteries, especially when we found, repeatedly, that configurations that worked just fine on our workbench wouldn’t work at all when the components were put into the mount!

But now it works.

Let me thank again in particular:

* Prasad Agrahar for giving me the OnStep idea in the first place by showing me a conversion he had done;

* Alan Tarica, a fellow ATMer, for cheerfully partnering and persevering with me in working on this project for the past 8 months in many, many ways; 

* Ken Hunter for providing tons of basic and advanced advice and a lot of hardware, all for free; 

* Robert Benward for extremely helpful advice and drawings; 

* George Cushing for providing some of the original boards we used;

* Khalid Bahayeldin for lots and lots of OnStep design features;

* Howard Dutton for designing, implementing, and supporting this whole project in the first place; and 

* Arlen Raasch for bringing his wealth of trouble-shooting experience and a lot of nice equipment up to Hopewell, spending full days up there, and saving our asses in figuring out the final mysteries. Among other things, he kluged (by the way, “kluge” is German for “clever”, not clumsy) a level shifter to make it so that the 3.3 volt signals from our MaxESP3 board would actually and reliably communicate with the higher-voltage external DM542T stepper drivers that controlled the very-high-torque NEMA23 steppers, rewiring some of the jumpers on our already-modified MaxESP boards, and making the wiring look professional, and other stuff as well, thus essentially pushing us over the finish line. 

* All of the Hopewell members for supporting this project 

* Bill Rohrer and Michael Chesnes who physically helped out with soldering and wiring work at the observatory.

I plan to write up a coherent narrative with a list of lessons learned, and perhaps I can help make some of the step-by-step directions in the OnStep wiki a bit clearer to the uninitiated. Obviously I’ll need to write a user guide for this mount for the other Hopewell members.

If Alan and I had gone straight to our final configuration, this project would have been quite a bit cheaper. In addition to what’s inside the mount and control box at the observatory, we now have on hand something like this list of surplus items:

* four MaxESP boards in various stages of construction and functionality; 

* a dozen or more different slip stick stepper drivers we aren’t using; 

* four or more external stepper drivers, mostly TB6600;

* five or more stepper motors of different sizes; 

* a hand-held digital oscilloscope;

* lots and lots of wires of many types;

* lots of metal and plastic project boxes of various sizes;

* lots of tiny motherboards; and 

* lots and lots of sets of various mechanical electrical connectors (many were used, later cut off, and then ended up in the trash).

Yes, one does need spares, and yes, lots of this stuff has multiple uses, but this has not been a ‘green’ project. On the third hand, it has been extremely interesting and fun to learn all these new skills.

The final substantive changes that got the Ealing mount up and running were made during the Fourth of July fireworks down in the valleys on each side of the ridge that our observatory sits on. What were the changes? (1) switching the black and white leads from the mains power leads (they original, scavenged, cord had the white lead as Hot!) and (2) reversing the Declination motor direction. It also helped that I was not zoned-out and punchy from lack of sleep, as we had been when Arlen and I had last worked on it.

On July 4th, it at long last worked properly!

This Ealing mount’s original, labeled, built-in manual RA and DEC setting circles make it quite easy to put the scope into Home position before you turn on the power. One just loosens the clutches and moves the axes to 6:00 hours exactly in Right Ascension and 90 degrees exactly in Declination. From there, I found the OnStep system behaves very nicely. It accurately slewed to a number of bright, obvious targets of various sorts on both sides of the meridian. However, when I tried to get it to aim that night at M13, it refused, sending an error message that it was too close to the zenith for safety. And it was (altitude 87 degrees)! Very impressive – a safety feature I hadn’t even known about!

None of the objects that I slewed to was far from the center of the field of view, even when the scope slewed across the meridian. I was using an old, 2-inch diameter 50 mm Kellner eyepiece on an f/12 six-inch aperture D&G refractor.

I found that the Android app to be **much** better for initial setup than the SHC. Arlen, Alan and I all found that setting the correct latitude, longitude, UTC offset and so on from the SHC was a real brain-twister because of its unfortunately not-very-friendly user interface. Using the OnStep app on a cheap, old Android tablet made the whole initialization process very much easier and faster, especially after I let the tablet discover what time it really was from my iPhone’s wireless HotSpot. 

However, I found that the hand paddle is much better for fine-tuning of pointing and so on, because the bright display on an Android, no matter how dim one makes it, will destroy one’s night vision, and one cannot reliably feel where the directional buttons are on a flat screen while staring  through an eyepiece. Obviously, one can feel the buttons on the SHC quite well, maybe even with gloves. A joy stick would be even better…

Alan and I and the  other Hopewell members still have many more OnStep features to learn.

However: if I had known this project would take over eight months of hard work, I think I might have tried fiddling with the original Ealing clutches some more. 

Oh well, we have a mount that has much more capabilities than it ever had, and Alan and I have learned quite a bit of electronics! I’m proud of what we did!

Mysterious OnStep Behavior

16 Saturday Apr 2022

Posted by gfbrandenburg in astronomy, Hopewell Observatorry, Telescope Making

≈ Leave a comment

Tags

electronics, Hopewell Observatory, mystery, OnStep

We are still trying to get our venerable, university-grade Ealing mount to work properly with its new OnStep motor drive system. We thought we had – at long last – everything set up perfectly and running correctly with the various components wired up properly but not yet pushed into place in the interior cavities of our mount. All seemed to be working well until we pushed the last components and wires inside, and then closed the hatches.

Then things stopped working.

We soon figured out that the force we had to use when moving all those items inside the mount had broken some of the leads. We found those broken leads and replaced them with shorter ones.

When we started it up again, we discovered that the mount would not ‘track’ to the west in right ascension — something that the software and hardware are programmed to do as soon as the system is turned on. In fact, I couldn’t slew it to the west either. Eastwards was no problem. Also, we could only slew southwards, not northwards.

We didn’t know what to do, so I emailed a followup question to the wonderful folks at the OnStep wiki. Several folks thought we had a balance issue or a limit switch issue, but I went up today to check on the balance — and concluded that’s not the problem. We have no limit switches yet either in hardware or in software. So that’s not it, either.

Wondering if we had somehow screwed up the MaxESP3 board that is the heart of the OnStep system, I unplugged the board (and all of its sub-boards, as a unit) we had been using last weekend, and plugged in a duplicate board, built by Ken Hunter and ‘flashed’ by him with the same Config.H file as the other one.

Listen to the screeching!

This weird behavior is not the same weird behavior we were getting with the other OnStep MaxESP3.03 board. What on earth is going on?

Another suggestion is that we may be creating ground loops by not connecting our wiring properly. I don’t know. I wish I had taken some electronics classes during my time in college. It would have come in handy here!

More OnStep progress in re-building the Ealing telescope drive at the Hopewell Observatory

17 Thursday Feb 2022

Posted by gfbrandenburg in astronomy, Hopewell Observatorry, Telescope Making

≈ Leave a comment

Tags

ealing, electronics, Hopewell Observatory, OnStep, Telescope

I’ve got the new stepper motors, and their drivers, and their power supplies, working away just fine on my desk, and I’m pretty excited and confident that we will have enough power and precision to drive and slew the Ealing properly!

Counter-clockwise from top: Plug strip; Android tablet; OnStep board in black box; 24VDC power supply; weather module; smart hand controller; NEMA23 steppers (2 of them) with connectors on top; two drivers for the steppers; another power supply.

These steppers are very strong: I am completely unable to stop the motors with my hands (bare or gloved) either when they are just tracking or when they are slewing at full speed or guiding at low speed, even with a fairly large fixture on the end of the shaft.

Without Ken Hunter’s expertise, there is no way I could have figured out how to get these particular steppers wired so that they would run, especially since they require those special, large, green and black drivers that you see in the photo above, which are about the size of the palm of your hand. Ken deserves a real round of applause, and more. (I have found that his advice on the OnStep wiki message board is much more accurate and  friendlier than the advice of many others there.) In addition, he also repaired two boards that had been incorrectly soldered and assembled by someone else and which I and Alan Tarica purchased from that person, separately.

Before Ken’s intervention, the boards didn’t work. He found a number of assembly and soldering errors, and not only fixed them, but he also ‘flashed’ them with the latest OnStep software versions. At no cost! Now, they work very well.

I want to thank Prasad Agrahar again for his original inspiration and follow-through, and also Alan Tarica for his enthusiastic and knowledgeable assistance and advice (which I don’t always follow).

What’s more, as far as I can tell, this arrangement with super-duper steppers and drivers is unique in OnStep. Something like it clearly exists in some form in the professional or amateur CNC world, which is why we can purchase these insanely complex drivers for less than $9 apiece and the steppers for just $37 each, but to my knowledge nobody in the OnStep world has done this particular arrangement. 

The old NEMA-23 steppers and these new ones have the exact same ‘form factor’ except that one can use larger bolts to fasten the new ones to the L-shaped brackets I already have installed.

The attached schematic diagram is a first draft of how the connections on the mount itself will be made. The wiring job is going to have a lot of parts, and lots of connections! 

At the observatory, we won’t have those old military-grade, 14-connector cables any more, nor that very heavy old hand paddle whose cable we all used to trip over. Instead, I ordered 10 feet of 14-gauge, 4-conductor shielded, stranded cable that is highly rated for both high and low temperatures, in order to connect the DEC drive to the rest of the scope. It will need new strain-relief grommets. So  will several other wires. I can re-use most of the existing holes in the cover plates for this mount, and will seal the rest of them to keep out insects. Wiring all of those new connections will take a while!

We will have a local wireless connection (with a small external antenna, like on a router, to make sure there is a good wireless signal), and a small (2x3x5 cm) dedicated basic weather monitor (very basic: just humidity, temp, etc) attached somewhere on the mount*. There will also be an emergency ‘Kill’ switch to allow one to stop the drive immediately if needed.

You can control the scope with a Smart Hand Controller that will be attached via a flexible ethernet-type cable, or, if you prefer, with an inexpensive Android cell phone or tablet that has the proper software installed. (We will leave a tablet up there, with its charging cord.) One won’t need to unclamp, slew, and re-clamp the RA and DEC axes any more in order to acquire a target. We will see how good the pointing accuracy and tracking are, once it’s all up and running.

Since we are using much stronger stepper motors than the ones had been suggested to me and that I had purchased earlier, and they needed a lot more current, we needed different drivers. As a result, most of the connections I had previously fabricated won’t be of much use for us anymore. Perhaps I can give them away to somebody else who is attempting an OnStep conversion on a telescope mount that weighs much less than this one. 

Here is a little video of these things in action:

And here is my first draft of the schematics showing how these things all connect inside the scope as well as how we will connect them to the body of the mount itself. It’s crude, but I think it will be useful.

Subscribe

  • Entries (RSS)
  • Comments (RSS)

Archives

  • November 2022
  • October 2022
  • August 2022
  • July 2022
  • June 2022
  • May 2022
  • April 2022
  • February 2022
  • January 2022
  • December 2021
  • October 2021
  • September 2021
  • August 2021
  • July 2021
  • June 2021
  • May 2021
  • March 2021
  • December 2020
  • October 2020
  • September 2020
  • August 2020
  • March 2020
  • February 2020
  • January 2020
  • December 2019
  • November 2019
  • September 2019
  • August 2019
  • June 2019
  • May 2019
  • January 2019
  • November 2018
  • October 2018
  • September 2018
  • August 2018
  • May 2018
  • March 2018
  • January 2018
  • November 2017
  • October 2017
  • September 2017
  • August 2017
  • July 2017
  • June 2017
  • May 2017
  • April 2017
  • February 2017
  • December 2016
  • September 2016
  • June 2016
  • May 2016
  • April 2016
  • March 2016
  • February 2016
  • January 2016
  • December 2015
  • November 2015
  • August 2015
  • July 2015
  • April 2015
  • March 2015
  • February 2015
  • January 2015
  • December 2014

Categories

  • astronomy
  • astrophysics
  • education
  • flat
  • History
  • Hopewell Observatorry
  • Math
  • monochromatic
  • nature
  • optical flat
  • Optics
  • Safety
  • science
  • teaching
  • Telescope Making
  • Uncategorized

Meta

  • Register
  • Log in

Blog at WordPress.com.

  • Follow Following
    • Guy's Math & Astro Blog
    • Join 48 other followers
    • Already have a WordPress.com account? Log in now.
    • Guy's Math & Astro Blog
    • Customize
    • Follow Following
    • Sign up
    • Log in
    • Report this content
    • View site in Reader
    • Manage subscriptions
    • Collapse this bar
 

Loading Comments...