Tags
astronomy, ealing, Ealing mount, Hopewell, Hopewell Observatory, Moon, planet, solar system, Telescope
These were made by Gael Gomez, a recent HS grad who visited on Monday, July 1.


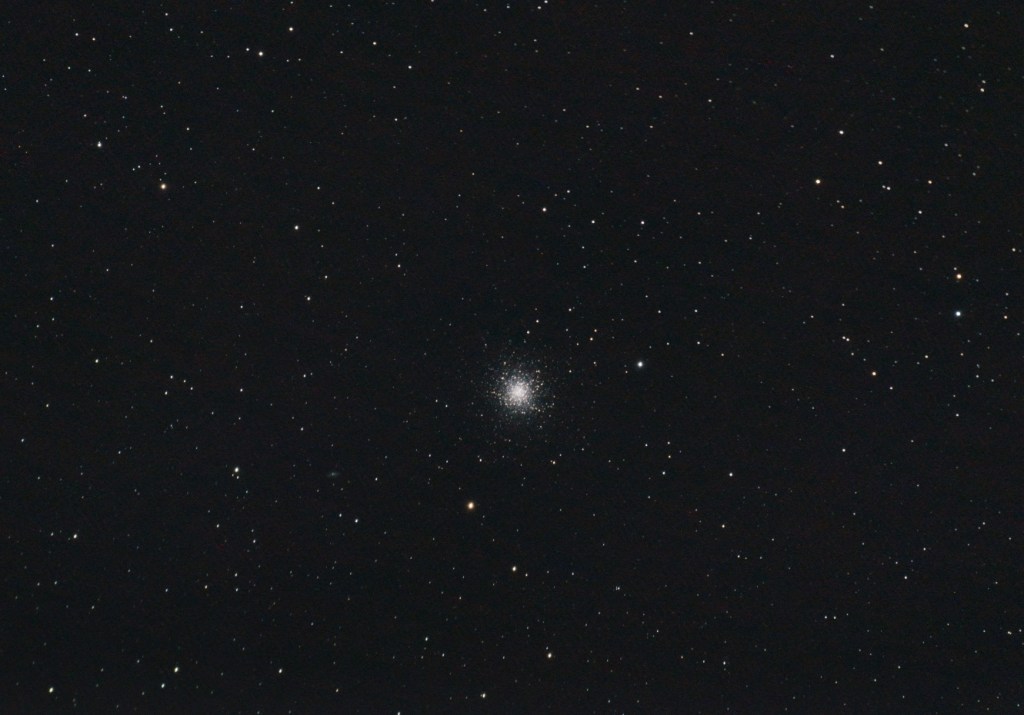


04 Thursday Jul 2024
Posted in astronomy, Hopewell Observatorry
Tags
astronomy, ealing, Ealing mount, Hopewell, Hopewell Observatory, Moon, planet, solar system, Telescope
These were made by Gael Gomez, a recent HS grad who visited on Monday, July 1.
09 Saturday Jul 2022
Posted in astronomy, astrophysics, Hopewell Observatorry, Optics, Telescope Making
Tags
Android, Arduino, DM524, ealing, electronics, MaxESP, motherboards, OnStep, signal, stepper drivers, Stepper Motors, TB6600, Telescope, Telescope drive
Guy BrandenburgJul 6
At long last, we have finally got the venerable, massive Ealing telescope mount at Hopewell Observatory working again, after nearly 9 months, with a totally different, modern, electronic stepper motor drive based on Arduino.
My first post to the OnStep group ( https://onstep.groups.io/g/main/message/37699 ) was on October 21, 2021, over eight months ago. In it, I wrote that I had decided to give up trying to fix the electro-mechanical synchronous drive and clutches on our Ealing-Byers mount at Hopewell Observatory, and asked the folks on the OnStep message boards for help in choosing the best OnStep combination to drive such a mount.
Since then, it’s been a very long and steep learning curve. We only fried a couple of little slip-stick drivers and maybe one MaxESP board. We got LOTS of help from the OnStep list (not that the posters all agreed with each other on everything)! We ran into a lot of mysteries, especially when we found, repeatedly, that configurations that worked just fine on our workbench wouldn’t work at all when the components were put into the mount!
But now it works.
Let me thank again in particular:
* Prasad Agrahar for giving me the OnStep idea in the first place by showing me a conversion he had done;
* Alan Tarica, a fellow ATMer, for cheerfully partnering and persevering with me in working on this project for the past 8 months in many, many ways;
* Ken Hunter for providing tons of basic and advanced advice and a lot of hardware, all for free;
* Robert Benward for extremely helpful advice and drawings;
* George Cushing for providing some of the original boards we used;
* Khalid Bahayeldin for lots and lots of OnStep design features;
* Howard Dutton for designing, implementing, and supporting this whole project in the first place; and
* Arlen Raasch for bringing his wealth of trouble-shooting experience and a lot of nice equipment up to Hopewell, spending full days up there, and saving our asses in figuring out the final mysteries. Among other things, he kluged (by the way, “kluge” is German for “clever”, not clumsy) a level shifter to make it so that the 3.3 volt signals from our MaxESP3 board would actually and reliably communicate with the higher-voltage external DM542T stepper drivers that controlled the very-high-torque NEMA23 steppers, rewiring some of the jumpers on our already-modified MaxESP boards, and making the wiring look professional, and other stuff as well, thus essentially pushing us over the finish line.
* All of the Hopewell members for supporting this project
* Bill Rohrer and Michael Chesnes who physically helped out with soldering and wiring work at the observatory.
I plan to write up a coherent narrative with a list of lessons learned, and perhaps I can help make some of the step-by-step directions in the OnStep wiki a bit clearer to the uninitiated. Obviously I’ll need to write a user guide for this mount for the other Hopewell members.
If Alan and I had gone straight to our final configuration, this project would have been quite a bit cheaper. In addition to what’s inside the mount and control box at the observatory, we now have on hand something like this list of surplus items:
* four MaxESP boards in various stages of construction and functionality;
* a dozen or more different slip stick stepper drivers we aren’t using;
* four or more external stepper drivers, mostly TB6600;
* five or more stepper motors of different sizes;
* a hand-held digital oscilloscope;
* lots and lots of wires of many types;
* lots of metal and plastic project boxes of various sizes;
* lots of tiny motherboards; and
* lots and lots of sets of various mechanical electrical connectors (many were used, later cut off, and then ended up in the trash).
Yes, one does need spares, and yes, lots of this stuff has multiple uses, but this has not been a ‘green’ project. On the third hand, it has been extremely interesting and fun to learn all these new skills.
The final substantive changes that got the Ealing mount up and running were made during the Fourth of July fireworks down in the valleys on each side of the ridge that our observatory sits on. What were the changes? (1) switching the black and white leads from the mains power leads (they original, scavenged, cord had the white lead as Hot!) and (2) reversing the Declination motor direction. It also helped that I was not zoned-out and punchy from lack of sleep, as we had been when Arlen and I had last worked on it.
On July 4th, it at long last worked properly!
This Ealing mount’s original, labeled, built-in manual RA and DEC setting circles make it quite easy to put the scope into Home position before you turn on the power. One just loosens the clutches and moves the axes to 6:00 hours exactly in Right Ascension and 90 degrees exactly in Declination. From there, I found the OnStep system behaves very nicely. It accurately slewed to a number of bright, obvious targets of various sorts on both sides of the meridian. However, when I tried to get it to aim that night at M13, it refused, sending an error message that it was too close to the zenith for safety. And it was (altitude 87 degrees)! Very impressive – a safety feature I hadn’t even known about!
None of the objects that I slewed to was far from the center of the field of view, even when the scope slewed across the meridian. I was using an old, 2-inch diameter 50 mm Kellner eyepiece on an f/12 six-inch aperture D&G refractor.
I found that the Android app to be **much** better for initial setup than the SHC. Arlen, Alan and I all found that setting the correct latitude, longitude, UTC offset and so on from the SHC was a real brain-twister because of its unfortunately not-very-friendly user interface. Using the OnStep app on a cheap, old Android tablet made the whole initialization process very much easier and faster, especially after I let the tablet discover what time it really was from my iPhone’s wireless HotSpot.
However, I found that the hand paddle is much better for fine-tuning of pointing and so on, because the bright display on an Android, no matter how dim one makes it, will destroy one’s night vision, and one cannot reliably feel where the directional buttons are on a flat screen while staring through an eyepiece. Obviously, one can feel the buttons on the SHC quite well, maybe even with gloves. A joy stick would be even better…
Alan and I and the other Hopewell members still have many more OnStep features to learn.
However: if I had known this project would take over eight months of hard work, I think I might have tried fiddling with the original Ealing clutches some more.
Oh well, we have a mount that has much more capabilities than it ever had, and Alan and I have learned quite a bit of electronics! I’m proud of what we did!
05 Thursday May 2022
Posted in astronomy, Hopewell Observatorry, Telescope Making
Tags
astronomy, ATM, ealing, Hopewell Observatory, OnStep, stepper motor, Telescope, Telescope Making, testing
For many months, we members of The Hopewell Observatory have been doing our best to repair the 50 year-old clock drive on our university-grade Ealing telescope mount.
Yesterday, after a lot of help from others, I finally got it to work — at least in the day time. With no telescopes mounted on it. And 100% cloud cover. So I really don’t know for sure.
We still need to test it out on a clear night, to see how well it tracks and finds targets.
I think I will re-configure the wiring so that it fits in a box outside the mount, instead of using the weirdly-shaped compartments inside: one needs to do occasional maintenance on the OnStep hardware and software, and none of that is easy to access right now.
A short video is attached.
17 Thursday Feb 2022
Posted in astronomy, Hopewell Observatorry, Telescope Making
I’ve got the new stepper motors, and their drivers, and their power supplies, working away just fine on my desk, and I’m pretty excited and confident that we will have enough power and precision to drive and slew the Ealing properly!

These steppers are very strong: I am completely unable to stop the motors with my hands (bare or gloved) either when they are just tracking or when they are slewing at full speed or guiding at low speed, even with a fairly large fixture on the end of the shaft.
Without Ken Hunter’s expertise, there is no way I could have figured out how to get these particular steppers wired so that they would run, especially since they require those special, large, green and black drivers that you see in the photo above, which are about the size of the palm of your hand. Ken deserves a real round of applause, and more. (I have found that his advice on the OnStep wiki message board is much more accurate and friendlier than the advice of many others there.) In addition, he also repaired two boards that had been incorrectly soldered and assembled by someone else and which I and Alan Tarica purchased from that person, separately.
Before Ken’s intervention, the boards didn’t work. He found a number of assembly and soldering errors, and not only fixed them, but he also ‘flashed’ them with the latest OnStep software versions. At no cost! Now, they work very well.
I want to thank Prasad Agrahar again for his original inspiration and follow-through, and also Alan Tarica for his enthusiastic and knowledgeable assistance and advice (which I don’t always follow).
What’s more, as far as I can tell, this arrangement with super-duper steppers and drivers is unique in OnStep. Something like it clearly exists in some form in the professional or amateur CNC world, which is why we can purchase these insanely complex drivers for less than $9 apiece and the steppers for just $37 each, but to my knowledge nobody in the OnStep world has done this particular arrangement.
The old NEMA-23 steppers and these new ones have the exact same ‘form factor’ except that one can use larger bolts to fasten the new ones to the L-shaped brackets I already have installed.
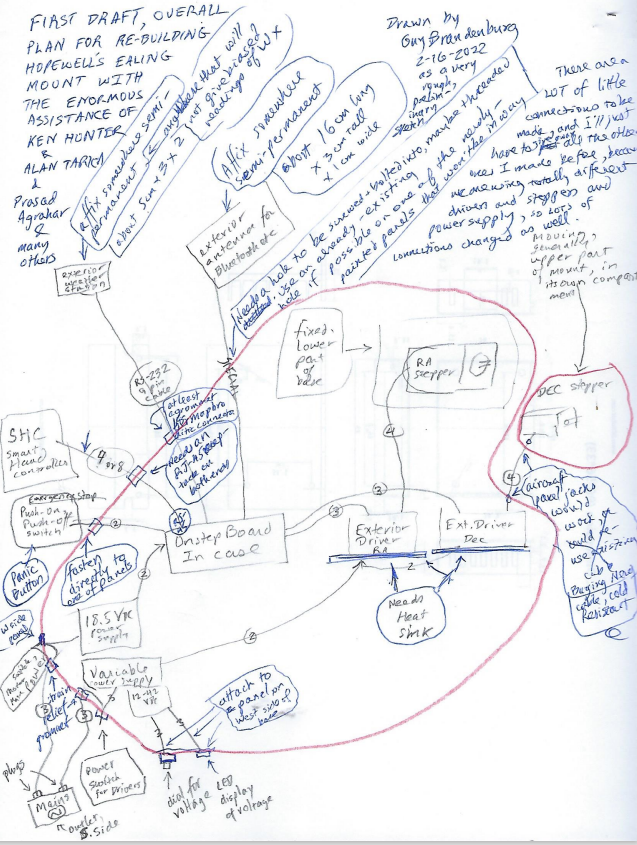
The attached schematic diagram is a first draft of how the connections on the mount itself will be made. The wiring job is going to have a lot of parts, and lots of connections!
At the observatory, we won’t have those old military-grade, 14-connector cables any more, nor that very heavy old hand paddle whose cable we all used to trip over. Instead, I ordered 10 feet of 14-gauge, 4-conductor shielded, stranded cable that is highly rated for both high and low temperatures, in order to connect the DEC drive to the rest of the scope. It will need new strain-relief grommets. So will several other wires. I can re-use most of the existing holes in the cover plates for this mount, and will seal the rest of them to keep out insects. Wiring all of those new connections will take a while!
We will have a local wireless connection (with a small external antenna, like on a router, to make sure there is a good wireless signal), and a small (2x3x5 cm) dedicated basic weather monitor (very basic: just humidity, temp, etc) attached somewhere on the mount*. There will also be an emergency ‘Kill’ switch to allow one to stop the drive immediately if needed.
You can control the scope with a Smart Hand Controller that will be attached via a flexible ethernet-type cable, or, if you prefer, with an inexpensive Android cell phone or tablet that has the proper software installed. (We will leave a tablet up there, with its charging cord.) One won’t need to unclamp, slew, and re-clamp the RA and DEC axes any more in order to acquire a target. We will see how good the pointing accuracy and tracking are, once it’s all up and running.
Since we are using much stronger stepper motors than the ones had been suggested to me and that I had purchased earlier, and they needed a lot more current, we needed different drivers. As a result, most of the connections I had previously fabricated won’t be of much use for us anymore. Perhaps I can give them away to somebody else who is attempting an OnStep conversion on a telescope mount that weighs much less than this one.
Here is a little video of these things in action:
And here is my first draft of the schematics showing how these things all connect inside the scope as well as how we will connect them to the body of the mount itself. It’s crude, but I think it will be useful.
21 Tuesday Dec 2021
Posted in astronomy, Hopewell Observatorry, Telescope Making
I think I have succeeded in getting our OnStep build to work properly. Previously, whenever I asked the drive to slew to an new location, the stepper motors would build up to a certain speed and then stop rotating while they screamed, seemingly in protest. It’s called stalling.
With the help of several of the principal leaders in the OnStep project (Howard Dutton, Ken Hunter, Khalid Bahayeldin) and Alan Tarica and Prasad Agrahar, I think I may have finally got the settings set properly. The final secret was to reduce the slewing speed in the smart hand controller to the lowest setting.
This does make slewing rather slow, however. To go from the location of Jupiter to Capella tonight, which is a pretty long distance across the sky, took nearly eight minutes. Watch the video.
08 Saturday Sep 2018
Posted in astronomy, flat, Hopewell Observatorry, optical flat, Optics, Telescope Making
Tags
Astro Bananas, cassegrain, couder, double pass auto collimation, ealing, foucault, Hopewell Observatory, matching Ronchi, Mel Bartels, Ronchi, ronchigram
The other regulars and I at the DC ATM group at the CCCC have been trying to test a 12 inch Cassegrain mirror and telescope manufactured nearly 50 years ago by a company called Ealing and currently owned by the Hopewell Observatory, of which I am a member. It hasn’t been easy. I discussed this earlier on Cloudy Nights.
Reports from several people, including Gary Hand and the late Bob Bolster, indicated that the optics on this mirror weren’t good at all. Apparently the folks at the University of Maryland’s observatory were sufficiently unhappy with it that they either sold it or gave it to National Capital Astronomers, a local astronomy club, who in turn gave it or sold it to Hopewell Observatory.
With a plain-vanilla Ronchi test, we could see that the mirror was very smooth and continuous, with no turned edge, astigmatism, or bad zones. With the Foucault/Couder zonal test (aka “Foucault” test) , I got results indicating that it was seriously overcorrected: some sort of hyperboloid, rather than the standard paraboloid characteristic of classical Cassegrain telescopes, which have a parabolic primary mirror and a hyperbolic secondary mirror.
However, I have begun losing my faith in my zonal readings, because they often seem to give results that are way out of whack compared to other testing methods.
So we decided to do some additional tests: the Double-Pass Auto-Collimation (DPACT) test used by Dick Parker, as well as the Matching Ronchi test (MRT).
The DPACT is very fiddly and exacting in its setup. We used (and modified) the setup lent to us by Jim Crowley and illustrated by him at his Astro Bananas website. Our results seem to show that the mirror is in fact NOT parabolic, rather, overcorrected, which confirms my Foucault measurements. If it were a perfect paraboloid, then the ronchi lines would be perfectly straight, but they definitely are NOT: they curve one way when inside the focal point, and curve the other when the tester is outside the focal point.
We also tested the entire setup on a radio tower that was about half a mile (~1km) distant. We found that the images were somewhat blurry no matter what we did.
We also attempted the MRT on the same mirror. However, requires very accurate photography and cutting-and-pasting skills in some sort of graphics programs. What you are inspecting is the curvature of the Ronchi lines. Here is the result that Alan T and I got last night:

In black is the ideal ronchigram for this mirror, according to Mel Bartels’ website. The colored picture is the one we made with either my cell phone or the device I finished making earlier this week, shown in my previous post. Here are the two images, separated rather than superimposed:


The mirror’s focal length is 47.5″ and the grating has 100 lines per inch, shown somewhat outside of the radius of curvature. The little ‘eyelash’ on the lower left is simply a stray wire that was in the way, and doesn’t affect the image at all. The big hole in the middle is there because the mirror is a cassegrain.
I don’t know about you, but I don’t really see any differences between the real mirror and the theoretical mirror. Do you?
So, what does this all mean?
07 Thursday Sep 2017
Posted in astronomy, flat, Hopewell Observatorry, Math, science, Telescope Making
Tags
artificial star, celestron, classical cassegrain, couder, double pass autocollimation test, ealing, FigureXP, focus, foucault, hyperbolic, optical tube assembly, parabolic, primary, refurbishing, ritchey-chretien, Ronchi, schmidt-cassegrain, secondary, spherical, Telescope
We at the Hopewell Observatory have had a classical 12″ Cassegrain optical tube and optics that were manufactured about 50 years ago.; They were originally mounted on an Ealing mount for the University of Maryland, but UMd at some point discarded it, and the whole setup eventually made its way to us (long before my time with the observatory).
The optics were seen by my predecessors as being very disappointing. At one point, a cardboard mask was made to reduce the optics to about a 10″ diameter, but that apparently didn’t help much. The OTA was replaced with an orange-tube Celestron 14″ Schmidt-Cassegrain telescope on the same extremely-beefy Ealing mount, and it all works reasonably well.
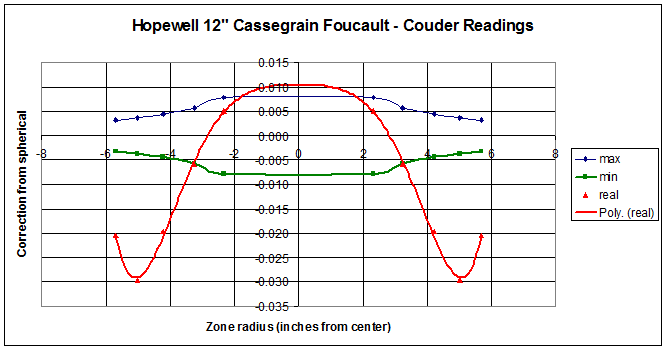
Recently, I was asked to check out the optics on this original classical Cassegrain telescope, which is supposed to have a parabolic primary and a hyperbolic secondary. I did Ronchi testing, Couder-Foucault zonal testing, and double-pass autocollimation testing, and I found that the primary is way over-corrected, veering into hyperbolic territory. In fact, Figure XP claims that the conic section of best fit has a Schwartzschild constant of about -1.1, but if it is supposed to be parabolic, then it has a wavefront error of about 5/9, which is not good at all.
Here are the results of the testing, if you care to look. The first graph was produced by a program called FigureXP from my six sets of readings:
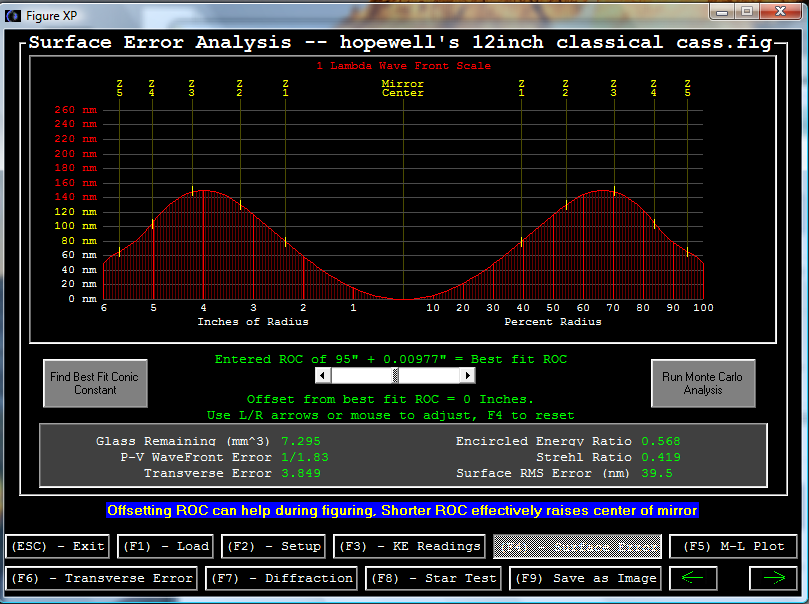
I have not yet tested the secondary or been successful at running a test of the whole telescope with an artificial star. For the indoor star test, it appears that it only comes to a focus maybe a meter or two behind the primary! Unfortunately, the Chevy Chase Community Center where we have our workshop closes up tight by 10 pm on weekdays and the staff starts reminding us of that at about 9:15 pm. Setting up the entire indoor star-testing rig, which involves both red and green lasers bouncing off known optical flat mirrors seven times across a 60-foot-long room in order to get sufficient separation for a valid star test, and moving two very heavy tables into said room, and then putting it all away when we are done, because all sorts of other activities take place in that room. So we ran out of time on Tuesday the 5th.
A couple of people (including Michael Chesnes and Dave Groski) have suggested that this might not be a ‘classical Cassegrain’ – which is a telescope that has a concave, parabolic primary mirror and a convex, hyperbolic secondary. Instead, it might be intended to be a Ritchey-Chretien, which has both mirrors hyperbolic. We have not tried removing the secondary yet, and testing it involves finding a known spherical mirror and cutting a hole in its center, and aligning both mirrors so that the hyperboloid and the sphere have the exact same center. (You may recall that hyperboloids have two focal points, much like ellipses do.)
Here is a diagram and explanation of that test, by Vladimir Sacek at http://www.telescope-optics.net/hindle_sphere_test.htm

FIGURE 56: The Hindle sphere test setup: light source is at the far focus (FF) of the convex surface of the radius of curvature RC and eccentricity ε, and Hindle sphere center of curvature coincides with its near focus (NF). Far focus is at a distance A=RC/(1-ε) from convex surface, and the radius of curvature (RS) of the Hindle sphere is a sum of the mirror separation and near focus (NF) distance (absolute values), with the latter given by B=RC/(1+ε). Thus, the mirrorseparation equals RS-B. The only requirement for the sphere radius of curvature RS is to be sufficiently smaller than the sum of near and far focus distance to make the final focus accessible. Needed minimum sphere diameter is larger than the effective test surface diameter by a factor of RS/B. Clearly, Hindle test is limited to surfaces with usable far focus, which eliminates sphere (ε=0, near and far focus coinciding), prolate ellipsoids (1>ε>0, near and far foci on the same, concave side of the surface), paraboloid (ε=1, far focus at infinity) and hyperboloids close enough to a paraboloid to result in an impractically distant far focus.
We discovered that the telescope had a very interesting DC motor – cum – potentiometer assembly to help in moving the secondary mirror in and out, for focusing and such. We know that it’s a 12-volt DC motor, but have not yet had luck tracking down any specifications on that motor from the company that is the legatee of the original manufacturer.
Here are some images of that part:


