
Tags
By Guy Brandenburg
3/27/2017
I describe here an attempt to quantify progress (or lack thereof) in the removal of the classic, and dreaded, turned-down edge (TDE) present on a 16.5” Newtonian glass mirror blank that I have been trying to “figure” for some years. The figuring process means changing a piece of glass that approximates a small section sliced out of a large hollow sphere, into a highly-accurate paraboloid — with the required level of accuracy being measured in nanometers.
Many amateur and professional telescope makers have maintained that you can only fix figuring errors if you can measure them. Not being able to get good, repeatable measurements of the TDE on my mirror, I had been sort of floundering, failing to get rid of the TDE even after YEARS of work (off and on; mostly off). So a decision was made to try to quantify things.
We recently had some success in matching computer-generated Ronchi images of theoretically-perfect mirrors with photos taken of works in progress, simply by cutting and pasting – which has been recommended by Mel Bartels in particular for quite some time. For the first time, I got the hang of it, and we were able to help a first-timer (Mike L) to figure a 10” plate glass f/5.4 mirror only ¾” thick to just about exactly ¼ lambda, according to our combined, repeated, careful measurements on a mirror that was cooled both by immersion in a room-temperature water bath and by sitting in a closet in the very same testing room for an entire weekend.
Prior to this experiment, I had been taking short videos of the entire mirror, moving the ronchi grating back and forth across the center of curvature. These videos reveal and record a lot of qualitative information about the mirror, including vocal commentary, but I found it impossible to transfer the images to my laptop for closer analysis until I got home, across town, which meant that the turn-around time after testing a mirror was much too long to be of any use. I had tried quite a large number of various strokes suggested by others, by our reading various ATM manuals, and by just thinking; but the very serious TDE on this (for me, relatively ambitious) project never seemed to get any better.
I simply gave up on imaging via video clips, since they were too hard to manipulate or measure on my phone, and which required too much bandwidth to send to my laptop until I got home. This time, I took Ronchi still-images on my cell phone, between 0.2 and 0.5 inches outside of the center of curvature.

(My experience has been generally easier to discern defects in a Ronchigram when the lines curve outwards at the top and bottom, which would mean the test grating is OUTSIDE the COC of a partly-parabolized mirror, as you see on the left in the black-and-white image above. However, when the lines curve inwards at the top and bottom, like the images in the center and to the right, then many serious defects remain hidden. 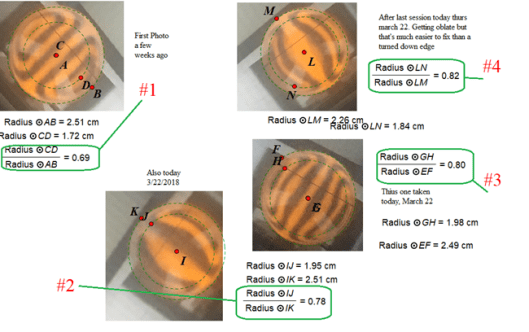
Procedure:
A standard 100 LPI grating from Willmann-Bell and a yellow LED were used, on an XYZ stage partly fabricated by me and placed exactly twice the focal length from the primary. Images were taken with an iPhone 6, shooting images zoomed in as much as possible. An attempt was made to have matching ronchigrams, i.e., with the same number of vertical lines showing.
(This was a weak point of the experiment. For one, it’s hard to hold cell phone steady enough, and an observer will notice that the images do NOT have exactly the same number of lines. That’s because I did not have a printout of the previous image right in front of me to make comparisons to. All that needs to be fixed in subsequent iterations. Also, other imaging devices need to be tried, as well.)
I was in fact able to email individual photograph frames to my laptop at the lab. After downloading the clearest images to my laptop, I used plain old MS Windows Paint to shrink and crop the useful portion of the picture, and then pasted the result into a Geometry software (Geometer.s Sketchpad, or GSP) that I was already familiar with. GSP was then used to draw a circle around the circumference of the image of the nearly-perfectly-circular glass disk, adjusting this as well as possible. This process automatically generated the center of the disk. Using that center, a second, and smaller, circle was drawn whose circumference was placed at the location along the ronchi lines where they appeared to begin to turn outwards. GSP was then to measure directly the radii of the two circles and to compute their ratio.
A final ratio of 0.7, just to pick a number that is easy to compute, means that just about half of the area of the mirror is covered by a wide rolled-down edge, since the ratio of areas is equal to the square of the ratio of the respective radii, and 0.7 squared is 0.49, or 49%.
In the diagram above, the images go in chronological order but COUNTER-clockwise, from upper left (labeled #1), which was made in mid- or early March, through the next three images, all taken on March 22. In between each image, various strokes were employed in figuring sessions for anywhere between 15-20 minutes to attempt to fix the TDE. All the figuring sessions involved sub-diameter laps anywhere from 8 to 12 inches in diameter that had been warm-pressed upon the mirror. The strokes were both forward and back and incorporated enough of a ‘W’ stroke to cover the entire mirror, using cerium oxide on either tempered burgundy or Acculap pitch, depending. The edge of the tool was allowed to go up to the edge of the mirror, +/- maybe 5 mm. The goal was simply to wear down the glass in the center until it caught up with the amount that the edge had been worn down. None of the laps seemed to have full contact with the mirror out to the very edge; thus the end of the stroke was NOT at the edge of the mirror.
You will notice that these ratios, circled in green, seem to increase monotonically from 69% to 80%, which is gratifying: if this real, then the fraction of the mirror that is NOT covered by TDE has gone from about 47% to about 67%, as you can see here. (Note: in figure #1, the large circle was denoted circle AB, and the smaller circle was denoted circle CD. I know that points A and C are not identical, but they are rather close; that error will be fixed in subsequent iterations.)
However: the key question is: IS THIS REAL? Or am I merely fooling myself?
I don’t know yet.
I certainly hope it is real.
But it needs to be checked with subsequent investigation.
My attempt at limiting my own subjectivity or wishful thinking was to try to draw the circles at the place where the more-or-less vertical lines began turning outwards. Hopefully that location really corresponded to the place where the turned/rolled edge began. However, it is entirely possible that the precise apparent location of the beginning of the TDE very much depends on exactly how many lines appear in the Ronchigram, thus, precisely how far from the COC the grating is located.
Unfortunately, often times I have to dismantle the entire apparatus, because we have to close up shop for the night, or somebody else needs to use the tester on another mirror. Thus, it is nearly impossible to ensure that the measurement apparatus remains undisturbed.
My next steps, I think, are these:
- Have a separate, and very simple ronchi apparatus that just consists of a grating and a light.
- Have previous images right in front of me as I prepare to take the next Ronchigrams, so that I can match the number of lines visible.
- Perhaps I should take a series of said standardized ronchigrams both inside and outside of COC with, say, 5 lines visible. I should also take some ronchigrams that might accentuate and expose any possible astigmatism; that is, very close to the COC. Any Ronchi lines that resemble the letters S, Z, J, U, or N would be very bad news.
- Attempt to attach a cheap video camera with built-in LED, Ronchi grating, and a suitable lens to make steadier images free from hand wobbles.
I would like to thank Isaac and Elias Applebaum for their diligent and noted explorations in solving a similar question relating to fixing or preventing TDE. That STEM project won them a number of well-deserved awards.
