Another recent scope at the NCA – ATM workshop at the CCCC

Tags

, ,

This ultra-short scope, by Todd M, has a mirror of 4.25″ (108 mm) and a pretty short focal length – about 2 feet (60 cm). He made just about everything, right here in the NCA ATM workshop at the Chevy Chase Community Center. He ground, polished, figured, and even helped aluminize the primary mirror; made the primary cell AND the spider and secondary holder; made all of the rest of the mount that you see; and even made the focuser itself from some plumbing parts!

It’s a very nice job, meriting a lot of praise. In case you were wondering, the paint was a special, very-high quality and very expensive top-of-the-line alkyd enamel, costing about $200 per gallon – and we have two of them. Explanation: it was an ‘oops’ can that was specially ordered and mixed for someone who changed their mind and couldn’t return it. In exchange for a non-profit donation receipt in the name of NCA, Bill R was able to get the person to donate both gallons to us.

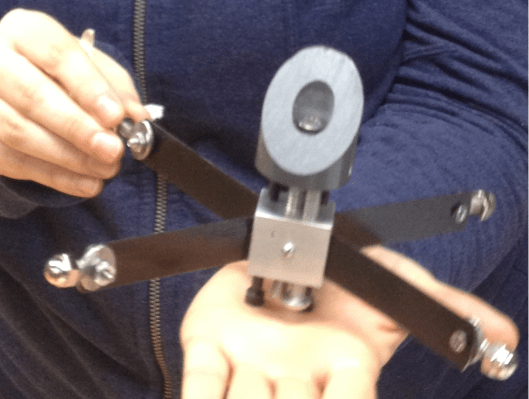
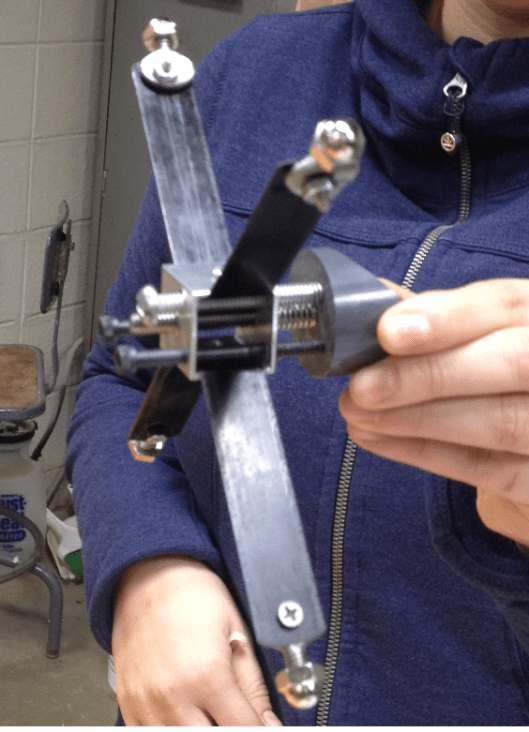
The spider and secondary holder are very similar to the one made by Ramona D that you can see here. The major differences are:

(1) Todd used busted bandsaw blades rather than steel strapping tape for the vanes. (Both were the same price: free.) After looking at both projects, which both turned out quite nicely, my conclusion is that if you want to use bandsaw blades, you have to heat-treat (anneal) them so they will have less of a tendency to break right at the location where you are trying to bend them by 45 degrees. (Heat it up to cherry red and then let it cool slowly in the air, making it softer and less brittle, I am told…)

(2) And of course, it certainly helps to grind down the teeth of the bandsaw blade both for safety and to reduce weird reflections. Strapping tape is about the same thickness as many band saw blades, but the tape is wider and hence more stable and less prone to turn crooked (I think).

(3) Todd used ordinary 1/4″-20 machine screws (aka bolts) to attach the vanes of the spider to and through the walls of the tube. He cut off the heads of the bolts and ground one side flat near the head, and then drilled a little hole in that flat part, tapped (threaded) that, and used a tiny little machine screw to attach the vane to the specially-prepared screw, in a process that I hope is clearly shown in these three drawings.

(4) Ramona, however, used thumbscrews instead of doing all that cutting, filing and tapping. Actually, our little tiny tapping drills didn’t play well with our bit holders – they kept slipping. So she just drilled holes in the center of each thumbscrew head, and bought three very small nuts and bolts and used them in the place of the little screw that Todd used.

(Thumbscrews like these:)

thumbscrews

Some student-made telescopes

I’ve been helping students at the First Light Saturday science school at the Carnegie Institution for Science for several years now. We’ve done a variety of activities, from making small generators and exploring water power; building and programming robots; measuring the chemical content of foods; growing plants under various conditions (including simulated zero-gravity); and this year, experimenting with light, including building their own small telescopes.

They so far have made three such telescopes: a Galilean, a Keplerian, and a more modern achromatic refractor. Here is what they used to make them. The lenses, all from Surplus Shed, cost a grand total of Five dollars per set. The PVC was a bit less, I think.

galilelan and keplerian telescope

Because of bad weather, our winter term was somewhat shortened. Here is one example of what they will finish – a small refractor on a tripod! (They’ll need to supply their own cat, though…)

IMG_4269

One Way to Make a Telescope Spider

Tags

, , , ,

All Newtonian telescopes require a secondary mirror — a flat mirror held at roughly a 45-degree angle to reflect the light from the primary out to the side. Generally this secondary mirror is an ellipsoid, in order to waste as little light as possible.

One major problem is figuring out how to hold this secondary mirror in place securely without interfering with the passage of light from your distant target. The secondary mirror can be held on a stalk, or on crossed arms like a spider’s web.

The images below show how Ramona D made a spider using a piece of extruded aluminum tube with a square cross section, several bolts, a spring, a piece of plastic dowel, some pieces of steel strapping tape, a few thumbscrews, and various small nuts and bolts. She did a very neat job, including threading and tapping several small holes in the aluminum tube.

The idea is not original to me: I got the idea from somebody else on line, but unfortunately, I don’t recall the name of the person to whom I should give credit.

Here are some photos that probably do a better job of explaining how to make it than I could explain in many, many paragraphs.

ramonas spider 1.png

ramonas spider 2

ramonas spider 3

ramonas spider 4

A recently-completed telescope

Tags

, ,

Steve S recently finished a telescope with help from the DC-area amateur telescope making (ATM) workshop that I’ve been running at the Chevy Chase Community Center (CCCC) for several years (I took over from the late Jerry Schnall around the turn of the century) with help from several local ATMers and under the auspices of the National Capital Astronomers (NCA).

Steve had made the mirror quite a long time ago (not here in DC). The optics are quite good according to my tests, and if you look at the photos, I think you will agree that the body of the telescope looks excellent as well.

IMG_4184

IMG_4183

As you can see, he used more-or-less dimensional wood rather than the more conventional plywood. Or should I say, clear pine that had been glued into boards at the lumber factory. He made the cradle with a bolt that allows one to loosen or tighten the grip on the tube so that one can rotate it or shift it forward or back to take care of any changes in balance.

It may not be obvious, but the wood is in fact coated with varnish.

The rocker box is held onto the azimuth bearing with sturdy wingnuts so that it can be more easily transported. The two circular sections of the azimuth bearing were table tops purchased at Lowe’s (IIRC).


Shoveling Snow

If you have ever cleared a sidewalk after a snowstorm (like I did this morning), you’ve probably noticed that shoveling snow is a lot of hard work.

I wondered just how hard I was working to shovel our porch and sidewalk, so I did some rough calculations. 

Not knowing the weights or masses of snow or water in American customary units I did it all in metric units because it’s so much easier.

Using a construction tool, I measured the snow as being about 13″ deep, or about 33 cm (1/3 of a meter). I shoveled a path that was roughly a meter or so wide, and a grand total of about 21 long paces (roughly a meter each) in length.

Which means I had shoveled a volume of 1/3 *21*1 or 7 cubic meters. If that was all liquid or solid water, that would be exactly 7 metric tons. But snow is about 90%air, so if we divide that by 10, we get 700 kilograms instead, or about 1500 pounds of fluff.

 Huff, huff, puff indeed.

By the way, my son Josef Brandenburg, a DC-area fitness expert and personal trainer, has a nice interview with Bruce Depuyt on the right way to shovel so that you don’t throw your back out and end up in the emergency room along with many thousands of other folks. (I didn’t.)

Telescope Making in Cuba?

Tags

, , , , , , ,

Inspired by a Canadian amateur astronomer who visited the place, I’ve been in recent contact by email with some potential amateur telescope makers in Cuba. 
 .
I proposed bringing the optics for some completed 4″ to 8″ Newtonian telescopes in my luggage (ie parabolized & aluminized mirrors, diagonals, and eyepieces) and then giving them ideas and assistance on making the rest of the scopes. I have a number of already-completed primaries and diagonals at our DC telescope making workshop, but would have to scrounge around for eyepieces. 
 .
(If mechanics in Cuba can keep 1958-model cars running for over 50 years, I bet that they can probably improvise other stuff a la John Dobson, if they have any raw materials at all, which I am not sure about). I am also not sure whether I should bring focusers and spiders, or whether they should make them there themselves…
 .
I understand from the Cubans that there are almost no telescopes in the entire country except for one no-longer-operational telescope at the University of Havana’s observatory, and certainly no Dobsonians. They sound quite interested in the idea, and also were suggesting that I might stay long enough to demonstrate how to grind and polish and figure a mirror.  If I follow up on that idea, it would probably require me bringing in abrasives and pitch in addition to the finished mirrors, which might cause further luggage problems. Explaining finished mirrors carefully wrapped up is one thing, but containers of, say, 15-micron WAO microgrit? They might cut open the bag and test to see if it’s really cocaine…. thus contaminating it…
 .
Both the Canadian and the Cubans said that bringing in materials officially labeled as ‘gifts’ would entail lots of red tape and delays.
.
For me, the payback would be the chance to practice my crappy Spanish in an exotic place that I’ve never visited, and to observe from Tropical skies that suffer relatively low light pollution, as well as doing some good in a country that seems to have a low violent crime rate…. I was planning on flying to Mexico or the Bahamas and then getting a flight to Havana, which seems cheaper than an official direct flight. I suspect that since this would be a scientific exchange, I might even be able to get both governments to sign off and issue an official visa or whatever.
 .
Any thoughts? Anybody ever been there?

Another Puzzle: An F/3, very thin Pyrex mirror that seems to have a plastic layer on top of the glass!

Got another puzzle for you: an f/3 8″ mirror that appears to have been made by laying a plastic layer on an unfinished thin mirror blank! I’ve never seen anything like it!

Anybody got any ideas?

Some background: Some weeks ago, Al P brought in to the DC-area ATM workshop the optics for a telescope that someone gave him a decade or so earlier. The telescope originally had some sort of thin, full-sized window that we determined was almost perfectly flat, so it had no corrective power that we could determine. He thought that the diagonal mirror had been attached to the window, but the rest of the telescope had long since disappeared. The aluminum layer on the mirror was in fairly decent shape considering how old the mirror was.

The mirror was very thin: 8″ across (20 cm) and only about 1 cm thick, so about 20:1 instead of the 6:1 diameter-to-thickness ration that used to be recommended in the 1930s through 1990s. The back of the mirror blank had circular grooves impressed into it, so many that at first glance it looked like an old-time glass LP record (rather than a vinyl one).

It was also very ‘fast’, with an focal ratio of almost exactly three (3)!

Unfortunately, the mirror was seriously undercorrected, and thus unusable if put into a telescope as is, even though a Ronchi test showed no signs of turned-down edge or of unwanted roughness or weird zones. A numerical Foucault test with Couder-style zones, repeated several times, revealed the lack of correction.

Eventually Al decided to try to refigure the mirror with an ordinary pitch lap, so he removed the aluminum layer with muriatic acid (HCl), and we remade a burgundy pitch lap and tried to get the lap into contact. It seemed to Al that the original bevel had pretty much vanished, so he used a fairly coarse sharpening stone to bring it back. We noticed a funny texture around the end of his bevel but weren’t sure what it was.

When we pressed the mirror against the lap, we immediately discovered that there was a huge amount of bumpiness and jerkiness – something was catching the lap, much like riding a Big Wheel trike on a cobblestone street. Plus, the pitch tended to stick to the mirror and had to be repeatedly removed with fingernails, turpentine, and paint thinner.

We tried rewarming and re-pressing the lap, with no improvement. When we ran our fingers around the edge of the glass, near the bevel, it seemed like there was a raised rim, almost like on a saucer. So Al got out a finer sharpening stone and increased the bevel all the way around, to about 3 or 4 mm wide. Still no improvement in the bumpiness, and the weird texture around the edge of the glass got even worse.

Then we tried removing all traces of upward-facing lip around the edge of the glass by taking a large sort-of-flat piece of 1/4″ glass, sprinkling some 220 grit and water on it, and stroking the mirror, face down, against the grit and piece of glass.

That also did not do anything to improve the bumpiness. Plus, it began to look to us more and more like this mirror had been made in a totally weird manner: a fairly rough piece of glass was hogged out to the correct curvature, then somehow coated with a smooth layer of plastic, then aluminized. If they did any figuring on it, they clearly did not use a pitch lap!

I attach a few photos that are badly out of focus because iphones don’t like to take close ups. The bright bars are LED fluorescent lights in the ceiling; the concentric rings or grooves are on the back of the mirror. Pay attention to the irregularly-shaped non-shiny areas, where we think the original plastic coating came off.


I am also going to link to a youtube video that I took through a cheap 60X – 100X LED microscope.

A few more clues: the plastic layer (if that’s what it is) does not seem to be removed with either HCl or turpentine or mineral spirits.

If anybody has any thoughts on this mysterious mirror, Al and I will be all ears.

Meanwhile he plans to create a new tool from dental plaster and porcelain tiles and regrind it to f/5.


Puzzlement when Trying to Figure a Convex Surface Through the Back

Tags

, , , , ,

Have you ever tried to make a convex optical surface?

If so, you know that it’s much more challenging than a concave one, since the rays of light do not come to a focus at all.

Some of us* at the Amateur Telescope Making workshop here in Washington DC have made several attempts at doing this, pretty much without success. I would like to show you some weird images that we got when we tried to ‘figure’ the convex surface by performing a Ronchi test from the back side, looking through what was supposed to be a flat.

What we find is that even though the glass itself is very clear and free of visible strain when seen by the naked eye or when using crossed polarized filters, it looks like we are looking through an extremely murky and totally un-annealed piece of ancient Venetian glass, causing all sorts of weird striations in what should otherwise be nice, smooth Ronchi lines.

These pictures go in order from outside the radius of curvature to inside the ROC.

IMG_3656 IMG_3660 IMG_3663 IMG_3665 IMG_3667 IMG_3668

You might well think that the glass itself has lots of strain left in it, causing the very weird patterns that you see here. I can prove that this is not the case by showing you a short video that we made with crossed polarizing filters of the 5-inch diameter blank itself and two pieces of plastic (the protective covers for one of the filters). Judge for yourself.

This is not the first time that this strange phenomenon has occurred.

Any suggestions from those with actual experience would be extremely welcome.

===================

* Me, Nagesh K, and Oscar O.