Tonight we were finally able to hold a telescope making workshop again, for the first time since March 13, 2020, according to our log-in sheet.
We had five people, and we looked at several mirrors.
The first one was a plate glass, 10″, f/5.5 Coulter mirror that Kevin Hartnett had obtained and wanted me to strip the old aluminum coating from and then silver it and overcoat it. I thought the coating looked rather good, especially given its age, and wanted to put it on the testing stand to see how the figure looked. All of us thought the geometric figure of the mirror looked pretty good, and the ronchi lines looked nice and smooth. Alin Tolea said he saw a narrow turned down edge region perhaps 1/4″. Kevin thought it performed well, and I can see why.
I hope my silvering job turns out at least as good as its current aluminization.
Here are a few frames from my video of the Ronchi images (100 lines per inch):
The second one was a 17.5″ f/4.5 pyrex mirror, also originally made by Coulter and then refigured by somebody called Optical Western Labs (?) in California. The owner, We did not like this mirror at all. We thought the Ronchi lines were not smooth; there is a raised area in the center; and it even shows some signs of astigmatism. Here are a couple of frames the video I took of its Ronchi measurements:
The third mirror was an 8″, under-f/4 plate glass mirror that the owner reported performed very poorly. Once we put it on the stand, we saw why: it had never been parabolized! The Ronchi lines were almost perfectly straight! You only want straight Ronchi lines if your goal is to have a spherical (as opposed to parabolic, ellipsoidal, or hyperbolic) mirror. That’s why all its images were blurry. Nagesh Kanvindeh immediately decided to start trying to parabolize it, and we happened to have a synthetic pitch lap of 8″ diameter that had been last used to finish an f/4 mirror, so he got started right away.
By the way, our new hours are 5:00 pm to 8:30 pm, Tuesdays and Fridays.
Many years ago, the late Bob Bolster, a founding member of Hopewell Observatory and an amazing amateur telescope maker, got hold of a large piece of glass, perhaps World War Two military surplus left over from the old Bureau of Standards.
I have no idea what it is made out of. If Bob had any clue about its composition, he didn’t tell anyone.
Its diameter is 22 inches, and its thickness is about 3.25″. It has a yellowish tint, and it is very, very heavy.
If you didn’t know, telescope lenses (just like binocular or camera lenses) are made from a wide variety of ingredients, carefully selected to refract the various colors of light just so. Almost all glass contains quartz (SiO2), but they can also contain limestone (CaCO3), Boric oxide (B2O3), phosphates, fluorides, lead oxide, and even rare earth elements like lanthanum or thorium. This linkwill tell you more than you need to know.
If you are making lenses for a large refracting telescope, you need to have two very different types of glass, and you need to know their indices of refraction very precisely, so that you can calculate the the exact curvatures needed so that the color distortions produced by one lens will be mostly canceled out by the other piece(s) of glass. This is not simple! The largest working refractor today is the Yerkes, with a diameter of 40 inches (~1 meter). By comparison, the largest reflecting telescope made with a single piece of glass today is the Subaru on Mauna Kea, with a diameter of 8.2 meters (323 inches).
For a reflecting telescope, one generally doesn’t care very much what the exact composition of the glass might be, as long as it doesn’t expand and contract too much when the temperature rises or falls.
We weren’t quite sure what to do with this heavy disk, but we figured that before either grinding it into a mirror or selling it, we should try to figure out what type of glass it might be.
Several companies that produce optical glass publish catalogs that list all sorts of data, including density and indices of refraction and dispersion.
Some of us Hopewell members used a bathroom scale and tape measures to measure the density. We found that it weighed about 130 pounds. The diameter is 22 inches (55.9 cm) and the thickness is 3 and a quarter inches (8.26 cm). Using the formula for a cylinder, namely V = pi*r2*h, the volume is about 1235 cubic inches or 20,722 cubic centimeters. Using a bathroom scale, we got its weight to be about 130 lbs, or 59 kg (both +/- 1 or 2). It is possible that the scale got confused, since it expects two feet to be placed on it, rather than one large disk of glass.
However, if our measurements are correct, its density is about 2.91 grams per cc, or 1.68 ounces per cubic inches. (We figured that the density might be as low as 2.80 or as high as 3.00 if the scale was a bit off.)
It turns out that there are lots of different types of glass in that range.
Looking through the Schott catalog I saw the following types of glass with densities in that range, but I may have missed a few.
2.86 N-SF5
2.86 M-BAK2
2.89 N-BAF4
2.90 N-SF8
2.90 P-SF8
2.91 N-PSK3
2.92 N-SF15
2.93 P-SF69
2.94 LLF1
2.97 P-SK58A
3.00 N-KZFS5
3.01 P-SK57Q1
By comparison, some of the commonest and cheapest optical glasses are BAK-4 with density 3.05 and BK-7 with density 2.5.
Someone suggested that the glass might contain radioactive thorium. I don’t have a working Geiger counter, but used an iPhone app called GammaPix and it reported no gamma-ray radioactivity at all, and I also found that none of the glasses listed above (as manufactured today by Schott) contain any Uranium, Thorium or Lanthanum (which is used to replace thorium).
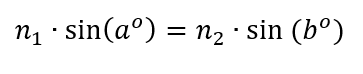
So I then rigged up a fixed laser pointer to measure its index of refraction usingSnell’s Law, which says
Here is a schematic of my setup:
The fixed angle a I found to be between 50 and 51 degrees by putting my rig on a large mirror and measuring the angle of reflection with a carpentry tool.
And here is what it looked like in practice:
I slid the jig back and forth until I could make it so that the refracted laser beam just barely hit the bottom edge of the glass blank.
I marked where the laser is impinging upon the glass, and I measured the distance d from that spot to the top edge of the glass.
I divided d by the thickness of the glass, in the same units, and found the arc-tangent of that ratio; that is the measure, b, of the angle of refraction.
One generally uses 1.00 for the index of refraction of air (n1). I am calling n2 the index of refraction of the glass. I had never actually done this experiment before; I had only read about doing it.
As you might expect, with such a crude setup, I got a range of answers for the thickness of the glass, and for the distance d. Even angle a was uncertain: somewhere around 49 or 50 degrees. For the angle of refraction, I got answers somewhere between 25.7 and 26.5 degrees.
All of this gave me an index of refraction for this class as being between 1.723 and 1.760.
This gave me a list of quite a few different glasses in several catalogs (two from Schott and one from Bausch & Lomb).
Unfortunately, there is no glass with a density between 2.80 and 3.00 g/cc that has an index of refraction in that range.
None.
So, either we have a disk of unobtanium, or else we did some measurements incorrectly.
I’m guessing it’s not unobtanium.
I’m also guessing the error is probably in our weighing procedure. The bathroom scale we used is not very accurate and probably got confused because the glass doesn’t have two feet.
A suggestion was made that this might be what Bausch and Lomb called Barium Flint, but that has an index of refraction that’s too low, only 1.605.
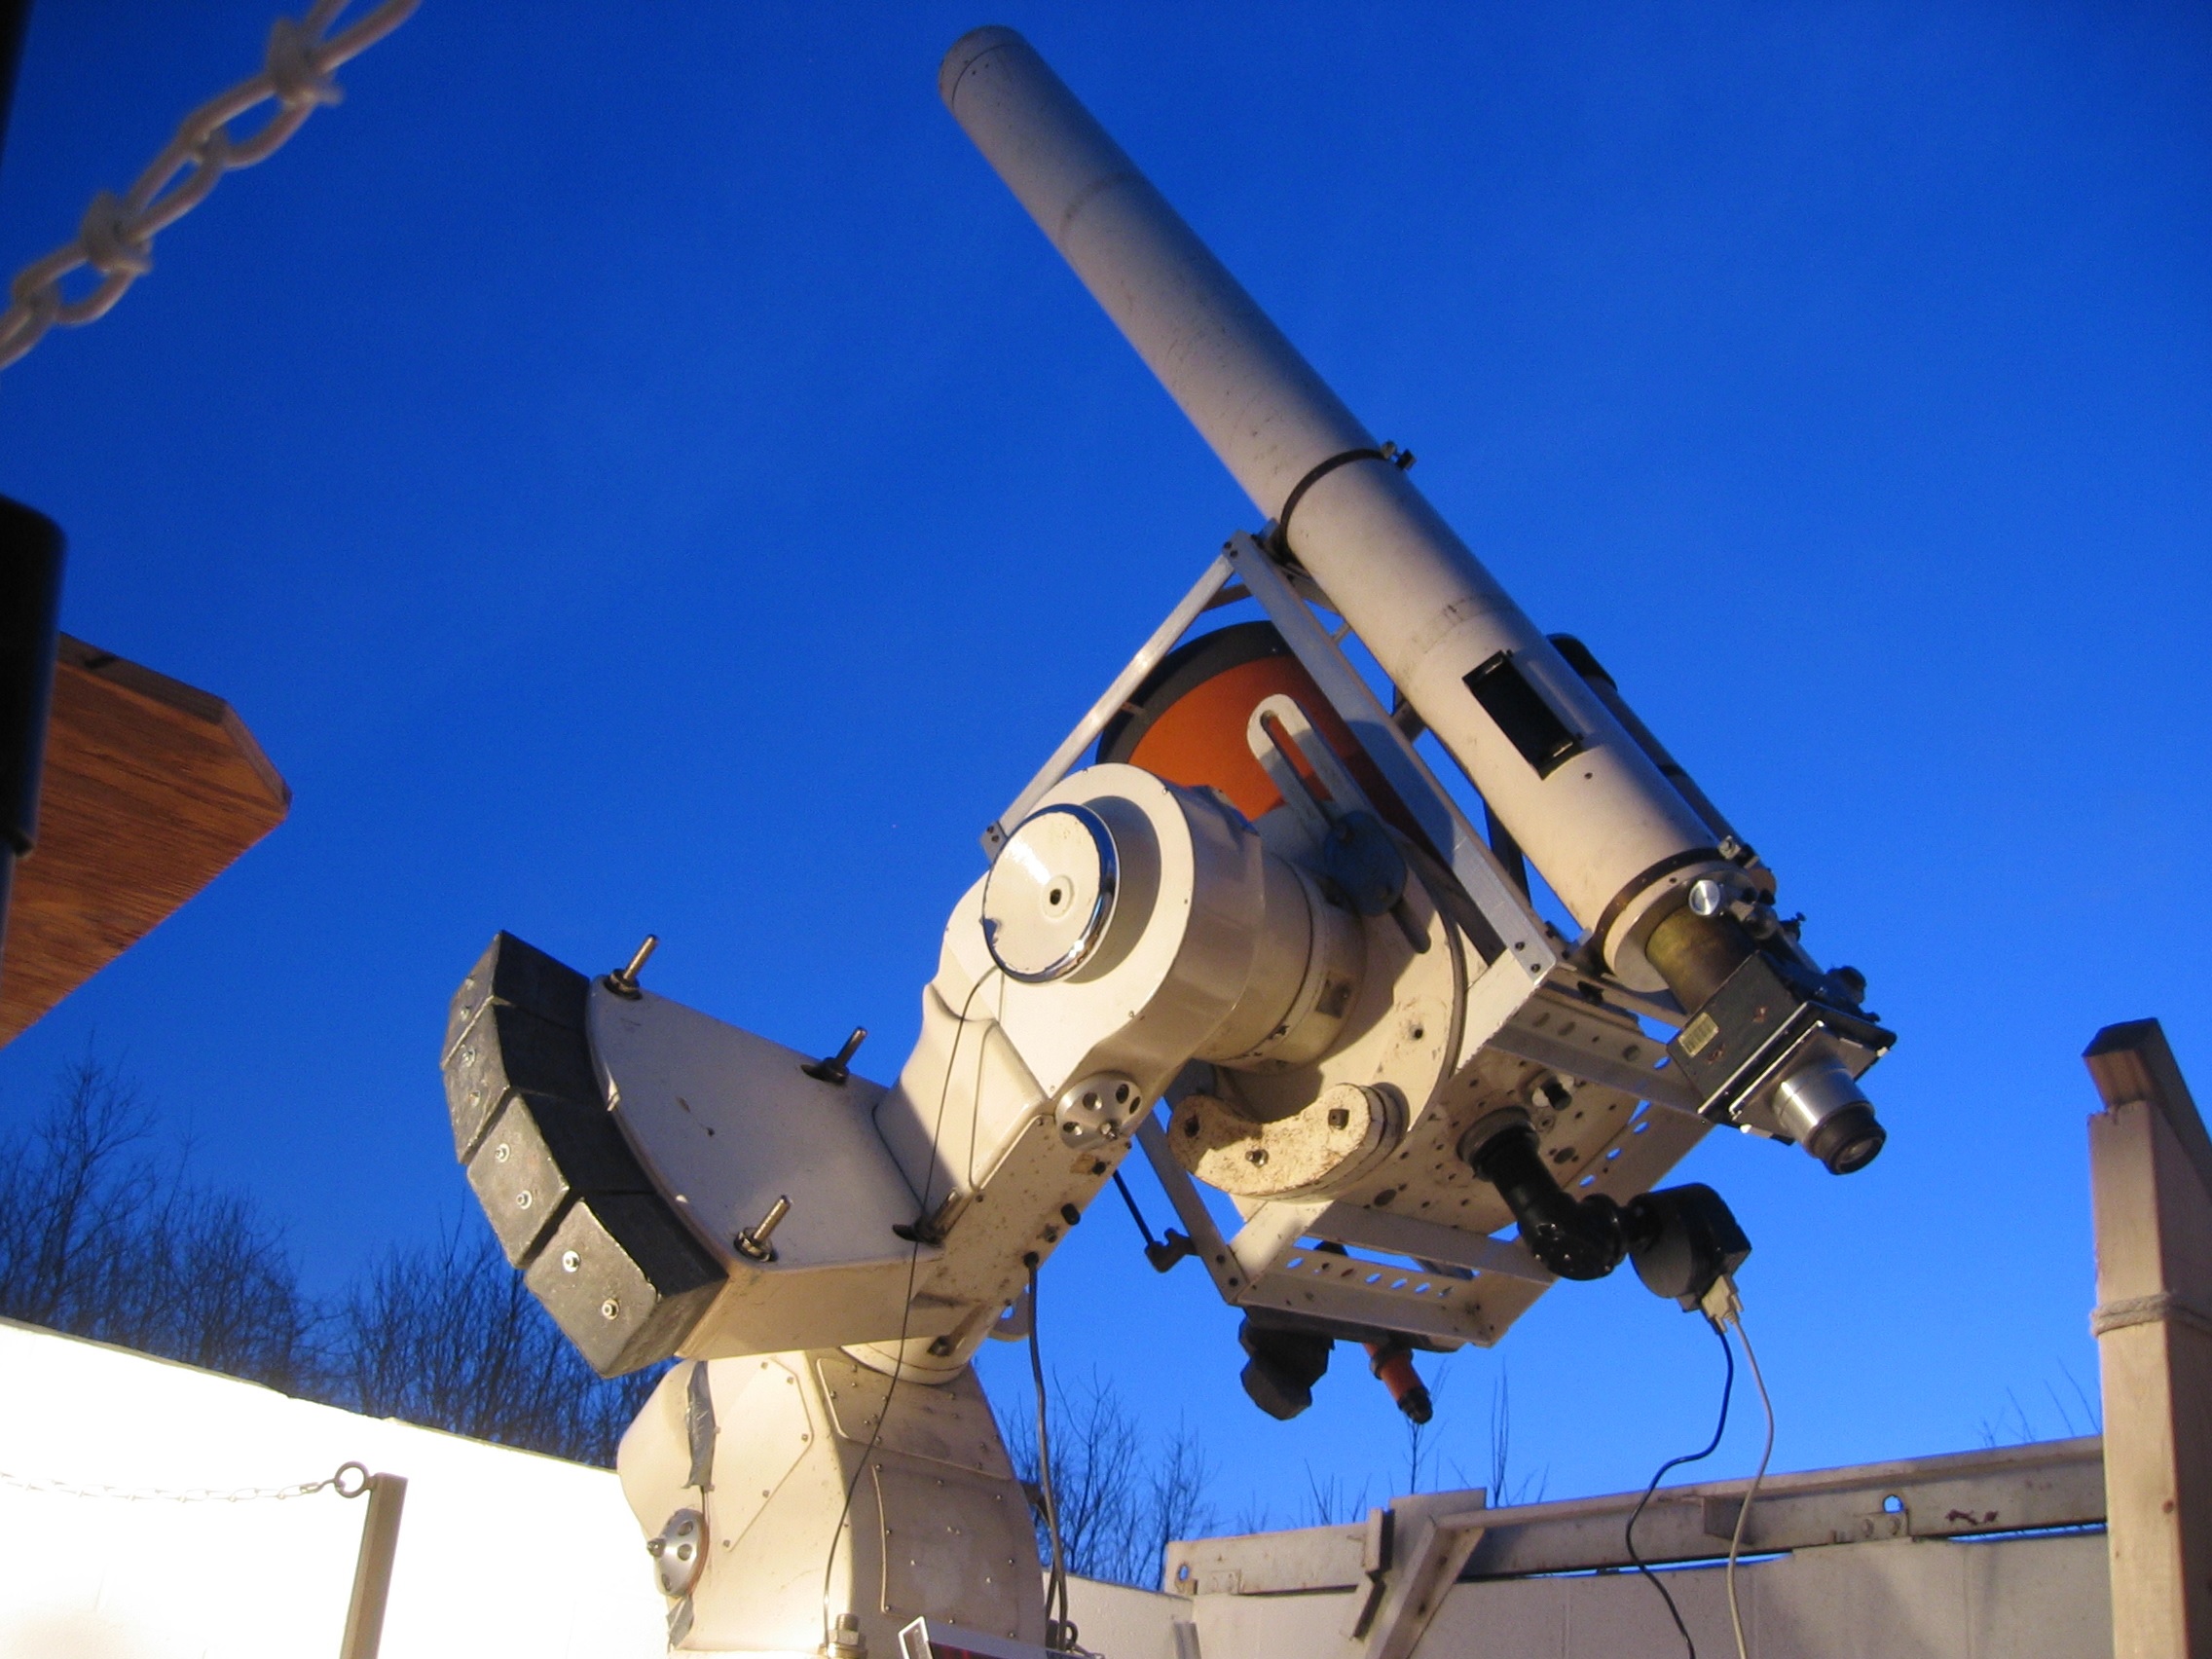
The Hopewell Observatory had available a finely-machined antique, brass-tube 6″ f./14 achromatic refractor.
The mount and drive were apparently made by John Brashear, but we don’t know for sure who made the tube, lens, focuser or optics.
We removed a lot of accumulated green or black grunge on the outside of the tube, but found no identifying markings of any sort anywhere, except for the degrees and such on the setting circles and some very subtle marks on the sides of the lens elements indicating the proper alignment.
The son of the original owner told me that the scope and mount were built a bit over a century ago for the American professional astronomer Carl Kiess. The latter worked mostly on stellar and solar spectra for the National Bureau of Standards, was for many years on the faculty of Georgetown University, and passed away in 1967. A few decades later, his son later donated this scope and mount to National Capital Astronomers (of DC), who were unable to use it. NCA then later sold it to us (Hopewell Observatory), who cleaned and tested it.
The attribution of the mount to Brashear was by Bart Fried of the Antique Telescope Society, who said that quite often Brashear didn’t initial or stamp his products. Looking at known examples of Brashear’s mounts, I think Fried is probably correct. Kiess’s son said he thought that the optics were made by an optician in California, but he didn’t remember any other details. His father got his PhD at UC Berkeley in 1913, and later worked at the Lick Observatory before settling in the DC area. The company that Brashear became doesn’t have any records going back that far.
When we first looked through the scope, we thought the views were terrible, which surprised us. However, as we were cleaning the lens cell, someone noticed subtle pencil marks on the edges of the two lens elements, indicating how they were supposed to be aligned with each other. Once we fixed that, and replaced the 8 or so paper tabs with three blue tape tabs, we found it produced very nice views indeed!
The focuser accepts standard 1.25″ eyepieces, and the focuser slides very smoothly (once we got the nasty, flaky corrosion off as delicately as possible and sprayed the metal with several coats of clear polyurethane). The workmanship is beautiful!
Top: tiller for hand control of right ascension. Middle: counterweight bar (machined by me to screw into the mount) with clamps to hold weights in place. Bottom: detail of 1.25″ rack-and-pinion focuser.
We have not cleaned the mechanical mount, or tried it out, but it does appear to operate: the user turns a miniature boat tiller at the end of a long lever to keep up with the motions of the stars.
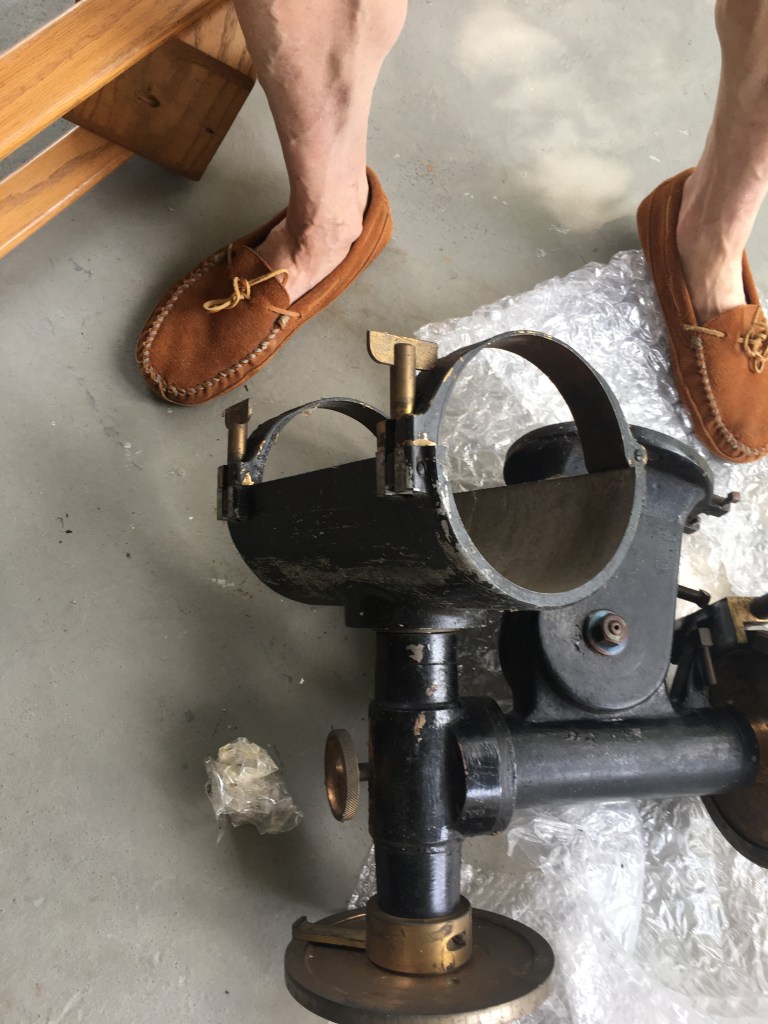
The mount and cradle (with size 12 feet for scale)
The counterweight rod was missing, so I machined a replacement, which has weight holder clamps like you see in gymnasiums. Normal Barbell-type weights with 1 inch holes fit well and can be adjusted with the clamps.
Unfortunately, the whole device is rather heavy, and we already own a nice 6″ f/15 refractor made by Jaegers, as well as some Schmidt-Cassegrain telescopes that also have long focal lengths. Putting this scope on its own pedestal, outside our roll-off roof, with adequate protection from both the elements and from vandals, or figuring out a way to mount it and remove it when needed, are efforts that we don’t see as being wise for us.
Did I mention that it’s heavy? The OTA and the mount together weigh roughly 100 pounds.
However, it’s really a beautiful, historic piece with great optics. Perhaps a collector might be interested in putting this in a dome atop their home or in their office? Or perhaps someone might be interested in trading this towards a nice Ritchey Chretien or Corrected Dal-Kirkham telescope of moderate aperture?
Anybody know what might be a fair price for this?
Guy Brandenburg
President
The Hopewell Observatory
Some more photos of the process and to three previous posts on this telescope.
Partway through cleaning the greenish, peeling, grimy layer and old duct tape residue with a fine wire brush at low speed to reveal the beautiful brass OTA.This shows the universal joint that attaches to the ’tiller’ and drives the RA axisDo you see the secret mark, not aligned with anything?Aluminum lens cover and cell before cleaningLens cell and cover, with adjustment screws highlighted, after cleaningIt works!
I am disassembling the lens cell of the >100 year old 6” f/14 Kiess refractor that produces horrible results on star tests.
There is absolutely no information inscribed anywhere inside the cell, inside the tube or outside it, nor on the edges of the lens elements. I can only guess as to what type of glass they used, and figuring it out won’t be easy. The least destructive method I can think of beginning to do this is by weighing them and calculating out their precise volumes, and from that calculating their densities. A graduate gemologist could probably calculate their indices of refraction, but not me.
Tomorrow I plan to measure the curvatures of the lens elements; perhaps someone familiar with old telescopes will then have clues as to who might have made this particular type of optical prescription.
The shims seem to me to be intact, so I think I can rule out astigmatism from lens elements put in crooked. [OTOH, someone on the Antique Telescopes Facebook group says that the large number of small black spacers in between the lenses may itself be causing the massive astigmatism problem that we found in the star test. I don’t have enough experience to be able to tell whether that’s correct or not.]
The small chips on the edge of the second (meniscus? Flint?) lens element were already there when I got it. I was also surprised to find that the first (biconvex, crown?) lens element has a small bubble very close to the center. It’s probably not significant, but I will check for strain as well.
Gently tapping off the lens cell from the tube
Note that the retaining ring holding the front of the first lens merely slides into the cell; it’s held in place by four screws. The threading is on the inside of the ring, and the outside is smooth
You can see the black tape and tan cardboard spacers
Me looking puzzled
The cardboard spacers around the edges
The two lenses together; note the multiple, small black tape spacers between the pieces of glass
The original chips on the second lens element
The empty lens cell. Note that they didn’t make it black
EDIT: It has now been sold to an ambitious telescope maker in Italy.
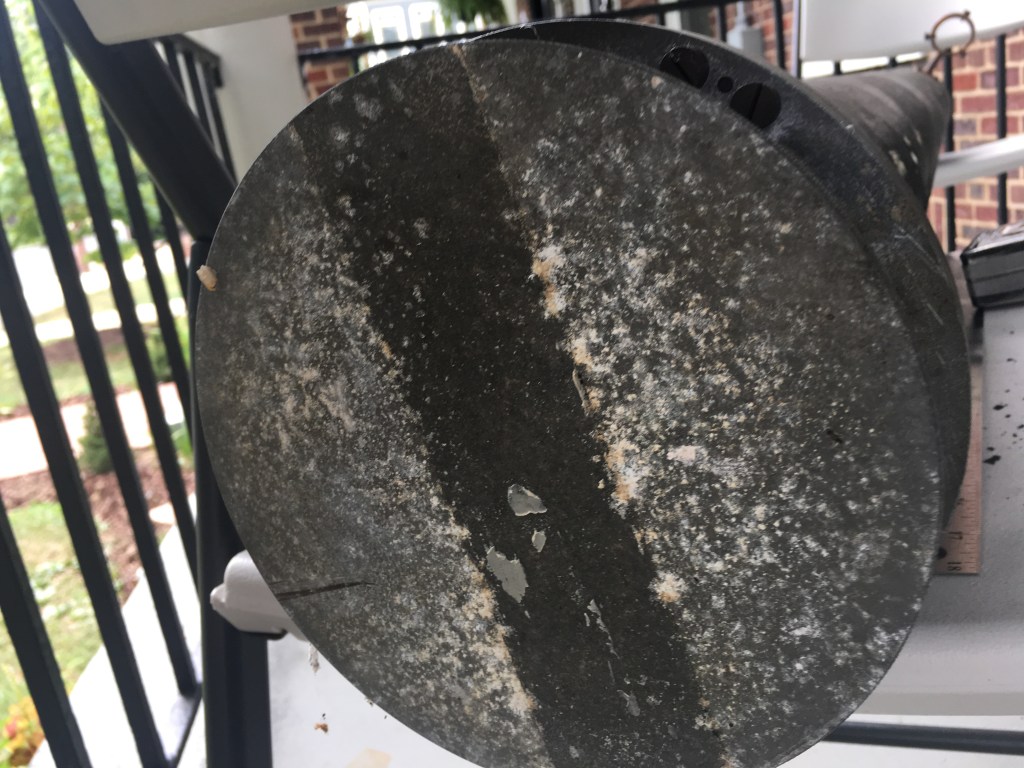
We had a 12-inch Casssegrain optical telescope assembly for sale at an extremely attractive price: just two hundred dollars (or any reasonable offer). You pay for shipping.
The full-thickness primary mirror alone is worth much more than that as a raw piece of unfinished Pyrex! (United Lens charges $450 for an equivalent, 12.5″ diameter, roughly 2″ thick, raw, unfigured, disk of Borofloat!)
The telescope was part of a package (mount-cum-telescope) that was purchased from the Ealing company back in the 1960s by the University of Maryland. The scope itself never gave satisfactory images, so the UMd observatory sold it off in the early 1990s, and it ended up at the Hopewell Observatory about a decade before I became a member. Hopewell kept the mount, which still works quite well, but removed the telescope and replaced it with a 14-inch Celestron Schmidt-Cassegrain.
I recently examined the telescope itself (the one we are selling) and found that it indeed has a hyperbolic primary with a focal length of about 4 feet (so it’s f/4). Presumably, the convex secondary is also a matching hyperboloid, to create a Ritchey-Chretien design, but I don’t feel like perforating a large spherical mirror to create a Hindle sphere to test it properly. In any case, using a 12-inch flat, I was unable to produce decent Ronchi images.
As you may know, figuring and collimating a Richey-Chretien require a LOT of patience, more than I have. My suggestion would be to refigure the primary into a paraboloid, procure a standard flat, elliptical diagonal, and repurpose this as a Newtonian. Refiguring this mirror a task that I don’t feel like taking on, since our observatory already has a 14″ Newtonian, a 14″ SCT, and I already have built a 12.5″ Newtonian of my own. Plus, I am finding that figuring a 16.5″ thin mirror is plenty of work already.
So, our loss could be your gain! Make an offer!
I attach a bunch of photos of the OTA from several viewpoints, including a ronchigram. The mirror has been cleaned off since these picture were made; the little electronic motor was for remote focusing of the secondary.
Last week, I was helping staff and students at the University of Maryland’s Observatory to clean out a storage trailer.
We noticed a seven-foot-long, 6-inch diameter telescope that had been sitting in a corner there, unused, ever since it was donated to the National Capital Astronomers (NCA) club nearly ten years earlier by the son of the original owner, Carl Kiess, who had worked at the Lick Observatory in California and the National Bureau of Standards in or near DC, but who had passed away nearly fifty years earlier. I figured I could put it on a motorized telescope mount at Hopewell Observatory and at a minimum test the optics to see if they were any good. The current officers and trustees of NCA all said they thought this was a good idea.
One thing that caught my eye was how filthy and flaky the coating was on the tube itself, although the lens appeared to be in good shape.
The drive, while impressive, does not have a motor, requires a pier, and is extremely heavy. I decided not to mess with the drive and to put it temporarily on our existing, venerable, sturdy, motorized, electronic drive we have at Hopewell Observatory.
So I experimented with various abrasives and solvents to clean off the nasty green coating; a fine wire wheel inserted in an electric drill did the best job. Here it is partly cleaned off:
I then used Brasso for a final polish, followed by a final cleaning with acetone, and then applied several coats of polyurethane to keep it looking shiny for a number of years. (The lenses stayed covered for all of this!) So this is how it looks now:
The next task is to make a temporary holder and then put it on the mount, and then test the optics.
Some very nice folks from the Australian Broadcasting Corporation came and interviewed me on film for a bit on folks who make their own telescopes to see the great August 2017 eclipse. Here is the link:
We at the Hopewell Observatory have had a classical 12″ Cassegrain optical tube and optics that were manufactured about 50 years ago.; They were originally mounted on an Ealing mount for the University of Maryland, but UMd at some point discarded it, and the whole setup eventually made its way to us (long before my time with the observatory).
The optics were seen by my predecessors as being very disappointing. At one point, a cardboard mask was made to reduce the optics to about a 10″ diameter, but that apparently didn’t help much. The OTA was replaced with an orange-tube Celestron 14″ Schmidt-Cassegrain telescope on the same extremely-beefy Ealing mount, and it all works reasonably well.
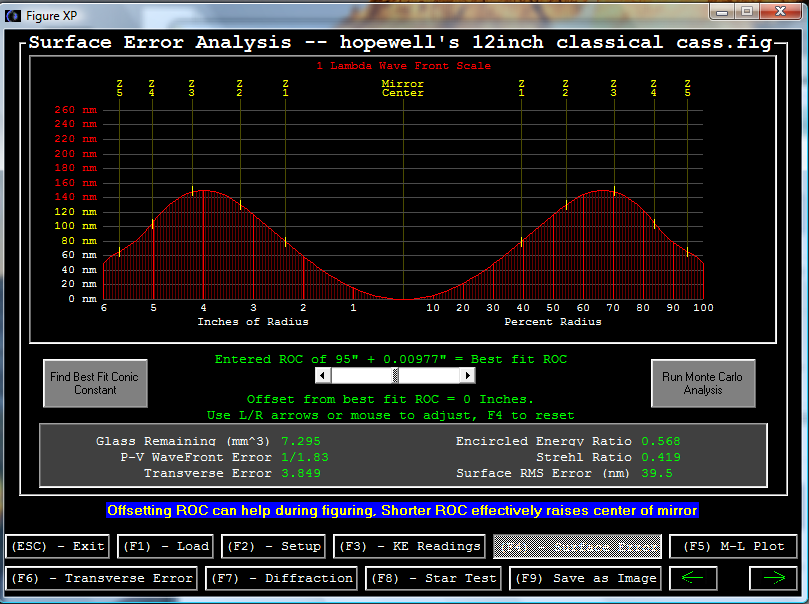
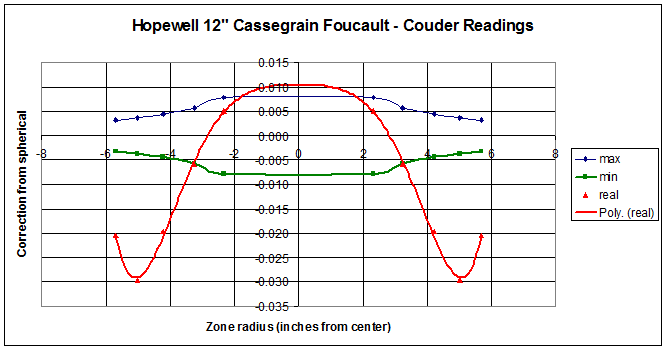
Recently, I was asked to check out the optics on this original classical Cassegrain telescope, which is supposed to have a parabolic primary and a hyperbolic secondary. I did Ronchi testing, Couder-Foucault zonal testing, and double-pass autocollimation testing, and I found that the primary is way over-corrected, veering into hyperbolic territory. In fact, Figure XP claims that the conic section of best fit has a Schwartzschild constant of about -1.1, but if it is supposed to be parabolic, then it has a wavefront error of about 5/9, which is not good at all.
Here are the results of the testing, if you care to look. The first graph was produced by a program called FigureXP from my six sets of readings:
I have not yet tested the secondary or been successful at running a test of the whole telescope with an artificial star. For the indoor star test, it appears that it only comes to a focus maybe a meter or two behind the primary! Unfortunately, the Chevy Chase Community Center where we have our workshop closes up tight by 10 pm on weekdays and the staff starts reminding us of that at about 9:15 pm. Setting up the entire indoor star-testing rig, which involves both red and green lasers bouncing off known optical flat mirrors seven times across a 60-foot-long room in order to get sufficient separation for a valid star test, and moving two very heavy tables into said room, and then putting it all away when we are done, because all sorts of other activities take place in that room. So we ran out of time on Tuesday the 5th.
A couple of people (including Michael Chesnes and Dave Groski) have suggested that this might not be a ‘classical Cassegrain’ – which is a telescope that has a concave, parabolic primary mirror and a convex, hyperbolic secondary. Instead, it might be intended to be a Ritchey-Chretien, which has both mirrors hyperbolic. We have not tried removing the secondary yet, and testing it involves finding a known spherical mirror and cutting a hole in its center, and aligning both mirrors so that the hyperboloid and the sphere have the exact same center. (You may recall that hyperboloids have two focal points, much like ellipses do.)
Here is a diagram and explanation of that test, by Vladimir Sacek at http://www.telescope-optics.net/hindle_sphere_test.htm
FIGURE 56: The Hindle sphere test setup: light source is at the far focus (FF) of the convex surface of the radius of curvature RC and eccentricityε, and Hindle sphere center of curvature coincides with its near focus (NF). Far focus is at a distance A=RC/(1-ε) from convex surface, and the radius of curvature (RS) of the Hindle sphere is a sum of the mirror separation and near focus (NF) distance (absolute values), with the latter given by B=RC/(1+ε). Thus, the mirrorseparation equals RS-B. The only requirement for the sphere radius of curvature RS is to be sufficiently smaller than the sum of near and far focus distance to make the final focus accessible. Needed minimum sphere diameter is larger than the effective test surface diameter by a factor of RS/B. Clearly, Hindle test is limited to surfaces with usable far focus, which eliminates sphere (ε=0, near and far focus coinciding), prolate ellipsoids (1>ε>0, near and far foci on the same, concave side of the surface), paraboloid (ε=1, far focus at infinity) and hyperboloids close enough to a paraboloid to result in an impractically distant far focus.
We discovered that the telescope had a very interesting DC motor – cum – potentiometer assembly to help in moving the secondary mirror in and out, for focusing and such. We know that it’s a 12-volt DC motor, but have not yet had luck tracking down any specifications on that motor from the company that is the legatee of the original manufacturer.
If it’s been a while since you spent time looking up at the heavens with your naked eyes, binoculars and telescopes, looking at planets, stars and galaxies, then this Saturday might be your night.
The Hopewell Observatory is having an open house on Saturday, July 2, 2016, and we have a variety of scopes to look through. Some of the scopes will be under our roll-off roof and some will be rolled out onto the small lawn outside the observatory itself.
Mars, Jupiter and Saturn will be very conveniently placed for viewing right at sundown, and if it’s dry and clear enough, we should be able to see the Milky Way. Many nebulae, open and globular clusters, galaxies, and double or triple stars will be visible as well.
You are invited! And it’s free!
The location is about an hour due west of Washington DC by way of I-66, near the town of Haymarket, VA. For detailed directions, follow this link, which I posted for one of the dates which got canceled because of bad weather. Ignore the date, but do pay attention to the fact that we have no running water! We have bottled water and a composting toilet and hand sanitizer. Plus makings for coffee, tea, and hot chocolate – all gratis.
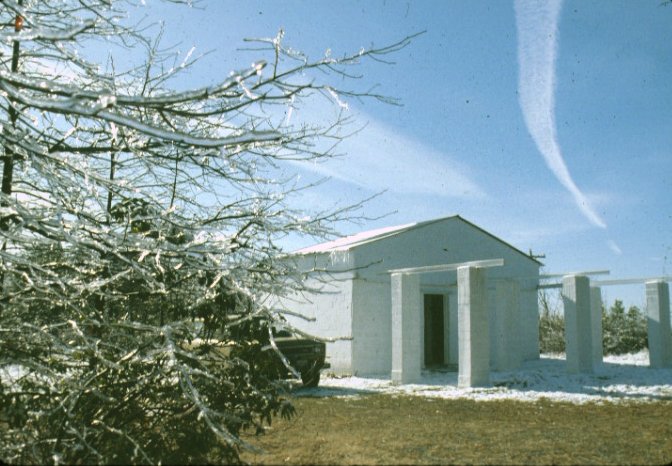
The picture above is of one of our telescope mounts, which carries several telescopes and was set up to take astrophotographs at the time. Below is a picture of the outside of the observatory shortly after a snowstorm.. Notice that there is no dome – instead, the galvanized steel roof rolls back on the rails and columns to the right of the picture when the scopes are in use.
If you have your own telescope, feel free to bring it. If it needs electricity, we have an outdoor 120VAC outlet, but you should bring your own extension cord and plug strip. If you want to stay all night, that will be fine, too! If you feel like bringing a cot or a tarpaulin and a sleeping bag, that’s equally OK by us! Show up at or near sunset, and stay until the sun comes up, if you like!
Warning: the area definitely has insects, such as ticks and chiggers, which appear to avoid everybody else and to do their best to attack me. I strongly recommend long pants, shoes/boots, and socks that you can tuck the pants into. Tuck your shirt into your pants as well, and use bug spray, too. I have personally seen plenty of deer, cicadas, moths, wild turkeys, squirrels, and birds, and I have heard from a neighbor that a bear tried to eat his chickens, but other than the insect pests, the wildlife stays out of your way.
We found these two beautiful moths that flew into the operations cabin at the Hopewell Observatory a couple of nights ago, and we have no idea what type they are. Never seen them before and can’t find any images identical to them. (One species is similar, though.)
Any suggestions will be welcome.
Ain’t they purty li’l things?
And when they opened their wings they were even more spectacular, but I didn’t get a good shot.BTW the yellow-and=red moth is sitting on the struts of a telescope made by Alan Bromborski.