• My series on making a Newtonian telescope
  • How Leon Foucault Made Telescopes

Guy's Math & Astro Blog

Guy's Math & Astro Blog

Tag Archives: Grinding

Some Progress – AT LAST! – With Figuring the 16.5″ f/4.5 Thin Mirror That Headlines This Blog

10 Saturday Nov 2018

Posted by gfbrandenburg in astronomy, Hopewell Observatorry, Optics, Safety, Telescope Making

≈ Leave a comment

Tags

Bob Bolster, George Ritchey, Grinding, Hopewell Observatory, matching Ronchi, Mel Bartels, Polishing, Ronchi, ronchigram, Telescope Making, testing

I have been wrestling with this mirror for YEARS. It’s not been easy at all. The blank is only about twice the diameter of an 8″ mirror, but the project is easily 10 times as hard as doing an 8-incher. (Yes, it’s the one in the photo heading this blog!)

Recently I’ve been trying to figure it using a polishing/grinding machine fabricated by the late Bob Bolster (who modeled his after the machine that George Ritchey invented for the celebrated 60″ mirror at Mount Wilson over a century ago). That’s been a learning exercise, as I had to learn by trial and error what the machine can and cannot do, and what strokes produce what effects. The texts and videos I have seen on figuring such a large mirror with a machine have not really been very helpful, so it’s mostly been trial and error.

My best results right now seem to come from using an 8″ pitch tool on a metal backing, with a 15 pound lead weight, employing long, somewhat-oval strokes approximately tangential to the 50% zone. The edge of the tool goes about 5 cm over the edge of the blank.

This little movie shows the best ronchigrams I have ever produced with this mirror, after nearly 6 hours of near-continuous work and testing. Take a look:

And compare that to how it used to look back in September:


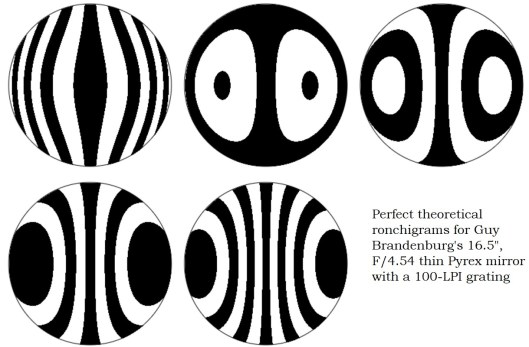
Also compare that to the theoretically perfect computed ronchigrams from Mel Bartels’ website:

perfect theoretical ronchigrams for guy's 42 cm mirror

Part of the reason this mirror has taken so long is that after grinding and polishing by hand some years ago, I finally did a proper check for strain, and discovered that it had some pretty serious strain. I ended up shipping it out to someone in Taos, New Mexico who annealed it – but that changed the figure of the mirror so much that I had to go back to fine grinding (all the way back to 120 or 220 grit, I think), and then re-polishing, all by hand. I tried to do all of that, and figuring of the mirror, at one of the Delmarva Mirror Making Marathons. It was just too much for my back — along with digging drainage ditches at Hopewell Observatory, I ended up in a serious amount of pain and required serious physical therapy (but fortunately, no crutches), so this project went back into storage for a long, long time.

Recently I’ve tried more work by hand and by machine. Unfortunately, when I do work by hand, it seems that almost no matter how carefully I polish, I cause astigmatism (which I am defining as the mirror simply not being a figure of rotation) which I can see at the testing stand as Ronchi lines that are not symmetrical around a horizontal line of reflection. (If a Ronchi grating produces lines that look a bit line the capital letters N, S, o Z, you have astigmatism quite badly. If astigmatism is there, those dreaded curves show up best when your grating is very close to the center of curvature (or center of confusion) of the central zone.

Using this machine means controlling or guessing at a LOT of variables:

  1. length of the first crank;
  2. length (positive or negative) of the second crank;
  3. position of the slide;
  4. diameter of the pitch lap;
  5. composition of the pitch;
  6. shape into which the pitch lap has been carved;
  7. amount of time that the lap was pressed against the lap;
  8. whether that was a hot press or a warm press or a cold press;
  9. amount of weight pushing down on the lap;
  10. type of polishing agent being used;
  11. thickness or dilution of polishing agent;
  12. temperature and humidity of the room;
  13. whether the settings are all kept the same or are allowed to blend into one another (eg by moving the slide);
  14. time spent on any one setup with the previous eleven or more variables;

Here is a sketch of how this works

bolster's ritchey-like machine

Fine and Intermediate Grinding of Your Mirror

15 Monday Dec 2014

Posted by gfbrandenburg in Telescope Making

≈ Leave a comment

Tags

Grinding, Grit, Mirror

3. Grinding (intermediate and fine): Once you have reached your goal for the sagitta, and inspected it, then it’s time to move on to the next smaller grit size and to a more conventional grinding technique. First of all, throw away all of the used newspaper, rinse out the water bucket, wipe off and put away the grit container, and clean off the workbench. Wash or rinse your hands, and make sure that your clothing does not contain the previous grit size. Then get new clean newsprint, clean water, and the next smaller grit size. Again, dampen the newsprint to keep the mirror and tool from sliding around.

 A. You will NOT be using the circular stroke once you are past the hogging-out stage. You will instead be doing a center-over-center stroke, where the mirror or tool that is on top is pushed back and forth in a straight line away and towards your body, such that the top piece of glass will project forwards, and then backwards, by about 1/6 of the diameter of your mirror. You will do this for maybe 8 to 10 times, then rotate both to avoid astigmatism. With 6”, 8”, and 10” mirrors, a decent rule of thumb is to budget an hour of grinding per grit size, or more. Otherwise, the grinding sequence is the same, including the regular rotation process.

 B. Here is one possible sequence of grits for an 8” or 10” mirror, but there are other possibilities. We have lots of different sizes of grits, made by various manufacturers over the past 50 years, and so we use a lot of steps. Other people don’t have as many sizes, and they will use fewer steps, but take longer at each grit size. The 60-400 grit sizes are generally made of silicon carbide (trade name Carborundum, formula SiC, which is also made into jewelry under the chemical name Moissanite or names like “Diamond Aura). Past that, most grits are aluminum oxide. Notice the different methods of measuring the grit – up through 400 grit, the number theoretically means the number of grains that it would take to make one linear inch. The micron sizes are in millionths of a meter, or thousandths of a millimeter. I have collected a number of tables that supposedly show how these sizes are related. Unfortunately, the tables do not agree with each other. We generally prepare slurries with the micron-measured grits; this means that you need to shake up the slurry before applying it to the work, but it also means you have fewer chances to contaminate your work.

 60 grit  (hogging out)

80 grit

120 grit

220 grit

320 grit

400 grit

30 micron

25 micron

17 micron

9 micron

5 micron

3 micron

 C. When you get into the micron sizes, you need to be on guard against the mirror sticking to the tool. If you feel them beginning to ‘catch’ and stick, then immediately separate them and add more slurry. If they do stick together, it’s merely a pain in the tush, not a disaster – we just use bar clamps and pieces of wood to carefully press the tool and mirror past the other. If this happens at home and you don’t have a long bar clamp, you can instead put them both into a clean bucket of warm water with a drop or two of detergent and wait for a while, then push; alternate with a bucket of cool water with some detergent and wait for a while, then push; repeat as necessary until they come apart. Don’t use boiling or near-freezing water because the thermal shock could possibly crack either the tool or the mirror.

 D. Be careful about contamination. It will only take a single grain of 120 grit to make a nasty bunch of scratches in a mirror that you are fine-grinding at 5 microns! Be paranoid! Dust particles can linger anywhere! Wash your hands frequently, don’t re-use paper towels that have dropped on the floor, clean off your work surface after you are done, and use plenty of clean newsprint to cover the workbenches. (However, a few scratches will NOT measurably damage the optical qualities of your telescope. It’s much more important that the overall figure be good.) Also watch out for grit or sawdust or metal chips sticking to your clothes and hair. To help prevent contamination, we have installed a large screened tent canopy. Only work under there for polishing and figuring.

 E. When to move to the next grit? Use your naked eye, and/or an inexpensive illuminated microscope to check for uniformity of wear all over the mirror before proceeding to the next step. With some of those microscopes is possible to use a cell phone to take photos of the texture of the glass. Make sure the texture is the same near the edge of your mirror as it is in the center. If it’s not, keep grinding for a while.

 F. You won’t be able to change the focal length very much once you are past 120 grit, so use your spherometer and a combination of work with tool on top (TOT) and mirror on top (MOT) to get the focal length where you want it to be before you move onto 220 grit. Remember: MOT will make the sagitta deeper, which means a shorter focal length, and TOT does the exact opposite.

(Link forward to the next section ==>)

(<== Link to go back to the previous section)


Subscribe

  • Entries (RSS)
  • Comments (RSS)

Archives

  • November 2022
  • October 2022
  • August 2022
  • July 2022
  • June 2022
  • May 2022
  • April 2022
  • February 2022
  • January 2022
  • December 2021
  • October 2021
  • September 2021
  • August 2021
  • July 2021
  • June 2021
  • May 2021
  • March 2021
  • December 2020
  • October 2020
  • September 2020
  • August 2020
  • March 2020
  • February 2020
  • January 2020
  • December 2019
  • November 2019
  • September 2019
  • August 2019
  • June 2019
  • May 2019
  • January 2019
  • November 2018
  • October 2018
  • September 2018
  • August 2018
  • May 2018
  • March 2018
  • January 2018
  • November 2017
  • October 2017
  • September 2017
  • August 2017
  • July 2017
  • June 2017
  • May 2017
  • April 2017
  • February 2017
  • December 2016
  • September 2016
  • June 2016
  • May 2016
  • April 2016
  • March 2016
  • February 2016
  • January 2016
  • December 2015
  • November 2015
  • August 2015
  • July 2015
  • April 2015
  • March 2015
  • February 2015
  • January 2015
  • December 2014

Categories

  • astronomy
  • astrophysics
  • education
  • flat
  • History
  • Hopewell Observatorry
  • Math
  • monochromatic
  • nature
  • optical flat
  • Optics
  • Safety
  • science
  • teaching
  • Telescope Making
  • Uncategorized

Meta

  • Register
  • Log in

Blog at WordPress.com.

  • Follow Following
    • Guy's Math & Astro Blog
    • Join 48 other followers
    • Already have a WordPress.com account? Log in now.
    • Guy's Math & Astro Blog
    • Customize
    • Follow Following
    • Sign up
    • Log in
    • Report this content
    • View site in Reader
    • Manage subscriptions
    • Collapse this bar
 

Loading Comments...