• My series on making a Newtonian telescope
  • How Leon Foucault Made Telescopes

Guy's Math & Astro Blog

Guy's Math & Astro Blog

Tag Archives: Telescope

Cleaning Up a Century-Old Refractor

18 Sunday Aug 2019

Posted by gfbrandenburg in astronomy, History, Hopewell Observatorry, Optics, Telescope Making

≈ 5 Comments

Tags

antique, Carl Kiess, Hopewell, refractor, Telescope

Last week, I was helping staff and students at the University of Maryland’s Observatory to clean out a storage trailer.

We noticed a seven-foot-long, 6-inch diameter telescope that had been sitting in a corner there, unused, ever since it was donated to the National Capital Astronomers (NCA) club nearly ten years earlier by the son of the original owner, Carl Kiess,  who had worked at the Lick Observatory in California and the National Bureau of Standards in or near DC, but who had passed away nearly fifty years earlier. I figured I could put it on a motorized telescope mount at Hopewell Observatory and at a minimum test the optics to see if they were any good. The current officers and trustees of NCA all said they thought this was a good idea.

One thing that caught my eye was how filthy and flaky the coating was on the tube itself, although the lens appeared to be in good shape.

IMG_5043
IMG_5044

IMG_5027

The drive, while impressive, does not have a motor, requires a pier, and is extremely heavy. I decided not to mess with the drive and to put it temporarily on our existing, venerable, sturdy, motorized, electronic drive we have at Hopewell Observatory.

So I experimented with various abrasives and solvents to clean off the nasty green coating; a fine wire wheel inserted in an electric drill did the best job. Here it is partly cleaned off:

GHCW2253
IMG_5059

I then used Brasso for a final polish, followed by a final cleaning with acetone, and then applied several coats of polyurethane to keep it looking shiny for a number of years. (The lenses stayed covered for all of this!) So this is how it looks now:

IMG_5060
IMG_5061

The next task is to make a temporary holder and then put it on the mount, and then test the optics.

Australian TV Bit on Me and the DC ATM Workshop

27 Monday Nov 2017

Posted by gfbrandenburg in astronomy, astrophysics, nature, Safety, science, Telescope Making

≈ Leave a comment

Tags

2017, ATM, Australia, eclipse, Stephanie March, Telescope

Some very nice folks from the Australian Broadcasting Corporation came and interviewed me on film for a bit on folks who make their own telescopes to see the great August 2017 eclipse. Here is the link:

( https://www.facebook.com/abcnews.au/videos/10157157152414988/ )

Trying to Test a 50-year-old Cassegran Telescope

07 Thursday Sep 2017

Posted by gfbrandenburg in astronomy, flat, Hopewell Observatorry, Math, science, Telescope Making

≈ Leave a comment

Tags

artificial star, celestron, classical cassegrain, couder, double pass autocollimation test, ealing, FigureXP, focus, foucault, hyperbolic, optical tube assembly, parabolic, primary, refurbishing, ritchey-chretien, Ronchi, schmidt-cassegrain, secondary, spherical, Telescope

We at the Hopewell Observatory have had a classical 12″ Cassegrain optical tube and optics that were manufactured about 50 years ago.; They were originally mounted on an Ealing mount for the University of Maryland, but UMd at some point discarded it, and the whole setup eventually made its way to us (long before my time with the observatory).


The optics were seen by my predecessors as being very disappointing. At one point, a cardboard mask was made to reduce the optics to about a 10″ diameter, but that apparently didn’t help much. The OTA was replaced with an orange-tube Celestron 14″ Schmidt-Cassegrain telescope on the same extremely-beefy Ealing mount, and it all works reasonably well.


Recently, I was asked to check out the optics on this original classical Cassegrain telescope, which is supposed to have a parabolic primary and a hyperbolic secondary. I did Ronchi testing, Couder-Foucault zonal testing, and double-pass autocollimation testing, and I found that the primary is way over-corrected, veering into hyperbolic territory. In fact, Figure XP claims that the conic section of best fit has a Schwartzschild constant of about -1.1, but if it is supposed to be parabolic, then it has a wavefront error of about 5/9, which is not good at all.

Here are the results of the testing, if you care to look. The first graph was produced by a program called FigureXP from my six sets of readings:

figure xp on the 12 inch cass

my graph of 12 inch cass readings

I have not yet tested the secondary or been successful at running a test of the whole telescope with an artificial star. For the indoor star test, it appears that it only comes to a focus maybe a meter or two behind the primary! Unfortunately, the Chevy Chase Community Center where we have our workshop closes up tight by 10 pm on weekdays and the staff starts reminding us of that at about 9:15 pm. Setting up the entire indoor star-testing rig, which involves both red and green lasers bouncing off known optical flat mirrors seven times across a 60-foot-long room in order to get sufficient separation for a valid star test, and moving two very heavy tables into said room, and then putting it all away when we are done, because all sorts of other activities take place in that room. So we ran out of time on Tuesday the 5th.

A couple of people (including Michael Chesnes and Dave Groski) have suggested that this might not be a ‘classical Cassegrain’ – which is a telescope that has a concave, parabolic primary mirror and a convex, hyperbolic secondary. Instead, it might be intended to be a Ritchey-Chretien, which has both mirrors hyperbolic. We have not tried removing the secondary yet, and testing it involves finding a known spherical mirror and cutting a hole in its center, and aligning both mirrors so that the hyperboloid and the sphere have the exact same center. (You may recall that hyperboloids have two focal points, much like ellipses do.)

Here is a diagram and explanation of that test, by Vladimir Sacek at http://www.telescope-optics.net/hindle_sphere_test.htm

hindle sphere test

FIGURE 56: The Hindle sphere test setup: light source is at the far focus (FF) of the convex surface of the radius of curvature RC and eccentricity ε, and Hindle sphere center of curvature coincides with its near focus (NF). Far focus is at a distance A=RC/(1-ε) from convex surface, and the radius of curvature (RS) of the Hindle sphere is a sum of the mirror separation and near focus (NF) distance (absolute values), with the latter given by B=RC/(1+ε). Thus, the mirrorseparation equals RS-B. The only requirement for the sphere radius of curvature RS is to be sufficiently smaller than the sum of near and far focus distance to make the final focus accessible. Needed minimum sphere diameter is larger than the effective test surface diameter by a factor of RS/B. Clearly, Hindle test is limited to surfaces with usable far focus, which eliminates sphere (ε=0, near and far focus coinciding), prolate ellipsoids (1>ε>0, near and far foci on the same, concave side of the surface), paraboloid (ε=1, far focus at infinity) and hyperboloids close enough to a paraboloid to result in an impractically distant far focus.

We discovered that the telescope had a very interesting DC motor – cum – potentiometer assembly to help in moving the secondary mirror in and out, for focusing and such. We know that it’s a 12-volt DC motor, but have not yet had luck tracking down any specifications on that motor from the company that is the legatee of the original manufacturer.

Here are some images of that part:

IMG_8207
IMG_8210
IMG_8224

When was the last time you spent a night under the stars?

29 Wednesday Jun 2016

Posted by gfbrandenburg in astronomy, astrophysics, Hopewell Observatorry, Telescope Making

≈ Leave a comment

Tags

astronomy, Hopewell Observatory, open house, Telescope

If it’s been a while since you spent time looking up at the heavens with your naked eyes, binoculars and telescopes, looking at planets, stars and galaxies, then this Saturday might be your night.

The Hopewell Observatory is having an open house on Saturday, July 2, 2016, and we have a variety of scopes to look through. Some of the scopes will be under our roll-off roof and some will be rolled out onto the small lawn outside the observatory itself.

Mars, Jupiter and Saturn will be very conveniently placed for viewing right at sundown, and if it’s dry and clear enough, we should be able to see the Milky Way. Many nebulae, open and globular clusters, galaxies, and double or triple stars will be visible as well.

You are invited!  And it’s free!

The location is about an hour due west of Washington DC by way of I-66, near the town of Haymarket, VA. For detailed directions, follow this link, which I posted for one of the dates which got canceled because of bad weather. Ignore the date, but do pay attention to the fact that we have no running water! We have bottled water and a composting toilet and hand sanitizer. Plus makings for coffee, tea, and hot chocolate – all gratis.

picture of hopewell

The picture above is of one of our telescope mounts, which carries several telescopes and was set up to take astrophotographs at the time. Below is a picture of the outside of the observatory shortly after a snowstorm.. Notice that there is no dome – instead, the galvanized steel roof rolls back on the rails and columns to the right of the picture when the scopes are in use.

showA13

If you have your own telescope, feel free to bring it. If it needs electricity, we have an outdoor 120VAC outlet, but you should bring your own extension cord and plug strip.  If you want to stay all night, that will be fine, too! If you feel like bringing a cot or a tarpaulin and a sleeping bag, that’s equally OK by us! Show up at or near sunset, and stay until the sun comes up, if you like!

Warning: the area definitely has insects, such as ticks and chiggers, which appear to avoid everybody else and to do their best to attack me. I strongly recommend long pants, shoes/boots, and socks that you can tuck the pants into. Tuck your shirt into your pants as well, and use bug spray, too. I have personally seen plenty of deer, cicadas, moths, wild turkeys, squirrels, and birds, and I have heard from a neighbor that a bear tried to eat his chickens, but other than the insect pests, the wildlife stays out of your way.

Again – for detailed directions, look at this link.

Any Moth Experts Out There?

20 Monday Jun 2016

Posted by gfbrandenburg in nature, science

≈ 1 Comment

Tags

Hopewell Observatory, moth, Telescope, virginia

We found these two beautiful moths that flew into the operations cabin at the Hopewell Observatory a couple of nights ago, and we have no idea what type they are. Never seen them before and can’t find any images identical to them. (One species is similar, though.)

Any suggestions will be welcome.

Ain’t they purty li’l things?

IMG_4996
IMG_5001

And when they opened their wings they were even more spectacular, but I didn’t get a good shot.BTW the yellow-and=red moth is sitting on the struts of a telescope made by Alan Bromborski.

One Way to Make a Telescope Spider

05 Saturday Mar 2016

Posted by gfbrandenburg in astronomy, Telescope Making

≈ 4 Comments

Tags

ATM, diagonal, dobsonian, spider, Telescope

All Newtonian telescopes require a secondary mirror — a flat mirror held at roughly a 45-degree angle to reflect the light from the primary out to the side. Generally this secondary mirror is an ellipsoid, in order to waste as little light as possible.

One major problem is figuring out how to hold this secondary mirror in place securely without interfering with the passage of light from your distant target. The secondary mirror can be held on a stalk, or on crossed arms like a spider’s web.

The images below show how Ramona D made a spider using a piece of extruded aluminum tube with a square cross section, several bolts, a spring, a piece of plastic dowel, some pieces of steel strapping tape, a few thumbscrews, and various small nuts and bolts. She did a very neat job, including threading and tapping several small holes in the aluminum tube.

The idea is not original to me: I got the idea from somebody else on line, but unfortunately, I don’t recall the name of the person to whom I should give credit.

Here are some photos that probably do a better job of explaining how to make it than I could explain in many, many paragraphs.

ramonas spider 1.png

ramonas spider 2

ramonas spider 3

ramonas spider 4

A recently-completed telescope

27 Saturday Feb 2016

Posted by gfbrandenburg in astronomy, Telescope Making

≈ Leave a comment

Tags

CCCC, dobsonian, Telescope

Steve S recently finished a telescope with help from the DC-area amateur telescope making (ATM) workshop that I’ve been running at the Chevy Chase Community Center (CCCC) for several years (I took over from the late Jerry Schnall around the turn of the century) with help from several local ATMers and under the auspices of the National Capital Astronomers (NCA).

Steve had made the mirror quite a long time ago (not here in DC). The optics are quite good according to my tests, and if you look at the photos, I think you will agree that the body of the telescope looks excellent as well.

IMG_4177
IMG_4178
IMG_4179

IMG_4184

steve suranovic's scope 5
steve's scope 6

IMG_4183

As you can see, he used more-or-less dimensional wood rather than the more conventional plywood. Or should I say, clear pine that had been glued into boards at the lumber factory. He made the cradle with a bolt that allows one to loosen or tighten the grip on the tube so that one can rotate it or shift it forward or back to take care of any changes in balance.

It may not be obvious, but the wood is in fact coated with varnish.

The rocker box is held onto the azimuth bearing with sturdy wingnuts so that it can be more easily transported. The two circular sections of the azimuth bearing were table tops purchased at Lowe’s (IIRC).


Telescope Making in Cuba?

04 Friday Dec 2015

Posted by gfbrandenburg in Telescope Making

≈ Leave a comment

Tags

ATM, cuba, dobsonian, Grit, Mirror, Optics, Polishing, Telescope

Inspired by a Canadian amateur astronomer who visited the place, I’ve been in recent contact by email with some potential amateur telescope makers in Cuba. 
 .
I proposed bringing the optics for some completed 4″ to 8″ Newtonian telescopes in my luggage (ie parabolized & aluminized mirrors, diagonals, and eyepieces) and then giving them ideas and assistance on making the rest of the scopes. I have a number of already-completed primaries and diagonals at our DC telescope making workshop, but would have to scrounge around for eyepieces. 
 .
(If mechanics in Cuba can keep 1958-model cars running for over 50 years, I bet that they can probably improvise other stuff a la John Dobson, if they have any raw materials at all, which I am not sure about). I am also not sure whether I should bring focusers and spiders, or whether they should make them there themselves…
 .
I understand from the Cubans that there are almost no telescopes in the entire country except for one no-longer-operational telescope at the University of Havana’s observatory, and certainly no Dobsonians. They sound quite interested in the idea, and also were suggesting that I might stay long enough to demonstrate how to grind and polish and figure a mirror.  If I follow up on that idea, it would probably require me bringing in abrasives and pitch in addition to the finished mirrors, which might cause further luggage problems. Explaining finished mirrors carefully wrapped up is one thing, but containers of, say, 15-micron WAO microgrit? They might cut open the bag and test to see if it’s really cocaine…. thus contaminating it…
 .
Both the Canadian and the Cubans said that bringing in materials officially labeled as ‘gifts’ would entail lots of red tape and delays.
.
For me, the payback would be the chance to practice my crappy Spanish in an exotic place that I’ve never visited, and to observe from Tropical skies that suffer relatively low light pollution, as well as doing some good in a country that seems to have a low violent crime rate…. I was planning on flying to Mexico or the Bahamas and then getting a flight to Havana, which seems cheaper than an official direct flight. I suspect that since this would be a scientific exchange, I might even be able to get both governments to sign off and issue an official visa or whatever.
 .
Any thoughts? Anybody ever been there?

On Making an Artificial Star for an Indoor Star Tester

04 Sunday Jan 2015

Posted by gfbrandenburg in History, Telescope Making

≈ 2 Comments

Tags

artificial star, ATM, CCCC, couder, foucault, Hubble, NCA, Ronchi, star testing, Telescope

I help run the amateur telescope-making workshop at the Chevy Chase Community Center in Washington, DC, sponsored and under the auspices of the National Capital Astronomers. Both the NCA and its ATM group have been on-going since the 1930’s, well before I was born. In our ATM group, have the somewhat esoteric thrill of manufacturing incredibly accurate scientific devices (telescopes), from scratch, with not much more than our bare hands and a few tools. And then we go and use them to observe the incredible universe we come from.

Since these telescope mirrors are required to be insanely accurate, we need extremely high-precision ways of testing them. However, we don’t have the tens or hundreds of thousands of dollars needed to purchase something like a professional Zygo Interferometer, so we use much cheaper ways of testing our mirror surfaces.

Some of those methods are associated with the names Foucault, Couder, Bath, Ronchi, Ross, Everest, and Mobsby, or are described with words like “knife-edge”, “double-pass” and “wire”. They all require some relatively simple apparatus and skill and practice in measurement and observation.

We are of the opinion that no one single test should be trusted: it’s easy to make some sort of error. (I’ve made plenty.) You may perhaps recall the disaster that happened when the Hubble Space Telescope mirror passed one test with flying colors, and other tests that weren’t so good were ignored. When the HST finally flew in orbit, it was discovered that the mirror was seriously messed up: the test that was trusted was flawed, so the mirror was also flawed.

We don’t want to do that. So, at a minimum, we do the Ronchi and Foucault/Couder knife-edge tests before we say that a mirror is ready to coat.

But the ultimate test of an entire telescope is the star test.

In principle, all you need for that is a steady star, your telescope, a short-focal-length eyepiece, and a copy of Richard Suiter’s book on star-testing optical telescopes.

Unfortunately, around here, it’s often cloudy at night, and if it’s clear, it might be windy, and around the CCCC building there are lots of lights — all of which make star-testing a scope on the two evenings a week that we are open, virtually impossible. We aren’t open in the daytime, and even if we were, I don’t see any ceramic insulators on any telephone poles that are both small enough and far enough away to use as artificial stars in the manner that Suiter describes. (There are a few radio towers visible, but I doubt that their owners would let us climb up one of them and hang up a Christmas tree ornament near the top!)

So, that means we need to make an artificial star.

I’ve been reading a few websites written by folks who have done just that, and it seems to be a bit easier than I thought. The key is to get a source of light that acts like a star at astronomical distances — but close enough that we can fit it inside the basement of the CCCC, probably not in the woodshop where we make the scopes, but more likely out in the hallway or in the large activity room next door, both of which are about 40 or 50 feet long.

So here are my preliminary calculations.

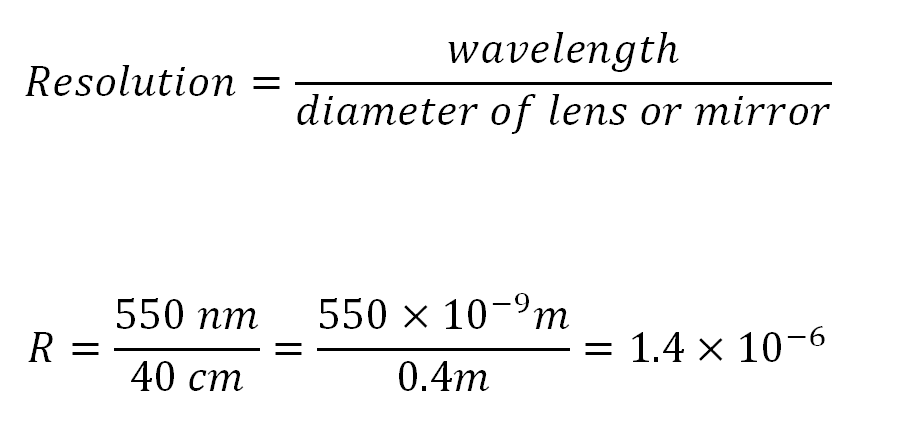
First off, it appears that the resolving power of a telescope equals the wavelength being used, divided by the diameter of the objective lens or mirror, both expressed in the same units. The result is in radians, which you can then turn into degrees, arc-minutes, arc-seconds, or whatever you like, but it’s perhaps easier to leave in radians. In any case, the larger the diameter, the tinier the angle that your telescope can resolve if it’s working properly.

I am going to use a 16-inch mirror diameter, or about 0.4 meters, as an example, and I will use green light at about 560 nanometers (560 x 10^-9 m) because that’s pretty close to the green mercury line we have in our monochromatic light box. I then get that the resolution is 1.4×10^-6 radians.

resolution of lens or mirror

(We can convert that into arc-seconds by multiply that by 180 degrees per PI radians  and by 60 arc-minutes per degree  and by 60 arc-seconds per arc-minute; we then get about 0.289 arc-seconds. If we were to use an 8-inch mirror, the resolution would be half as good, meaning the object would need to be twice as big to be resolved, or about 0.578 arc-seconds.)

resolution in arc seconds

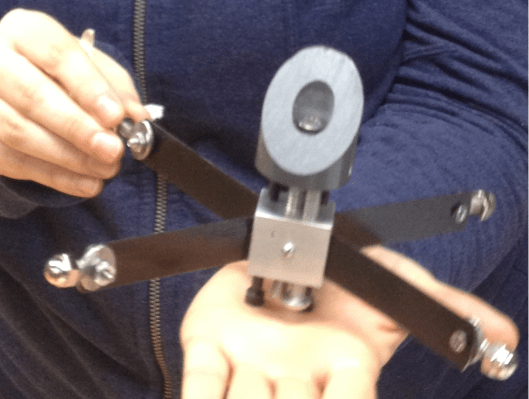
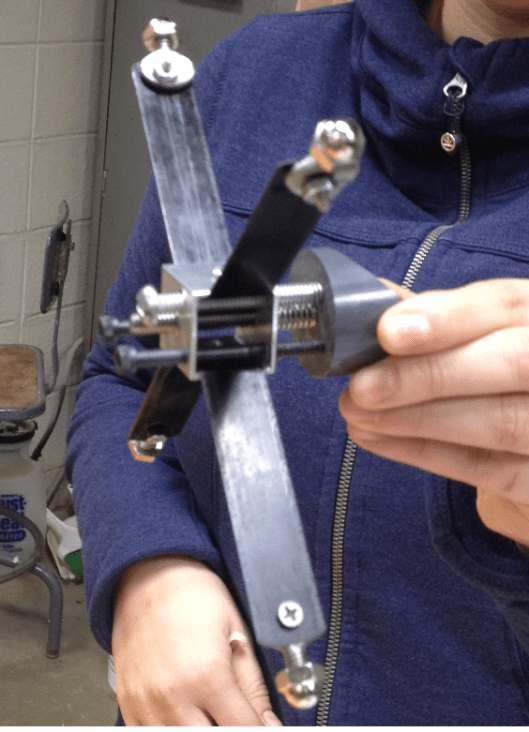
I read that one can make an artificial star by using an ordinary eyepiece and a small illuminated hole that is put some distance away from the eyepiece. The entire setup is aimed at the telescope, and then you have an artificial star. Here is the general idea:

artificial star setup

Supposedly, the equations go as follows, with all of the dimensions in the same units. I think I will use millimeters.

Star Size of artificial rigWe want to make it so that the size of the artificial star will be small enough to be below the limit of resolution of any telescope we are making. I am pretty sure that we can set things up so that there is 40 feet (13 meters) between our telescope rig and the table or tripod on which we sill set up this artificial star.

I also know that I can find an eyepiece with a focal length of 12 mm that I’m willing to use for this purpose, and I also purchased some tiny little holes from “Hubble Optics” that are of the following sizes: 50, 100, 150, 200, and 250 microns, or millionths of a meter. Those holes are TINY!!! So that takes care of H and F. I still need to figure out what SS should be.

A few lines ago, I found that for a 16-inch telescope, I need a resolution of about 1.4×10^-6 radians. The nice thing about radians is that if you want to find the length of the arc at a certain radius, you don’t need to do any conversions at all: the length of the arc is simply the angle (expressed in radians) times the length of the radius, as shown here:

angle arc radius

c=theta times Radius

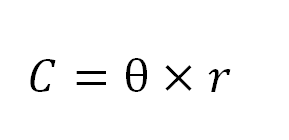
So if our artificial star is going to be 13 meters away, and we know that the largest angle allowed is roughly 1.4×10^-6 radians, I just multiply and I get 1.82×10^-5 meters, or 1.82 x 10^-2 millimeters, or 18.2 microns.

Which means that I already have holes that are NOT small enough: the 150-micron holes are about 10 times too big at a distance of 13 meters, so my premature rejoicing of a few minutes ago, was, in fact, wrong.  So, when I make the artificial star gizmo, I’ll need to figure out how to make the ‘star size’ to be roughly one-tenth the size of the holes in the Hubble Optics micro-hole flashlight.

Or, if I rearrange the equation with the L, H, F and SS, I get that L = H * F / SS. The only unknown is L, the distance between the hole and the eyepiece/lens. For H, I have several choices (50, 100, 150, 200 and 250 microns), SS is now known to be 18 microns or so (36 if I want to test an 8-incher), and I plan on using a 12.5 mm eyepiece. If I plug in the 150 micron hole, then I get that L needs to be about 104 millimeters, or only about 4 inches. Note that the longer L is, the smaller the artificial star becomes. Also, if I replace the 12.5 mm eyepiece with a shorter one, then the artificial star will become smaller; similarly, the smaller the Hubble Optics hole, the smaller the artificial star. This all sounds quite doable indeed.

Major Steps in Making A Telescope (Guy’s Version; there are many others!)

15 Monday Dec 2014

Posted by gfbrandenburg in Telescope Making

≈ Leave a comment

Tags

Planning, Telescope

ESSENTIAL STEPS FOR MAKING YOUR OWN TELESCOPE

By Guy Brandenburg

[Guy is the main telescope-making instructor at the amateur telescope-making (ATM) workshop sponsored by the National Capital Astronomers (NCA). This workshop is currently housed in the basement the Chevy Chase Community Center (CCCC) at 5601 Connecticut Avenue, NW, WDC 20015.

[This guide is based on what Guy has gleaned by reading a variety of books on telescope making, as well as instruction by Jerry Schnall (his predecessor in this workshop), watching demonstrations at Stellafane, his own participation in two Delmarva Mirror-Making Marathons, visits from other ATMers to our workshop (including by John Dobson), a tour of a commercial optical factory near Bel-Air MD, a couple of weeks in residence at Mount Wilson (CA) and a few visits to the Chabot telescope-making workshop in Oakland, CA. He has tried to steal good ideas from all of them, incorporating what he has taught for years in his math classes in DC public schools. He tries not to insert too many bad ideas of his own.

[Our current Telescope Making, Modification and Maintenance Workshop (TMMW) meets on Tuesdays and Fridays except for snow and holidays, from 6:00 to about 8:30 pm. You can contact Guy at gfbrandenburg@gmail.com. Since we have dangerous power and hand tools in our workshop, all visitors must sign a release-of-liability form upon arrival and must also register with the DC Department of Parks and Recreation, 

[Guy is also the current president of NCA, which was founded in 1937 in DC by a group of professional and amateur astronomers. Famous astronomers Vera Rubin and Nancy Grace Roman were members. Records show that NCA has continuously sponsored this telescope making workshop, in various locations around DC and suburbs, since World War 2.]

{It is certainly true that you can purchase used telescopes for a fraction of their original price — but what if the telescope you bought doesn’t actually work? You would need to learn to fix it yourself, because repair bills can be quite high, negating any cost savings. If the scope involves electronics that won’t work, the older the device, the less likely that it can be repaired or that anybody actually stocks replacement parts. All hope is not lost! You can replace a fried and non-replaceable commercial electronic drive with stepper motors and an Arduino using a free system called OnStep. However, be prepared to learn a lot about gear ratios, voltages, soldering, and IC boards. Kind of fun, but time-consuming! If you are local, we can help, at our workshop, for free.}

But, if you still want to make a telescope, then …

  1. Plan your project by looking at various home-made and commercial telescopes, either in person or in books or magazines or on-line. Star parties put on by local clubs often will have some home-made telescopes on the field, and their owners/makers will be delighted to tell you what worked well and what they would wish to modify one day. Decide what size and focal length you can afford to make and can actually manage to carry around in your car or your hands, or install somewhere permanently. A Newtonian reflector is by far the easiest type of telescope design to make yourself. If you keep at it and don’t drop the mirror on a hard floor, you are pretty much guaranteed success and a well-performing telescope. All of the other designs (refractors, cassegrains, catadioptrics, etc.) are much, much harder to make and can fail for reasons that are very hard to figure out. Larger-diameter scopes are more expensive, heavier, and take more time to make, but you can see more detail and dimmer objects, too.
    1. Costs: If you are thrifty and crafty, you can definitely make a telescope of a given size for less money than one you purchase, but if you insist on the finest and most expensive components (exotic wood, for example), you can end up spending much more. Fifty years ago, the only way that the average person could afford to own a telescope was if they made it themselves; commercial 6-inch scopes sold in the 1950s for prices that are equivalent to about $2,000 in today’s money. Today, a six-inch commercial telescope and mount costs much less than that, and the prices of Pyrex-equivalent mirror blanks have recently tripled. A recent study in Sky & Telescope found that the biggest potential savings are for large telescopes, but a lot depends on one’s ability to scrounge and find inexpensive, but good-quality, components.

 B. Time: It’s not possible to say exactly how long any project will take. However, I always find that everything that I make, takes longer than I originally estimate, which is known as Hofstadter’s Law. When I made my first telescope, a 6” f/8, I kept notes on how much time I spent on grinding, polishing and figuring, and later added that all up: 30 hours. My second telescope, an 8” f/6, took me 40 hours. But keep in mind, those totals only count the time I spent actually pushing glass, not the time planning things, thinking about things, discussing the project, taking Ronchi and Foucault measurements, setting up the work, and cleaning up after a grit. They also did not include any of the time I spent on making the tubes and mounts or aluminizing the mirrors or learning how to use the telescopes in the first place. Obviously, you might take less time than me, or longer.

C. Longer focal length for a given diameter means sharper images of stars and planets, and usually an easier job of grinding and figuring, and they work well with less-expensive eyepieces, and the scope will work even if not perfectly collimated (aligned internally), and you won’t have problems with coma. However, it also means dimmer images with narrower fields of view, and objects will remain visible for shorter lengths of time, requiring constant adjustment; also the scope will be longer, heavier, and harder to maneuver. A focal ratio of 6 is considered by many ATMers to be an intermediate one.

 D. A shorter focal length for a given diameter means brighter images, a wider field of view, and a shorter, lighter telescope that is easy to carry around. However, the figuring process will be more difficult, collimation will be more critical, and coma will be a problem at the edges of your field of view. You may need to use additional tests to verify that your mirror is in fact well-figured.

 E. The difficulty, cost, weight, and amount of time needed to make a scope is roughly proportional to the cube of the diameter, which means that a scope with a 12-inch diameter mirror will be about 8 times harder, heavier, and more expensive than a 6 inch diameter telescope. On the other hand, its light-gathering power is proportional to the square of the diameter, so the 12-inch mirror will gather four times the amount of light than a 6-inch mirror, which in practice means that you will see stars and other objects a magnitude or two fainter with the larger scopes.

 F. As you can see, in astronomy, there are trade-offs. There is no car, no boat, no garment, no athlete, and no telescope that is BEST for ALL purposes. For example, a scope that is really good at providing a wide-field image of the Pleiades won’t do well at imaging the bands and festoons on Jupiter. Just setting up a huge scope 20” or more in diameter is a major undertaking and probably requires a step-ladder, whereas a 6” Dob can be set up and ready to go in about a minute by a sixth-grader. A large Dob is going to do its best work at a dark-sky location like the Rockies or parts of West Virginia. A computerized go-to scope, which you are probably not going to be able to build yourself unless you have some amazing skills in machining, computer programming, and electrical engineering, can work anywhere. Your goal should be to build a telescope that will be used!

 G. Rather important: a home-made Dobsonian-mounted Newtonian reflector is not really suitable for astrophotography. For that, you will need a very expensive equatorial mount as well as a digital camera of some sort (DSLR or CCD or dedicated web-cam) and, usually, a computer and a power supply. A “Dob” is GREAT for optical viewing with your eyes, and you don’t have to spend the entire night doing polar alignment, taking flats and darks and multiple guided exposures of the same object for hours on end with an expensive DSLR or CCD camera or dedicated web-cam; nor do you have to spend hours and hours learning how to digitally process all those digital images. Instead, you LOOK with your eyes, and you can look at dozens of different objects in a night, without fussing with electronic gadgets…

 H. You will need to decide on the materials for your mirror: plate glass (relatively cheap but usually no more than ¾” thick), Pyrex or its generic equivalents, or a relatively exotic material such as ‘fused silica’ (i.e. quartz) or a really exotic material like Zerodur, Cer-Vit, or BVC. For several decades, ATMers used full-thickness Pyrex mirror blanks produced in massive amounts by Corning Glass. They were relatively inexpensive, durable, and had low thermal coefficients of expansion. Unfortunately, Corning has stopped making Pyrex, and the generic replacements known as Borofloat and other trade names are now made overseas in considerably smaller batches, so the price for a full-thickness borosilicate crown glass equivalent to Pyrex has tripled or quadrupled. It turns out that modern float glass (also called plate glass) works quite well for making telescopes, unlike the wavy window-pane glass of 80 years ago. The term “float” means that the glass is made in a continuous process and is annealed and manufactured to be extremely flat and homogeneous by, yes, floating it on a bed of pure molten tin. You do have to be more careful about preventing astigmatism, and must cool the glass down to ambient room temperature in a bath of cool water whose temperature you have measured, but many excellent mirrors have been made using ¾”-thick plate glass cut into disks by the water-jet method at a local glass fabricator.

 I. Instead of making your own mirror, you could buy a used or new one that someone else made. There are generally several used primary mirrors for sale at any given time, of various sizes and prices, at websites like eBay, Cloudy Nights Classified,  or Astromart. Astromart has the widest selection, but you have to pay a fee (about $10-$20 per year) to post or respond to ads. Cloudy Nights has a lot of forums where people express their opinions on subjects astronomical, and many of them are probably correct. (Definitely worth reading in any case!) Some of the scopes you can find are real bargains, but you don’t know what the quality is unless you or someone you trust tests it. Here at the NCA ATM workshop, we generally have some mirrors of various sizes that were either made by one of us, or which were donated to us, or which we bought through one of those online sources.

 J. Record-keeping: you will be engaging in a scientific project, so you will need to do what scientists do: keep records of what you do. Write down what grit size you are on, what sort of stroke you are using, how long you spent on the various steps, and how you overcame the various problems that arose. If possible, take photographs of your work (especially of the ronchigrams during the figuring process). Also make plenty of diagrams and sketches and calculations, and label them, too! Your notes will let you know what works and what doesn’t, and will save you a tremendous amount of time. At the CCCC, we have a file cabinet and hanging file folders in which you can keep your notes.

 K. If you have decided to make your own mirror for your own telescope, then there are four major steps: Rough grinding or “hogging out”; medium and fine grinding; polishing; and figuring. The hardest part is the figuring, but fortunately by the time you get there, you will have learned a lot about how to treat the glass. Let’s examine all four steps, in my next post. ==>

Newer posts →

Subscribe

  • Entries (RSS)
  • Comments (RSS)

Archives

  • December 2025
  • November 2025
  • October 2025
  • September 2025
  • July 2025
  • January 2025
  • November 2024
  • October 2024
  • August 2024
  • July 2024
  • May 2024
  • April 2024
  • January 2024
  • December 2023
  • October 2023
  • August 2023
  • June 2023
  • May 2023
  • April 2023
  • November 2022
  • October 2022
  • August 2022
  • July 2022
  • June 2022
  • May 2022
  • April 2022
  • February 2022
  • January 2022
  • December 2021
  • October 2021
  • September 2021
  • August 2021
  • July 2021
  • June 2021
  • May 2021
  • March 2021
  • December 2020
  • October 2020
  • September 2020
  • August 2020
  • March 2020
  • February 2020
  • January 2020
  • December 2019
  • November 2019
  • September 2019
  • August 2019
  • June 2019
  • May 2019
  • January 2019
  • November 2018
  • October 2018
  • September 2018
  • August 2018
  • May 2018
  • March 2018
  • January 2018
  • November 2017
  • October 2017
  • September 2017
  • August 2017
  • July 2017
  • June 2017
  • May 2017
  • April 2017
  • February 2017
  • December 2016
  • September 2016
  • June 2016
  • May 2016
  • April 2016
  • March 2016
  • February 2016
  • January 2016
  • December 2015
  • November 2015
  • August 2015
  • July 2015
  • April 2015
  • March 2015
  • February 2015
  • January 2015
  • December 2014

Categories

  • astronomy
  • astrophysics
  • education
  • flat
  • History
  • Hopewell Observatorry
  • Math
  • monochromatic
  • nature
  • optical flat
  • Optics
  • Safety
  • science
  • teaching
  • Telescope Making
  • Uncategorized

Meta

  • Create account
  • Log in

Blog at WordPress.com.

  • Subscribe Subscribed
    • Guy's Math & Astro Blog
    • Join 53 other subscribers
    • Already have a WordPress.com account? Log in now.
    • Guy's Math & Astro Blog
    • Subscribe Subscribed
    • Sign up
    • Log in
    • Report this content
    • View site in Reader
    • Manage subscriptions
    • Collapse this bar
 

Loading Comments...