• My series on making a Newtonian telescope
  • How Leon Foucault Made Telescopes

Guy's Math & Astro Blog

Guy's Math & Astro Blog

Tag Archives: Hopewell Observatory

It’s Not Rust! It’s Just Grease!

19 Sunday Dec 2021

Posted by gfbrandenburg in astronomy, Hopewell Observatorry, Optics, Telescope Making, Uncategorized

≈ Leave a comment

Tags

Byers, Ealiing, Hopewell Observatory, OnStep

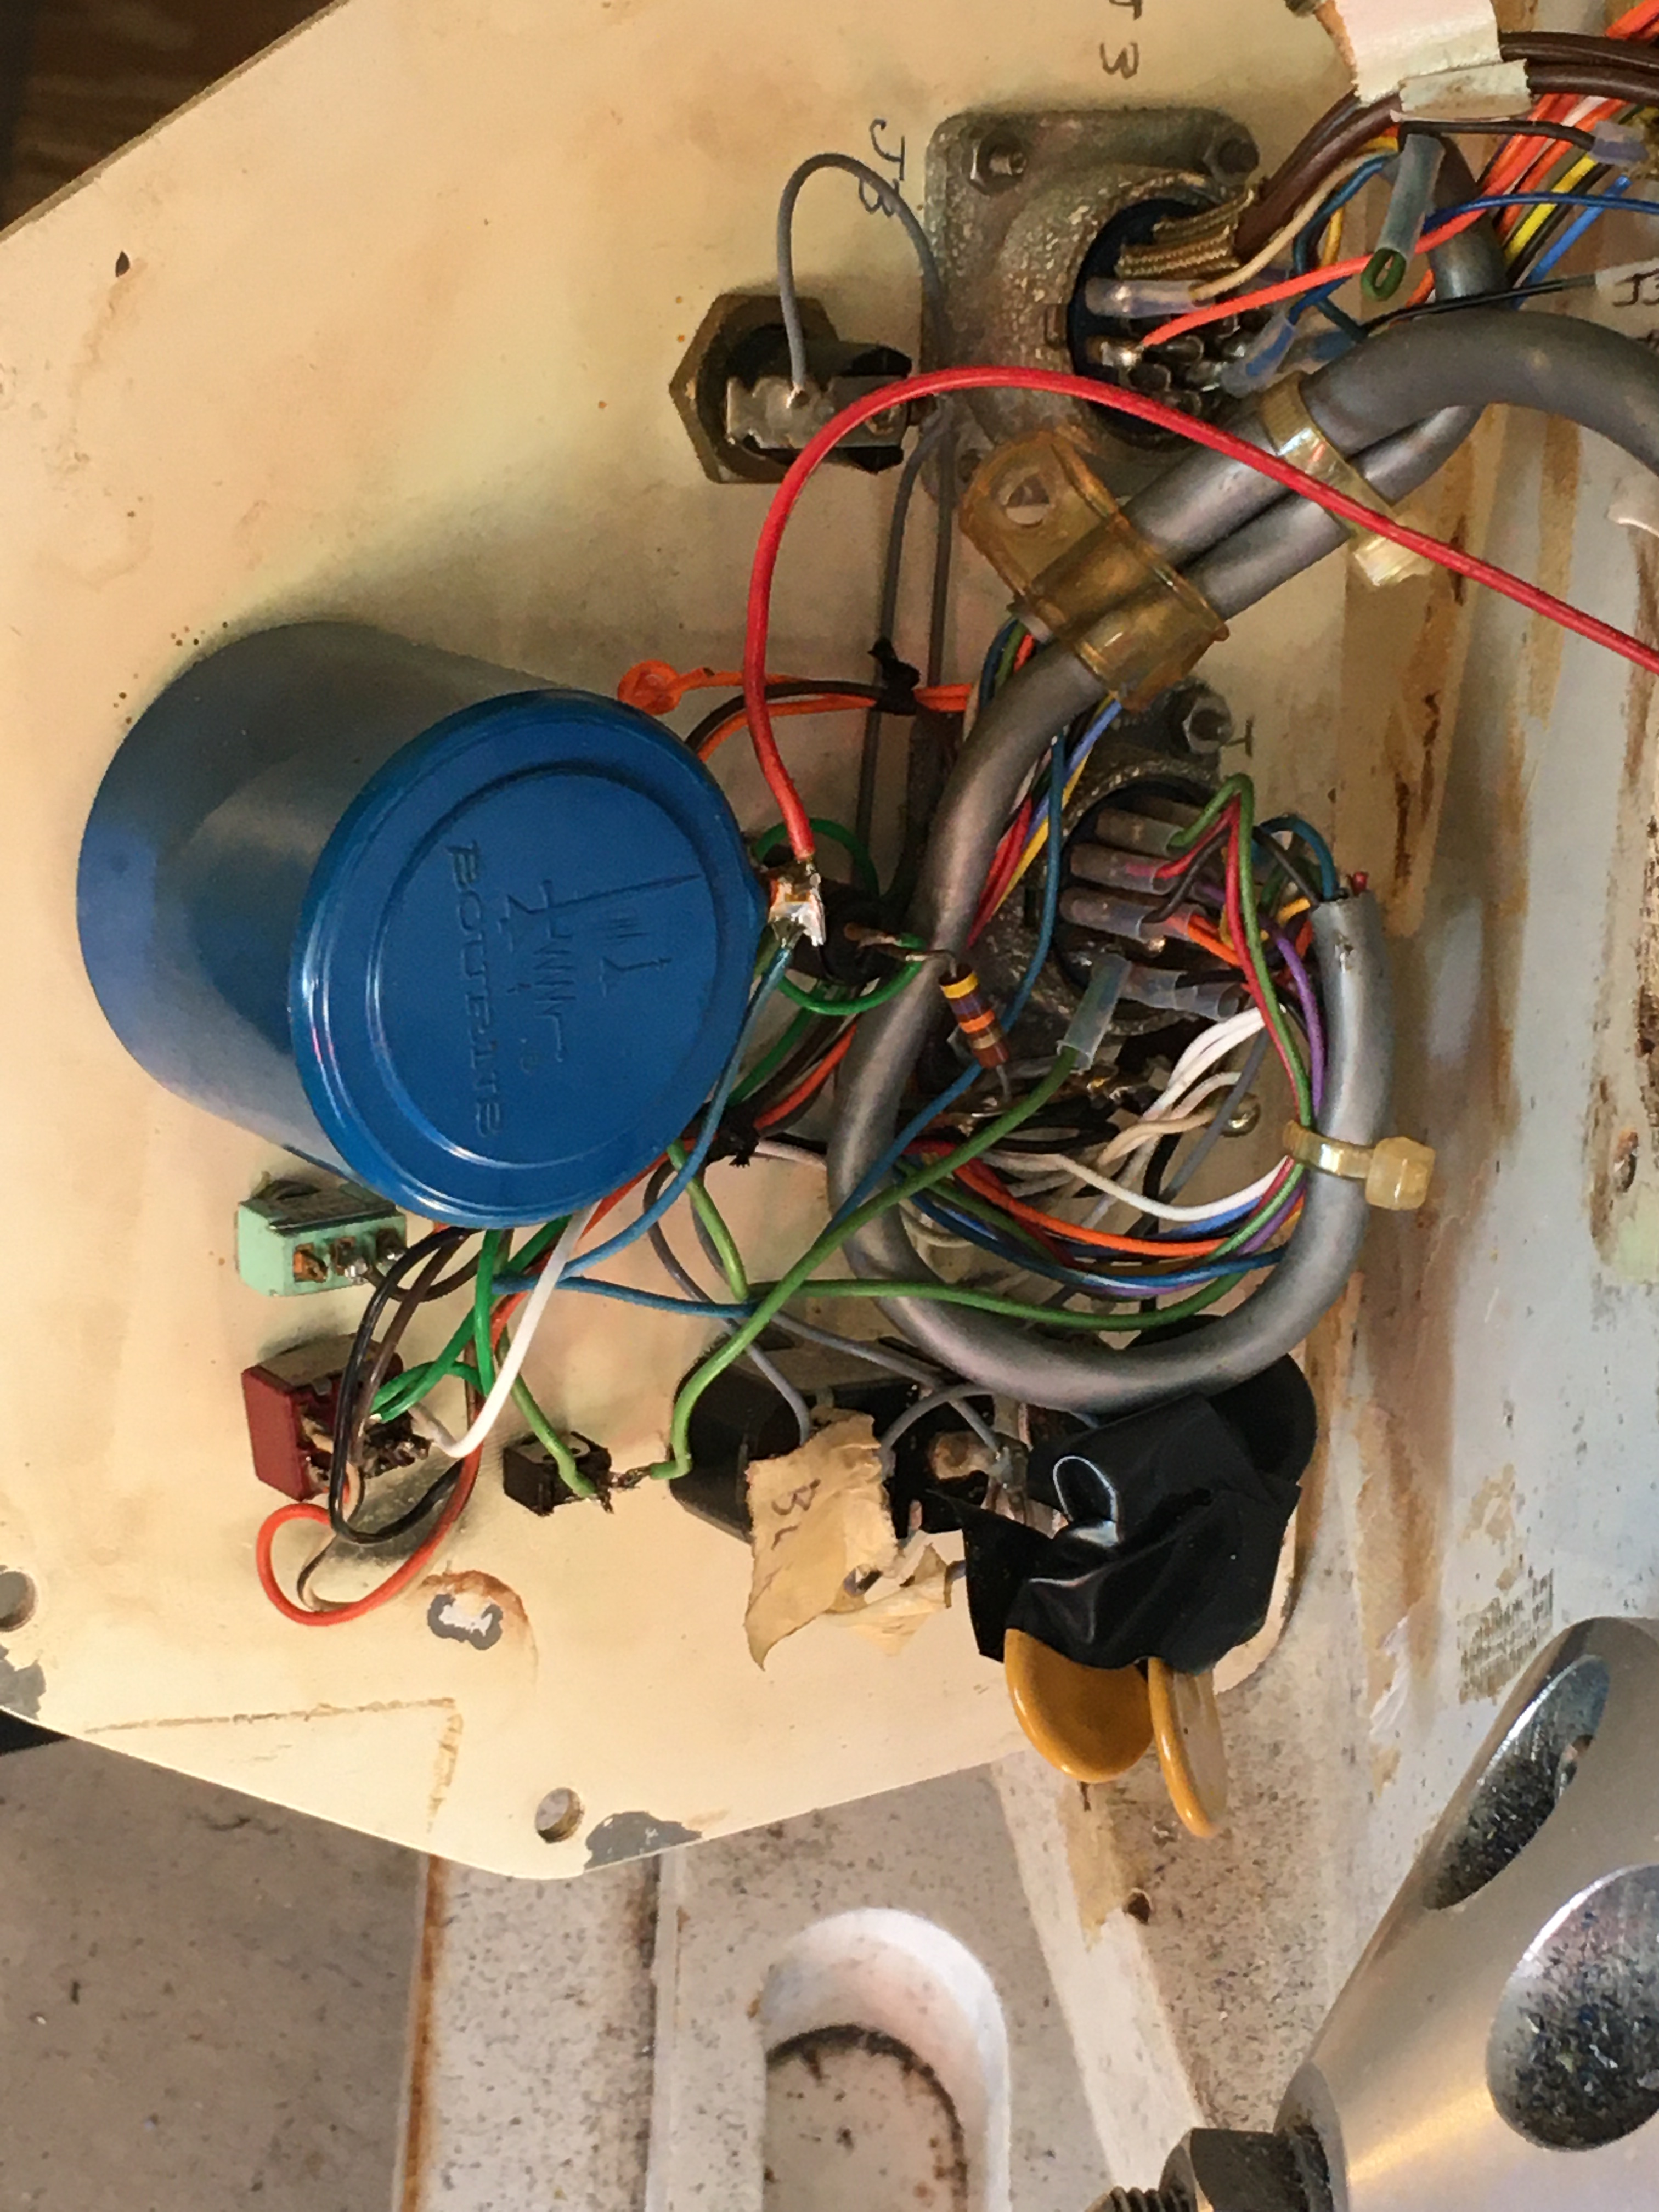
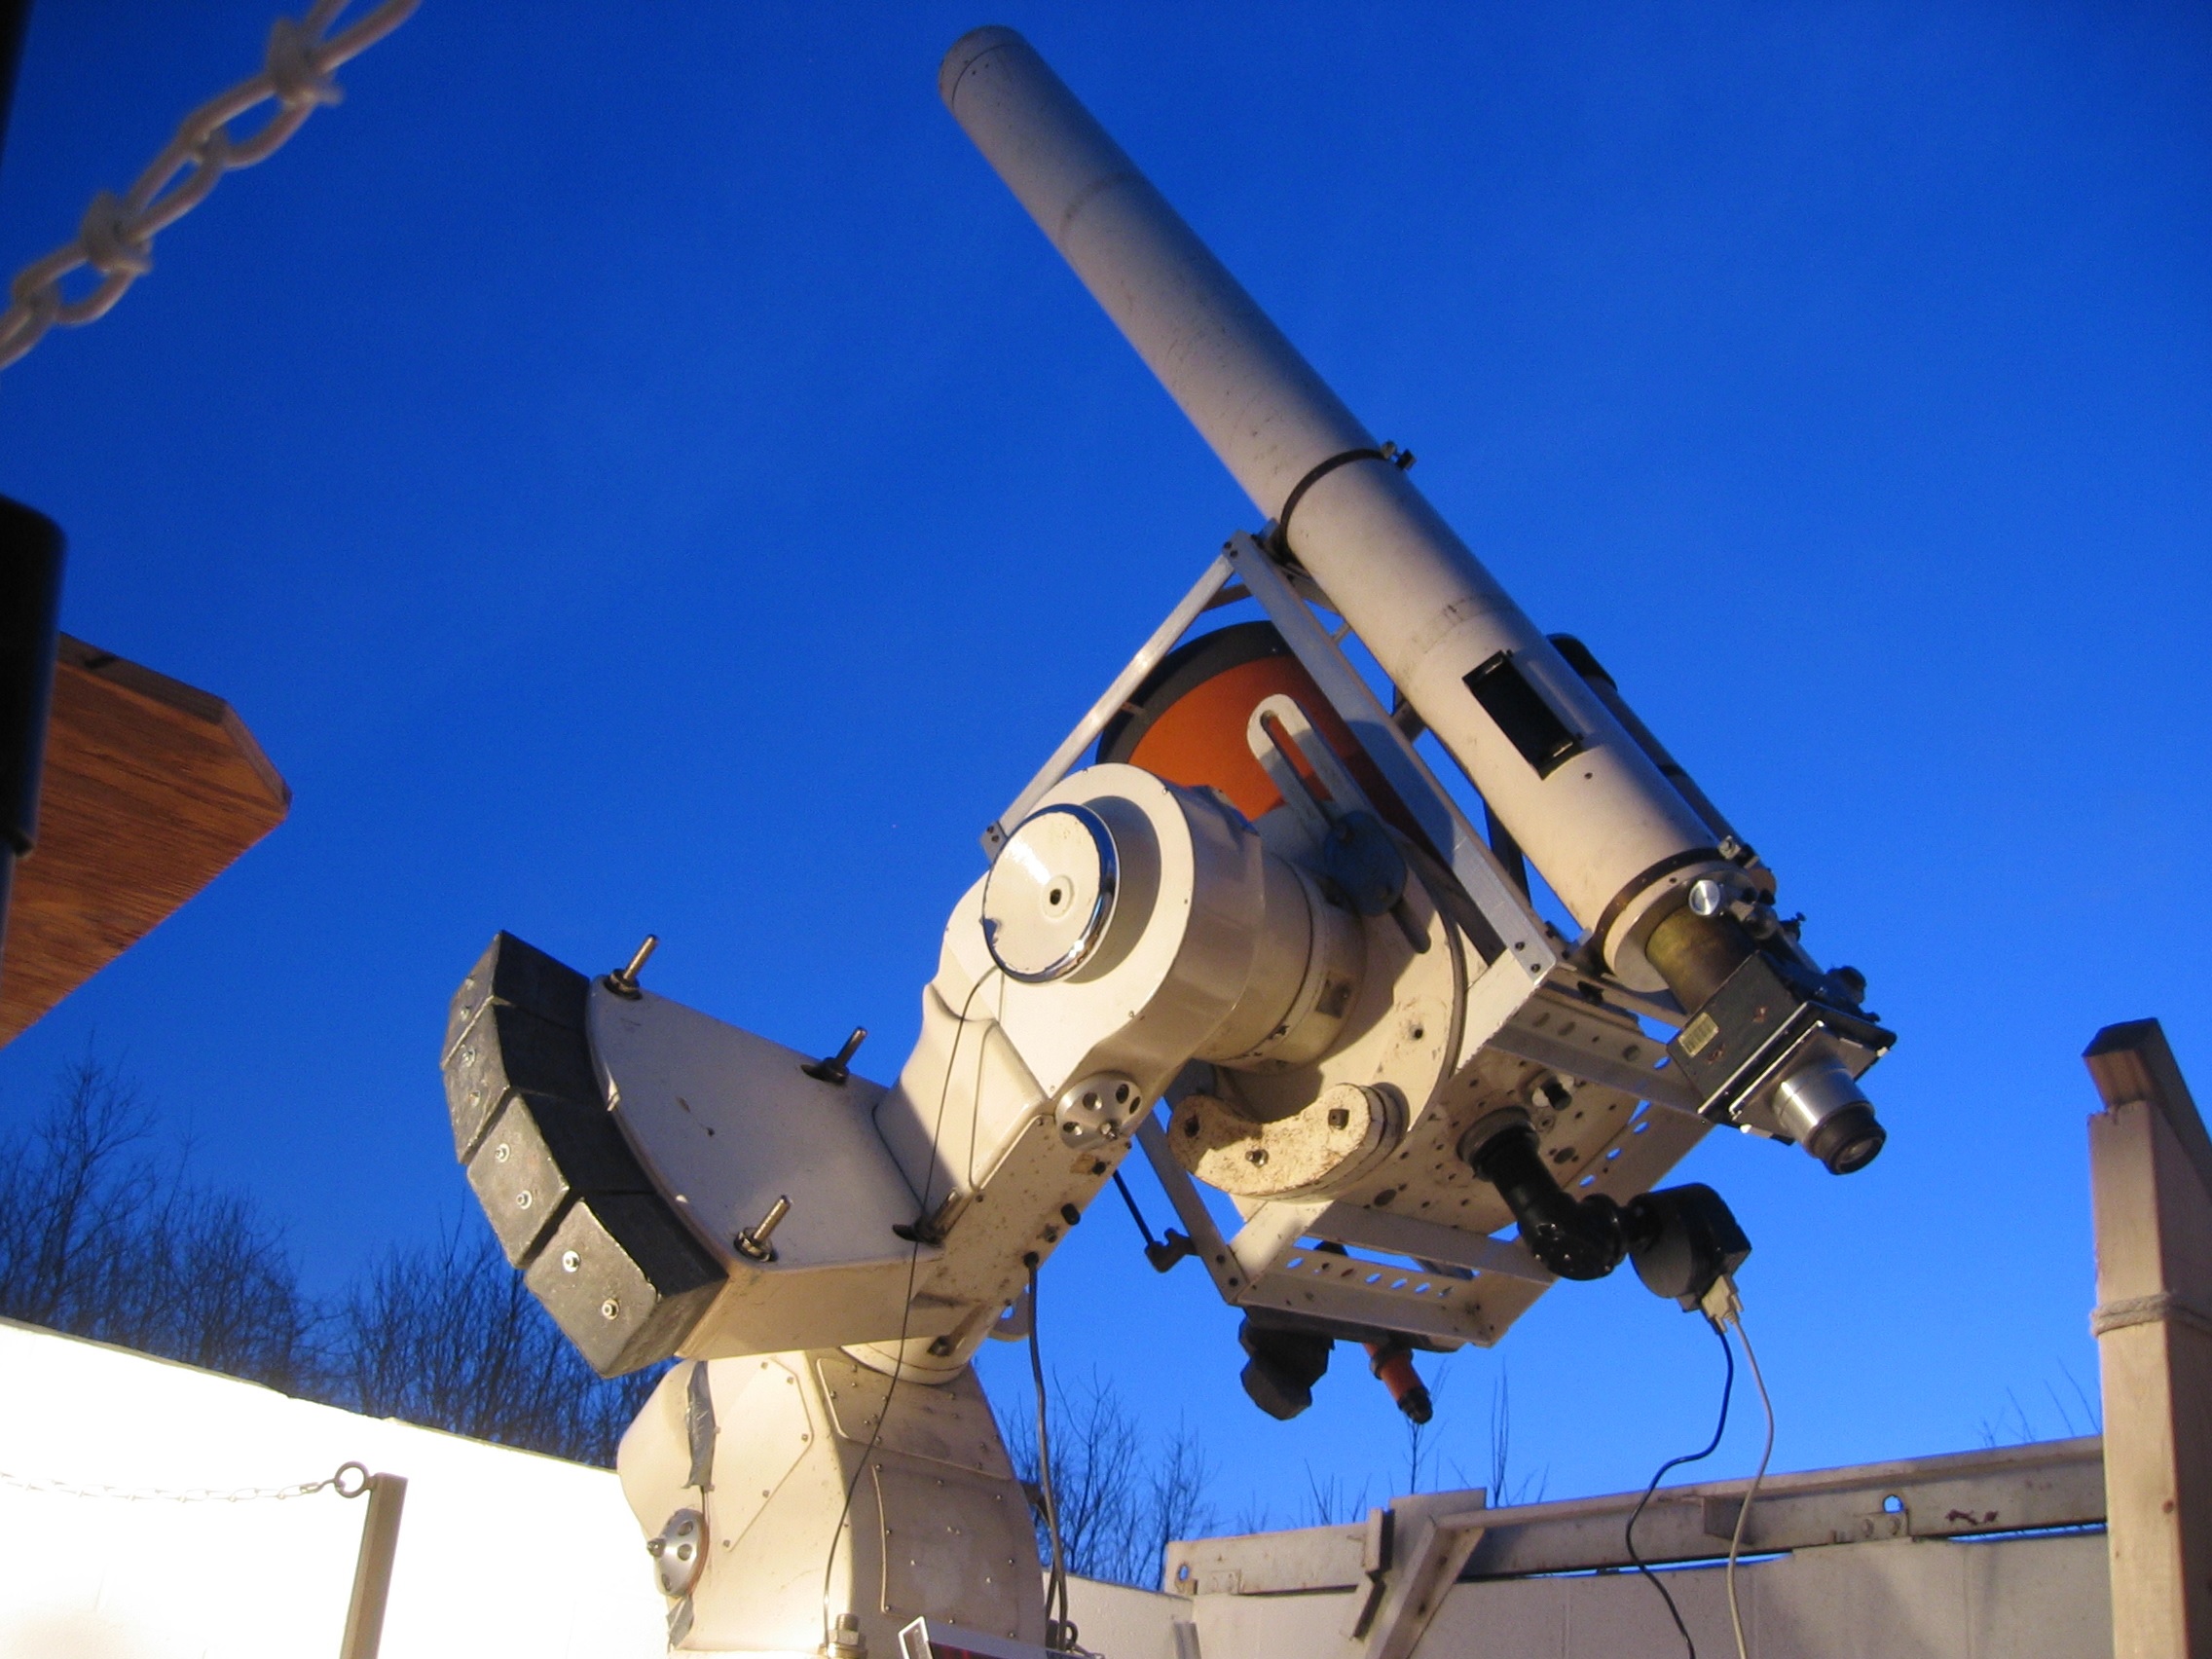
Here is a photo of the inside of the declination axis of the Ealing mount at Hopewell Observatory.

The gears you see were made about 50 years ago by the Ed Byers company, who continue to produce some of the finest gears anywhere. The periodic error on this mount is very, very low, which is a Good Thing, and why we want to keep it and just upgrade the old drive. As you can see in a previous post, the old system had a finicky clutch drive that had caused a lot of problems, but worked very well indeed when it worked properly.

I am working to replace it with a more modern, reliable and user-friendly, namely an OnStep ‘build’.

The friendly and helpful folks at the OnStep project were asking for a picture showing how the existing Byers drive was put together. I hope these four photos help.

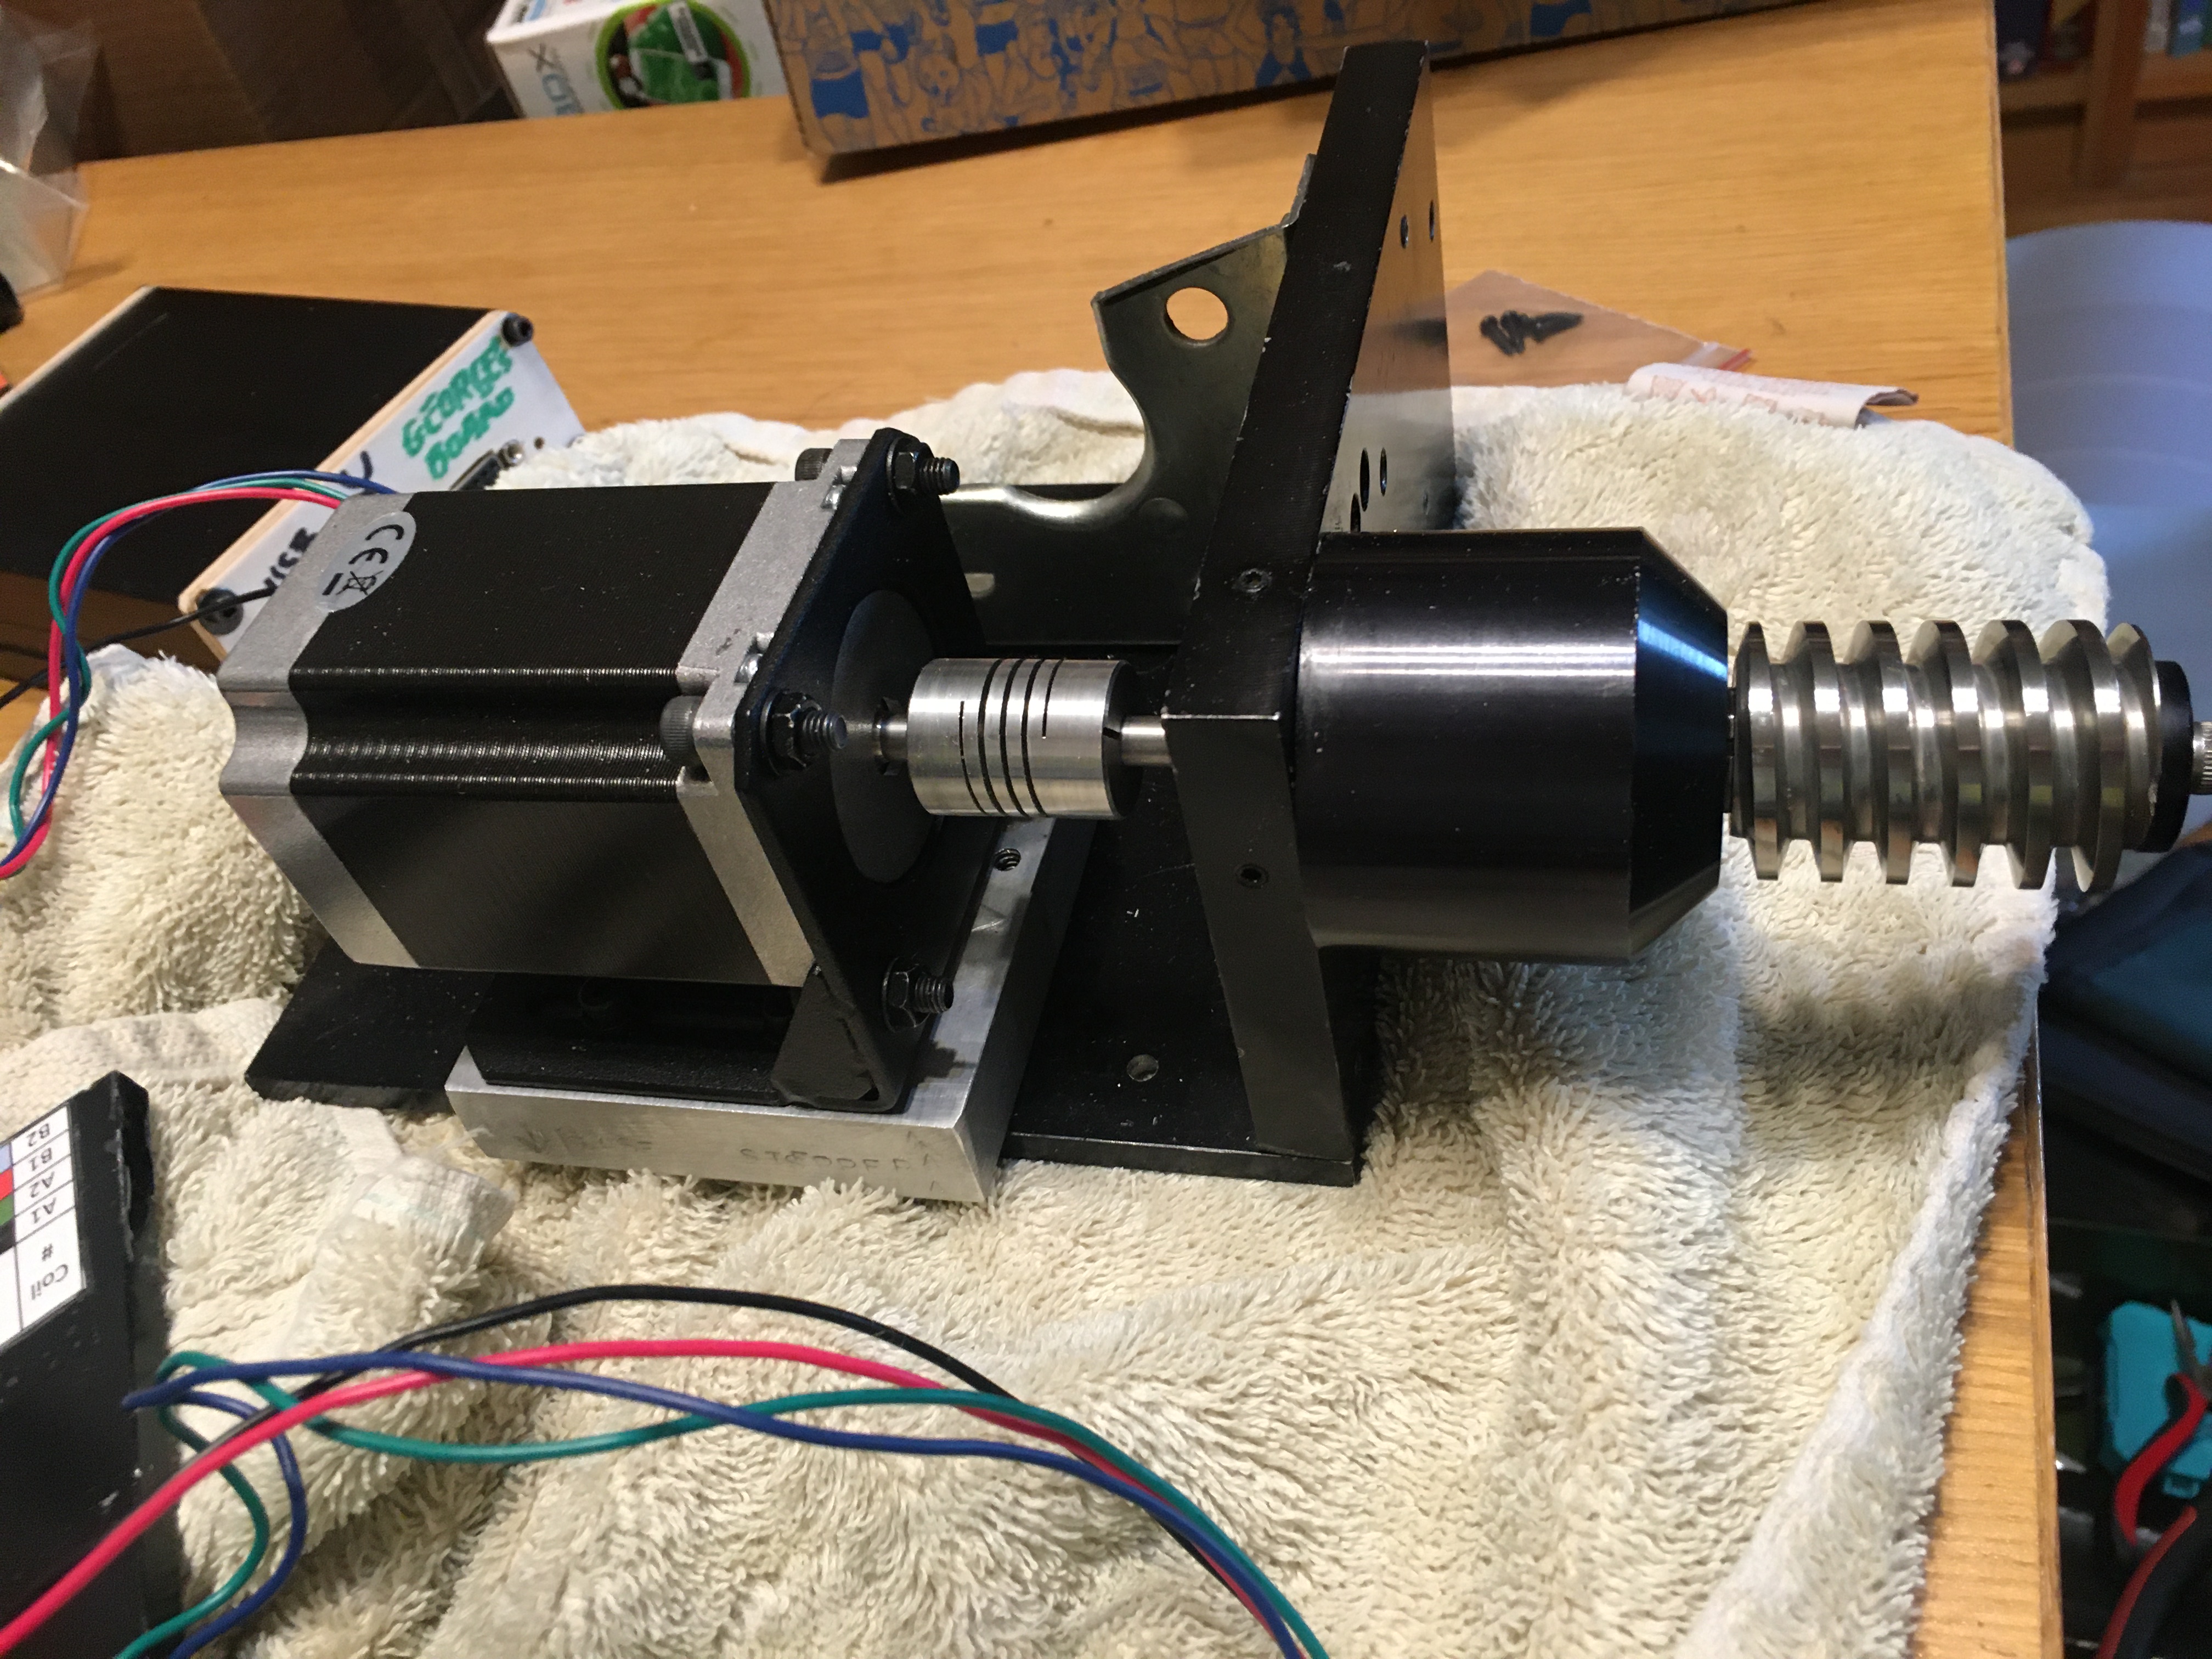
In the first photo, notice the greasy worm gear at the bottom left. It was removed from the mount, along with the old motors, and is sitting on my desk (with the old grease cleaned off), directly coupled to the stepper motor, which connects to one of the OnStep boards (in the wood-and-black aluminum box). In the second photo,

The black anodized bracket in the second photo holds the motor and the worm gear rigidly together. The bracket bolts into a place in the mount (not shown). It took a bit of work to get the stepper motor and the worm gear lined up within a couple of thousandths of an inch, but it’s done. Prasad turned me onto those cool little universal joints that permit one to connect items that don’t match perfectly.

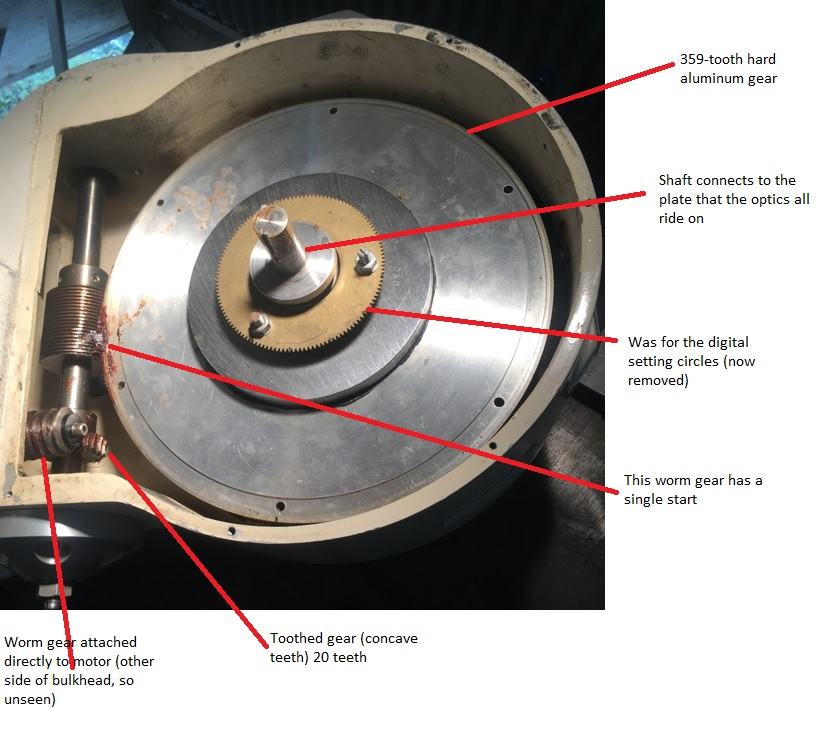
20 turns of the worm gear, times 359 teeth on the big gear, means that it takes 7,180 turns of the stepper motor to make one full revolution of this declination axis or of the right ascension axis, which is identically mounted. (Not that you would want to go about spinning your telescope very far on either axis!)

So 19.97 turns of either motor make the scope travel 1 degree (7180 divided by 360).

And since our stepper motors make 200 steps in one revolution of the worm gear, it takes about 3994 motor steps to make the scope turn by that one degree (the last result, times 200).

Or if you are micro-stepping by, say, the rate of one sixteenth of a step, then by my calculations it will take 63,911 microsteps to turn by that degree (the last result, times 16). And that seems to be outside the range of permissible microsteps for these stepper motors, perhaps causing them to scream in protest. (I swear, that’s what it sounds like!)

From left to right: A spare OnStep board inside its wood-and-aluminum project box; the NEMA23 stepper motor on its bracket; a universal joint; a big bearing; the first worm gear (now cleaned off)

It appears that Khaled and Prasad might be correct: I might need to add a toothed gears and a belt to this arrangement to reduce that last number (63,911) by some factor. For very little money I just ordered a pair of such things, designed for 3-D printers and other computer-controlled machines. It will have 60 teeth on the motor and 20 teeth on the worm gear, and then the above would instead have only 21,304 microsteps to turn one degree. (No wonder they protest!) Once again I’ll have to disassemble the motor and drive bracket and do a bit of machining. A drill press and a punch will be fine.

The last two photos give some more detail on how the old drive system worked.

Close up of worm gear driving a toothed gear wheel that drives another worm gear that drives the right ascension axis
One of the original drive motor and clutch assemblies in place, inside the mount. All those gears have now been removed.

Mysterious Noises from Stepper Motors for the Ealing Telescope Mount

18 Saturday Dec 2021

Posted by gfbrandenburg in astronomy, Hopewell Observatorry, Telescope Making

≈ 3 Comments

Tags

Alan Tarica, Ealing mount, George Cushing, Hopewell Observatory, Howard Dutton, Ken Hunter, Khalid Bahayeldin, OnStep, Prasad Agrahar, stepper motor, Telescope Making, Telescope Modification

A few blog entries ago, I thought I had made great progress in getting the old telescope drives for Hopewell Observatory’s venerable Ealing Mount to work again. Unfortunately, it became clear that one had to adjust the amount of friction in the clutches very, very accurately, and I saw no way to fine tune it.

So I bit the bullet and decided to convert the mount over to an inexpensive system, at least partly DIY, that uses very inexpensive solid-state printed circuit boards and Android phones to control stepper motors that make the telescope point in the directions desired. (Instead of spending many thousands on a Sidereal Technologies rebuild.)

This system is called OnStep and is spearheaded by a number of very generous volunteers: Howard Dutton, who basically invented the system and wrote all the original code, along with Ken Hunter, George Cushing, and Khaled Bahayeldin, and a number of others whose names I don’t recall. It uses off-the-shelf components, chips and sub-boards, that cost very, very little; these are put on one of a slew of different possible 3D-printed circuit boards. There is even a Wiki that could use a bit of editing. It’s got a ton of information but when I was starting out, I found it extremely confusing, and I am not alone. I promised to try to improve it when I get the Ealing telescope working properly.

After getting the software to work, then you arrange the connections to your telescope’s gears, power supply, and communications inside your own mount.

I am immeasurably aided in this conversion effort by Alan Tarica, who is the co-leader of the Washington, DC-area’s Telescope Making, Maintenance, and Modification Workshop (which has been going on for about 80 years) and by Prasad Agrahar, who made a remarkable telescope in our TMMMW several years ago and went on to build his own OnStep conversion of an existing commercial telescope. Prasad’s example showed me that if our old Ealing drive died, we should try OnStep.

Well, the Ealing drive did finally die. (It had presented problems ever since it was first delivered to the University of Maryland Observatory nearly 50 years ago.)

Michael Chesnes and Bill Rohrer of Hopewell helped materially with removing the old components of the scope and with then trying to debug the electrical problem that has now sprang up with our roll-off roof.

Ken Hunter made for us, and debugged, an entire OnStep board and refused to take any money for it. Prasad Agrahar gave us some NEMA17 stepper motors and some wires and likewise refused to let us pay. Prasad drove all the way from Philadelphia to help Alan and me figure this stuff out in person, both at the workshop and out at the observatory. Ken has spent hours, remotely from Yuma AZ, walking me through the various steps in managing the many settings that need to be uploaded and adjusted in order to get things to work. Ken told me he used to run the ATMFREE list-serve, but retired from that after an injury, and he remembered meeting me once at Stellafane. He also very kindly sent us an antenna for the system so that it can run WiFi or BlueTooth more efficiently from inside our massive metal mount.

Alan and I are fairly far along in the conversion, thanks to all this help. I had to learn some of the basics of the Arduino operating environment, which one uses to set all the many, many parameters needed to get the system running. And had to improve my soldering techniques! Fortunately, all the heavy lifting of getting all of the many lines of code working together has been done by Howard, Ken, and the others, so all I had to do was set things up to fit our particular set of choices for the board, the stepper driver, the sub-boards, the gears, and the motors.

Here is our current setup: we have two (now three) MaxESP boards running OnStep version 2.04 (iirc). (Multiple boards because they are cheap and in case one gets fried by a lightning strike or stupidity. It happens!)

They have TMC5160 stepper drivers, connected to two rather beefy NEMA23 stepper motors (200 steps per turn), which I arranged to fit exactly in-line with the worm gear that we will later put back into the mount. We have tweaked the ‘CONFIG.H’ file settings the best we could, and with an enormous amount of help, I think I’ve set the speeds of the stepper motors correctly. The worm gear turns another gear with 20 teeth, which turns another one with 359 teeth. (All made by Byers, and made very, very well.)

(We had NEMA17’s run by the TMC2130 stepper drivers, but we didn’t think they were beefy enough to rotate the very large mount we have, even if we balance it perfectly.)

It’s been a very interesting learning expedition. It’s taken quite a bit of time, but not really very much money. With mass production, the components (screws, capacitors, diodes, resistors, and so on) if purchased in medium quantities, are really very inexpensive.

However, the stepper motors are still not behaving properly. They scream instead of moving, as you can see in this video. I will post the current parameters on the OnStep wiki, where I said. You can see and hear the action in this little video. When I try to slew to any random, dummy target, the steppers will start rotating and also start making a deafening squeal that gets higher in pitch and volume. However, after a little while, both rotors stop turning either completely or almost completely. The smart hand controller pretends that the mount is moving in both axes, but it’s not true.

Right now, I don’t know what is causing this problem.

Anybody have suggestions?

Satisfying Fixes Made to 50-year-old Electro-mechanical Telescope Drive at Hopewell Observatory

29 Wednesday Sep 2021

Posted by gfbrandenburg in astronomy, Hopewell Observatorry, Optics, Telescope Making

≈ 2 Comments

Tags

declination, Ealing mount, gear-motor, Hopewell Observatory, OnStep, Optics, right ascension, stepper motor, Telescope

About a week week ago, the right ascension (or RA) drive on a vintage mount at the Hopewell Observatory stopped working. Instead of its usual hum, it began making scraping noises, and then ground to a halt. (This drive is the one that allows one to track the stars perfectly as the earth slowly rotates.)

Another member and I carefully removed the drive mechanism, and I took it home. At first, I thought it was the motor itself, but after examining it carefully, I noticed that some clutch pads inside the gearbox had come unglued, causing the clutch plates to be cockeyed. The motor itself worked just fine when disconnected from the gear box.

I recalled that the pads and the clutch had been very problematic, and that our resident but now-deceased electro-mechanical-optical wizard Bob Bolster had had to modify the gearbox quite a bit. I carefully disassembled the gearbox and used acetone to remove all the old glue that he had used to glue the pads on. After doing some research to find some equivalent pad material, I yesterday ordered some new gasket material with adhesive backing from McMaster-Carr. Lo and behold, I received it TODAY! Wow!

I cut out new pads, re-assembled everything, and the gears and worm drive work just fine. Not only that: there were no screws or nuts left over!

In addition, I now see how we can replace the extremely complicated partially-analog clutch-and-drive mechanism, in both RA and in Declination with a much simpler stepper-motor system using something called OnStep.

Here is a photo of the some of the innards of the scope:

A bit complicated, no?

In the next photo, my pencil is pointing to the clutch pads inside the gear box that had come loose, causing the clutch plates to become cockeyed, jamming the gears. The clutch is so that the observer can ever-so-slightly tweak the telescope forward or backwards in RA, in order to center the target. There is another gearbox for the declination, but it’s still working OK, so we left it alone.

The synchronous gear-motor in the background. My pencil is pointing to the problem.

Of course, we still have to re-install the gearbox back in the scope.

Bob Bolster, mentioned above, was one of the founding members of the Hopewell Observatory. He was an absolute wizard at fixing things and keeping this telescope mount going, but he is no longer alive. I was afraid that I would not be able to fix this problem, but it looks like I’ve been successful.

I append an image of a very beautifully-refurbished Ealing telescope and mount – similar to the one owned by Hopewell – that belongs to the Austin Astronomical Society. Ours is so much more beat up than this one that it’s embarrassing! Plus, both we and the University of Maryland were unable to get the telescope itself, which is a Ritchey-Chretien design, ever to work properly. So we sold the mirror and cell to a collector in Italy for a pittance, and installed four other, smaller scopes on the mount instead.

A piece of mystery glass

29 Sunday Aug 2021

Posted by gfbrandenburg in astronomy, Hopewell Observatorry, Math, Optics, Telescope Making

≈ 3 Comments

Tags

ATM, barium, Bausch & Lomb, Bureau of Standards, flint, glass, Hopewell Observatory, Math, mystery glass, Optics, Schott, Snell's Law, Telescope

Many years ago, the late Bob Bolster, a founding member of Hopewell Observatory and an amazing amateur telescope maker, got hold of a large piece of glass, perhaps World War Two military surplus left over from the old Bureau of Standards.

I have no idea what it is made out of. If Bob had any clue about its composition, he didn’t tell anyone.

Its diameter is 22 inches, and its thickness is about 3.25″. It has a yellowish tint, and it is very, very heavy.

If you didn’t know, telescope lenses (just like binocular or camera lenses) are made from a wide variety of ingredients, carefully selected to refract the various colors of light just so. Almost all glass contains quartz (SiO2), but they can also contain limestone (CaCO3), Boric oxide (B2O3), phosphates, fluorides, lead oxide, and even rare earth elements like lanthanum or thorium. This link will tell you more than you need to know.

If you are making lenses for a large refracting telescope, you need to have two very different types of glass, and you need to know their indices of refraction very precisely, so that you can calculate the the exact curvatures needed so that the color distortions produced by one lens will be mostly canceled out by the other piece(s) of glass. This is not simple! The largest working refractor today is the Yerkes, with a diameter of 40 inches (~1 meter). By comparison, the largest reflecting telescope made with a single piece of glass today is the Subaru on Mauna Kea, with a diameter of 8.2 meters (323 inches).

For a reflecting telescope, one generally doesn’t care very much what the exact composition of the glass might be, as long as it doesn’t expand and contract too much when the temperature rises or falls.

We weren’t quite sure what to do with this heavy disk, but we figured that before either grinding it into a mirror or selling it, we should try to figure out what type of glass it might be.

Several companies that produce optical glass publish catalogs that list all sorts of data, including density and indices of refraction and dispersion.

Some of us Hopewell members used a bathroom scale and tape measures to measure the density. We found that it weighed about 130 pounds. The diameter is 22 inches (55.9 cm) and the thickness is 3 and a quarter inches (8.26 cm). Using the formula for a cylinder, namely V = pi*r2*h, the volume is about 1235 cubic inches or 20,722 cubic centimeters. Using a bathroom scale, we got its weight to be about 130 lbs, or 59 kg (both +/- 1 or 2). It is possible that the scale got confused, since it expects two feet to be placed on it, rather than one large disk of glass.

However, if our measurements are correct, its density is about 2.91 grams per cc, or 1.68 ounces per cubic inches. (We figured that the density might be as low as 2.80 or as high as 3.00 if the scale was a bit off.)

It turns out that there are lots of different types of glass in that range.

Looking through the Schott catalog I saw the following types of glass with densities in that range, but I may have missed a few.

2.86  N-SF5

2.86 M-BAK2

2.89 N-BAF4

2.90 N-SF8

2.90 P-SF8

2.91 N-PSK3

2.92 N-SF15

2.93 P-SF69

2.94 LLF1

2.97 P-SK58A

3.00 N-KZFS5

3.01 P-SK57Q1

By comparison, some of the commonest and cheapest optical glasses are BAK-4 with density 3.05 and BK-7 with density 2.5.

Someone suggested that the glass might contain radioactive thorium. I don’t have a working Geiger counter, but used an iPhone app called GammaPix and it reported no gamma-ray radioactivity at all, and I also found that none of the glasses listed above (as manufactured today by Schott) contain any Uranium, Thorium or Lanthanum (which is used to replace thorium).

So I then rigged up a fixed laser pointer to measure its index of refraction using Snell’s Law, which says

Here is a schematic of my setup:


The fixed angle a I found to be between 50 and 51 degrees by putting my rig on a large mirror and measuring the angle of reflection with a carpentry tool.

And here is what it looked like in practice:

I slid the jig back and forth until I could make it so that the refracted laser beam just barely hit the bottom edge of the glass blank.

I marked where the laser is impinging upon the glass, and I measured the distance d from that spot to the top edge of the glass.

I divided d by the thickness of the glass, in the same units, and found the arc-tangent of that ratio; that is the measure, b, of the angle of refraction.

One generally uses 1.00 for the index of refraction of air (n1). I am calling n2 the index of refraction of the glass. I had never actually done this experiment before; I had only read about doing it.

As you might expect, with such a crude setup, I got a range of answers for the thickness of the glass, and for the distance d. Even angle a was uncertain: somewhere around 49 or 50 degrees. For the angle of refraction, I got answers somewhere between 25.7 and 26.5 degrees.

All of this gave me an index of refraction for this class as being between 1.723 and 1.760.

This gave me a list of quite a few different glasses in several catalogs (two from Schott and one from Bausch & Lomb).

Unfortunately, there is no glass with a density between 2.80 and 3.00 g/cc that has an index of refraction in that range.

None.

So, either we have a disk of unobtanium, or else we did some measurements incorrectly.

I’m guessing it’s not unobtanium.

I’m also guessing the error is probably in our weighing procedure. The bathroom scale we used is not very accurate and probably got confused because the glass doesn’t have two feet.

A suggestion was made that this might be what Bausch and Lomb called Barium Flint, but that has an index of refraction that’s too low, only 1.605.

Mystery is still unsolved.

Some Progress – AT LAST! – With Figuring the 16.5″ f/4.5 Thin Mirror That Headlines This Blog

10 Saturday Nov 2018

Posted by gfbrandenburg in astronomy, Hopewell Observatorry, Optics, Safety, Telescope Making

≈ Leave a comment

Tags

Bob Bolster, George Ritchey, Grinding, Hopewell Observatory, matching Ronchi, Mel Bartels, Polishing, Ronchi, ronchigram, Telescope Making, testing

I have been wrestling with this mirror for YEARS. It’s not been easy at all. The blank is only about twice the diameter of an 8″ mirror, but the project is easily 10 times as hard as doing an 8-incher. (Yes, it’s the one in the photo heading this blog!)

Recently I’ve been trying to figure it using a polishing/grinding machine fabricated by the late Bob Bolster (who modeled his after the machine that George Ritchey invented for the celebrated 60″ mirror at Mount Wilson over a century ago). That’s been a learning exercise, as I had to learn by trial and error what the machine can and cannot do, and what strokes produce what effects. The texts and videos I have seen on figuring such a large mirror with a machine have not really been very helpful, so it’s mostly been trial and error.

My best results right now seem to come from using an 8″ pitch tool on a metal backing, with a 15 pound lead weight, employing long, somewhat-oval strokes approximately tangential to the 50% zone. The edge of the tool goes about 5 cm over the edge of the blank.

This little movie shows the best ronchigrams I have ever produced with this mirror, after nearly 6 hours of near-continuous work and testing. Take a look:

Final movie Nov 9

Final movie Nov 9

And compare that to how it used to look back in September:

hill and anomaly on 16

hill and anomaly on 16


Also compare that to the theoretically perfect computed ronchigrams from Mel Bartels’ website:

perfect theoretical ronchigrams for guy's 42 cm mirror

Part of the reason this mirror has taken so long is that after grinding and polishing by hand some years ago, I finally did a proper check for strain, and discovered that it had some pretty serious strain. I ended up shipping it out to someone in Taos, New Mexico who annealed it – but that changed the figure of the mirror so much that I had to go back to fine grinding (all the way back to 120 or 220 grit, I think), and then re-polishing, all by hand. I tried to do all of that, and figuring of the mirror, at one of the Delmarva Mirror Making Marathons. It was just too much for my back — along with digging drainage ditches at Hopewell Observatory, I ended up in a serious amount of pain and required serious physical therapy (but fortunately, no crutches), so this project went back into storage for a long, long time.

Recently I’ve tried more work by hand and by machine. Unfortunately, when I do work by hand, it seems that almost no matter how carefully I polish, I cause astigmatism (which I am defining as the mirror simply not being a figure of rotation) which I can see at the testing stand as Ronchi lines that are not symmetrical around a horizontal line of reflection. (If a Ronchi grating produces lines that look a bit line the capital letters N, S, o Z, you have astigmatism quite badly. If astigmatism is there, those dreaded curves show up best when your grating is very close to the center of curvature (or center of confusion) of the central zone.

Using this machine means controlling or guessing at a LOT of variables:

  1. length of the first crank;
  2. length (positive or negative) of the second crank;
  3. position of the slide;
  4. diameter of the pitch lap;
  5. composition of the pitch;
  6. shape into which the pitch lap has been carved;
  7. amount of time that the lap was pressed against the lap;
  8. whether that was a hot press or a warm press or a cold press;
  9. amount of weight pushing down on the lap;
  10. type of polishing agent being used;
  11. thickness or dilution of polishing agent;
  12. temperature and humidity of the room;
  13. whether the settings are all kept the same or are allowed to blend into one another (eg by moving the slide);
  14. time spent on any one setup with the previous eleven or more variables;

Here is a sketch of how this works

bolster's ritchey-like machine

Difficulties in Using the Matching Ronchi Test on a 12″ Cassegrain Mirror

08 Saturday Sep 2018

Posted by gfbrandenburg in astronomy, flat, Hopewell Observatorry, optical flat, Optics, Telescope Making

≈ 2 Comments

Tags

Astro Bananas, cassegrain, couder, double pass auto collimation, ealing, foucault, Hopewell Observatory, matching Ronchi, Mel Bartels, Ronchi, ronchigram

The other regulars and I at the DC ATM group at the CCCC have been trying to test a 12 inch Cassegrain mirror and telescope manufactured nearly 50 years ago by a company called Ealing and currently owned by the Hopewell Observatory, of which I am a member. It hasn’t been easy. I discussed this earlier on Cloudy Nights.

Reports from several people, including Gary Hand and the late Bob Bolster, indicated that the optics on this mirror weren’t good at all. Apparently the folks at the University of Maryland’s observatory were sufficiently unhappy with it that they either sold it or gave it to National Capital Astronomers, a local astronomy club, who in turn gave it or sold it to Hopewell Observatory.

With a plain-vanilla Ronchi test, we could see that the mirror was very smooth and continuous, with no turned edge, astigmatism, or bad zones. With the Foucault/Couder zonal test (aka “Foucault” test) , I got results indicating that it was seriously overcorrected: some sort of hyperboloid, rather than the standard paraboloid characteristic of classical Cassegrain telescopes, which have a parabolic primary mirror and a hyperbolic secondary mirror.

However, I have begun losing my faith in my zonal readings, because they often seem to give results that are way out of whack compared to other testing methods.

So we decided to do some additional tests: the Double-Pass Auto-Collimation (DPACT) test used by Dick Parker, as well as the Matching Ronchi test (MRT).

The DPACT is very fiddly and exacting in its setup. We used (and modified) the setup lent to us by Jim Crowley and illustrated by him at his Astro Bananas website. Our results seem to show that the mirror is in fact NOT parabolic, rather, overcorrected, which confirms my Foucault measurements. If it were a perfect paraboloid, then the ronchi lines would be perfectly straight, but they definitely are NOT: they curve one way when inside the focal point, and curve the other when the tester is outside the focal point.

We also tested the entire setup on a radio tower that was about half a mile (~1km) distant. We found that the images were somewhat blurry no matter what we did.

We also attempted the MRT on the same mirror. However, requires very accurate photography and cutting-and-pasting skills in some sort of graphics programs. What you are inspecting is the curvature of the Ronchi lines. Here is the result that Alan T and I got last night:

matching ronchi for 12 inch cass

In black is the ideal ronchigram for this mirror, according to Mel Bartels’ website. The colored picture is the one we made with either my cell phone or the device I finished making earlier this week, shown in my previous post. Here are the two images, separated rather than superimposed:

IMG_1337

ideal ronchigram 12 inch cass ealing

The mirror’s focal length is 47.5″ and the grating has 100 lines per inch, shown somewhat outside of the radius of curvature. The little ‘eyelash’ on the lower left is simply a stray wire that was in the way, and doesn’t affect the image at all. The big hole in the middle is there because the mirror is a cassegrain.

I don’t know about you, but I don’t really see any differences between the real mirror and the theoretical mirror. Do you?

Conclusion

So, what does this all mean?

  • One possibility is that the mirror is in fact perfectly parabolic (as apparently shown by the MRT, but contrary to what I found with Foucault and DPACT) but there is something wrong with the convex, hyperbolic secondary.
  • Another possibility is that the mirror is in fact NOT parabolic, but hyperbolic, as shown by both my Foucault measurements and the DPACT (and contrary to the MRT), which would mean that this telescope was in fact closer to a Ritchey-Chretien; however, since it was marketed as a classical Cassegrain, then the (supposedly) hyperbolic secondary was in fact not tuned correctly to the primary.
  • The answer is left as an exercise for the reader.
  • A star test would be the best answer, but that would require being able to see a star. That hasn’t happened in these parts for quite some time. In addition, it would require an eyepiece holder and a mount of some sort. Or else setting up an indoor star…

Open House at the Hopewell Observatory: Saturday, October 15, 2022

09 Friday Jun 2017

Posted by gfbrandenburg in astronomy, Hopewell Observatorry, science, Telescope Making

≈ 1 Comment

Tags

Haymarket, Hopewell Observatory, invitation, open house, VA

You are all invited, and it’s free. The directions and many other details can be found at a previous post on this blog. 

(Just ignore the date, because it’s no longer 2016! The directions are long, and I didn’t feel like copying and pasting them here.)

Caveat: we do not have running water, so no modern lavatory. We do have bottled water, an outhouse, electricity, and hand sanitizer. This place is really in the middle of the woods, which is where lots of insects and other arthropods live, so keep that in mind. We do have some bug juice you can use, but keep any spray far away from the telescopes!

If you have a telescope of your own, or binoculars, feel free to bring them. A flashlght or headlamp will be useful. We prefer red light at night, since white light makes you night-blind for about 10-20 minutes. If your flashlight(s) put(s) out white light, we have red plastic, tape, scissors, and rubber bands that you can use to shield your light.

When was the last time you spent a night under the stars?

29 Wednesday Jun 2016

Posted by gfbrandenburg in astronomy, astrophysics, Hopewell Observatorry, Telescope Making

≈ 1 Comment

Tags

astronomy, Hopewell Observatory, open house, Telescope

If it’s been a while since you spent time looking up at the heavens with your naked eyes, binoculars and telescopes, looking at planets, stars and galaxies, then this Saturday might be your night.

The Hopewell Observatory is having an open house on Saturday, July 2, 2016, and we have a variety of scopes to look through. Some of the scopes will be under our roll-off roof and some will be rolled out onto the small lawn outside the observatory itself.

Mars, Jupiter and Saturn will be very conveniently placed for viewing right at sundown, and if it’s dry and clear enough, we should be able to see the Milky Way. Many nebulae, open and globular clusters, galaxies, and double or triple stars will be visible as well.

You are invited!  And it’s free!

The location is about an hour due west of Washington DC by way of I-66, near the town of Haymarket, VA. For detailed directions, follow this link, which I posted for one of the dates which got canceled because of bad weather. Ignore the date, but do pay attention to the fact that we have no running water! We have bottled water and a composting toilet and hand sanitizer. Plus makings for coffee, tea, and hot chocolate – all gratis.

picture of hopewell

The picture above is of one of our telescope mounts, which carries several telescopes and was set up to take astrophotographs at the time. Below is a picture of the outside of the observatory shortly after a snowstorm.. Notice that there is no dome – instead, the galvanized steel roof rolls back on the rails and columns to the right of the picture when the scopes are in use.

showA13

If you have your own telescope, feel free to bring it. If it needs electricity, we have an outdoor 120VAC outlet, but you should bring your own extension cord and plug strip.  If you want to stay all night, that will be fine, too! If you feel like bringing a cot or a tarpaulin and a sleeping bag, that’s equally OK by us! Show up at or near sunset, and stay until the sun comes up, if you like!

Warning: the area definitely has insects, such as ticks and chiggers, which appear to avoid everybody else and to do their best to attack me. I strongly recommend long pants, shoes/boots, and socks that you can tuck the pants into. Tuck your shirt into your pants as well, and use bug spray, too. I have personally seen plenty of deer, cicadas, moths, wild turkeys, squirrels, and birds, and I have heard from a neighbor that a bear tried to eat his chickens, but other than the insect pests, the wildlife stays out of your way.

Again – for detailed directions, look at this link.

Any Moth Experts Out There?

20 Monday Jun 2016

Posted by gfbrandenburg in nature, science

≈ 1 Comment

Tags

Hopewell Observatory, moth, Telescope, virginia

We found these two beautiful moths that flew into the operations cabin at the Hopewell Observatory a couple of nights ago, and we have no idea what type they are. Never seen them before and can’t find any images identical to them. (One species is similar, though.)

Any suggestions will be welcome.

Ain’t they purty li’l things?

IMG_4996
IMG_5001

And when they opened their wings they were even more spectacular, but I didn’t get a good shot.BTW the yellow-and=red moth is sitting on the struts of a telescope made by Alan Bromborski.

Some sights at or near Hopewell Observatory

25 Monday Apr 2016

Posted by gfbrandenburg in Hopewell Observatorry

≈ Leave a comment

Tags

Hopewell Observatory, Spring

Working on scraping and repainting the observatory roof:

IMG_4532
IMG_4533
IMG_4535


A view to the west:

IMG_4536
IMG_4537

And some nearby pink lady’s slippers:

IMG_4540
IMG_4544

← Older posts
Newer posts →

Subscribe

  • Entries (RSS)
  • Comments (RSS)

Archives

  • June 2026
  • May 2026
  • April 2026
  • February 2026
  • December 2025
  • November 2025
  • October 2025
  • September 2025
  • July 2025
  • January 2025
  • November 2024
  • October 2024
  • August 2024
  • July 2024
  • May 2024
  • April 2024
  • January 2024
  • December 2023
  • October 2023
  • August 2023
  • June 2023
  • May 2023
  • April 2023
  • November 2022
  • October 2022
  • August 2022
  • July 2022
  • June 2022
  • May 2022
  • April 2022
  • February 2022
  • January 2022
  • December 2021
  • October 2021
  • September 2021
  • August 2021
  • July 2021
  • June 2021
  • May 2021
  • March 2021
  • December 2020
  • October 2020
  • September 2020
  • August 2020
  • March 2020
  • February 2020
  • January 2020
  • December 2019
  • November 2019
  • September 2019
  • August 2019
  • June 2019
  • May 2019
  • January 2019
  • November 2018
  • October 2018
  • September 2018
  • August 2018
  • May 2018
  • March 2018
  • January 2018
  • November 2017
  • October 2017
  • September 2017
  • August 2017
  • July 2017
  • June 2017
  • May 2017
  • April 2017
  • February 2017
  • December 2016
  • September 2016
  • June 2016
  • May 2016
  • April 2016
  • March 2016
  • February 2016
  • January 2016
  • December 2015
  • November 2015
  • August 2015
  • July 2015
  • April 2015
  • March 2015
  • February 2015
  • January 2015
  • December 2014

Categories

  • astronomy
  • astrophysics
  • education
  • flat
  • History
  • Hopewell Observatorry
  • Math
  • monochromatic
  • nature
  • optical flat
  • Optics
  • Safety
  • science
  • teaching
  • Telescope Making
  • Uncategorized

Meta

  • Create account
  • Log in

Blog at WordPress.com.

  • Subscribe Subscribed
    • Guy's Math & Astro Blog
    • Join 54 other subscribers
    • Already have a WordPress.com account? Log in now.
    • Guy's Math & Astro Blog
    • Subscribe Subscribed
    • Sign up
    • Log in
    • Report this content
    • View site in Reader
    • Manage subscriptions
    • Collapse this bar

Loading Comments...